Okay, I'd heard about putting Stanza struts into a 120Y. Well my 120Y had broken front brakes, stuffed shocks, and whiny wheelbearings.
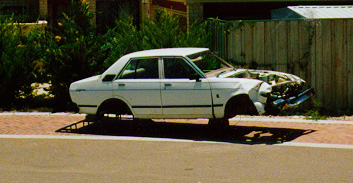
Enter one 1980 Stanza, delivered, no engine, $50. This is what one looks like after all the goodies have been stripped. Oh and yes, the drivers side radius rod was slightly bent from some accident, but it straighened out okay. Nothing else looked bent however, well, as far as I could tell...
Straight away bolted the 13" front wheels onto the 120Y, couple of months later put the front seats in. The diff was way too different, and it was drum anyway, so I ditched that. The struts stayed in the shed, waiting, until now...
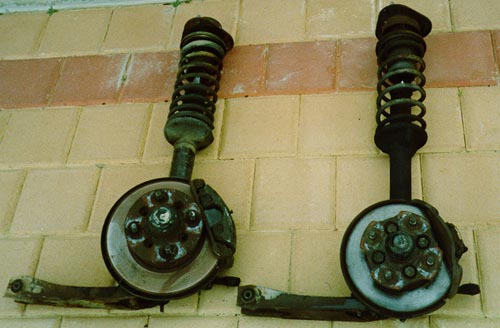
Stanza strut on left, 120Y strut on right.
Day 1
Lets get down to the facts. Haven't seen any serious techo doco on it, but saw in a Street Machine ages ago that "Stanza struts bolt up to 120Ys for bigger brakes and tougher suspension", and Martin Pott has a couple of guys saying this and that, but can it really be done?
Firstly armed with tape measure and verniers, got me this basic set of data together (some measurements a bit approximate):
| Item | 120Y | Stanza |
| Lower control arm length, from centre of lower ball joint to centre of pivot bolt | 305mm | 315mm |
| Disk diameter (both non-ventilated) | 210mm | 240mm |
| Length of radius/castor rod (both 75mm of thread) | 455mm | 485mm |
| Diameter of radius/castor rod (thread exactly the same) | 15mm | 16mm |
| Distance between centres of radius rod control arm mounting bolt holes | 42mm | 46mm |
| Diameter of radius rod control arm mounting bolt holes (second hole threaded) | 8.5mm | 10.5mm |
| Diameter of shock absorber shaft | 18mm | 22mm |
| Diameter of strut | 45mm | 51mm |
| Diameter of sway bar | 20mm | 19mm |
| Tie rods | same | same |
| Length of strut from mounting bolt to centre of lower ball joint | 710mm | 710mm |
| Number of coils on spring | 8 | 10 |
| Diameter of upper strut mount hole | 80mm | 92mm |
The struts
From the measurements things look okay. Same length, beefier springs, tougher shock and bigger brakes. The control arm slightly longer, but a little bit more negative camber shouldn't be too bad(?)
The 120Y brake has a steel pipe from the caliper which connects to the flexible hose half way up the strut. The Stanza has the flexible hose straight from the caliper. Hence you can't just join the brakes up (even though it is the same connectors).
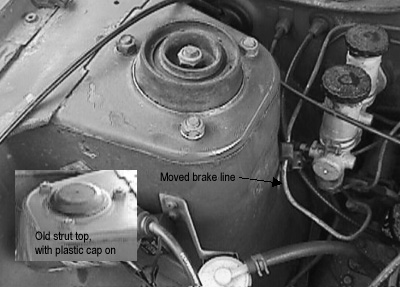
The top of the strut tower is different to the 120Y. The Stanza requires a 92mm hole, whereas the 120Y body has only a 80mm hole.
Potential solutions:
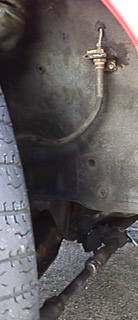
- The brake hose connector on the inner guard can be moved to a place closer to the caliper (as was on the Stanza) allowing the free full travel of suspension.
- A small male to male connect could join the 2 flexible hoses together - the one from the Stanza caliper to the one on the 120Y body - making sure to tie them off so as not to interfere with suspension and steering travel.
- Enlarge the hole at the top of the strut tower...
Sadly the top of the 120Y strut cannot be swapped onto the Stanza struts because the tread on the top of the shock is bigger and the offset of the strut top would raise the car 30mm higher - bad.
The radius/castor rods
Well the stanza ones are longer which would put the castor waaay out. The 120Y ones would make a good fit *except*:
- The bolt holes on the connection to the control rod are smaller.
- The bolt holes on the connection to the control rod are in different places.
- The Stanza has a cut out between the holes allowing one of the ball joint bolts to fit in place - that 120Y ball joint bolt is smaller meaning no cutout required.
I think the easiest way here is going to be to machine 30mm down the Stanza rod, doesn't need to be threaded because the bolt never goes that far down. I might check and see if a 180B or 200B or other Niss/Dat car might happen to have a radius rod that would do the trick.
Tie rods and sway bar
The tie rod end ball joints are exactly the same, and the little bit extra length that will be required I'd say is available. If not, I have the rest of the Stanza steering bits, can swap the threaded rods over.
The sway bar on the 120Y (amazingly enough) is fatter, and sits still in the perfect place. The little mounting towers should take care of any slight misalignment
That was all for Day 1. A bit more thought and some discussions with others is in order - to continue or not to continue. Bottom line so far: Looks like a feasible swap, but it isn't just a bolt in operation. And at the end of the day, who knows what the steering geometery is going to be like. Only one way to find out...
Day 2
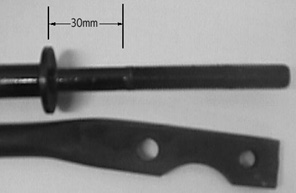
Stanza radius rod end.
Well I decided to persist. I got my mate Howard 'duck' Jones to machine 30mm off theradius rods. looks like this. Top man, top job. It's about the only thing that I couldn't do myself, but I sure would love a lathe to give it a try...
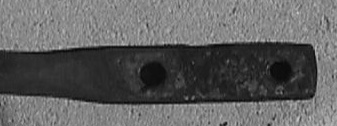
120Y radius rod end. Note how there is no 'cut out' that gets the stanza end around one of the ball joint bolts.
Meantime I've got the jigsaw out, load the metal blade and taken to the top of the shock tower. Took out just enough metal to allow the struts to pop through the top. Pretty easy to do. Note that for some stupid reason the 3 bolts that go through the shock tower were 1mm further spread out than on the 120Y. Opened the holes up that 1mm, and through they came.
Day 3
It was a cold and rainy night, so not much further activity. Good news, the radius rods fitted great - note I can now confirm that the machined 30mm section does not need to be threaded
Footnote: it's really annoying winding a nylon nut down that extra inch and a bit...
Strut number 1 in firmly in place, I used the 120Y sway bar stand-offs rather than the stanza ones even though they were the same length. The rationale behind this is that the rubbers were slightly bigger, and the sway bar is bigger so it stands to reason that the 120Y ones are tougher.
The tie rod ends bots straight up as expected, no suprises there. Some eyeballing will be needed to get the toe-in right as the control arms are that 10mm longer.
Day 4
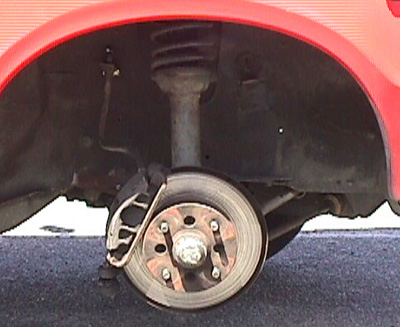
Cold and rainy again, spent about an hour and a half getting the other strut on. She's now back on all fours, and... no suprises whatsoever.
She's toed right out as expected due to the overall 20mm distance increase from the 10mm longer control arms. She's riding high, again as expected because an A15 in a 120Y body is lighter than a Stanza.
However I was expecting the camber to be 0° or even a little bit negative, but in fact it was positive. I'll leave the springs for a week or so to settle, but invariably I'm gonna have to drop the front down a bit. I'm thinking of cutting 2 coils offa the spring. That way the camber will become less positive as the ride height reaches a more sociably accepted level ;)
First benefit found: wow, the shocks work and the front is tough! It's not gonna rattle me fillings out, but I can tell that the suspension is going to be much less sloppy that it was before.
All that is left now is to relocate the brake lines. I have a choice or 2 here, I'll let you know which path I take...
Day 5
It's all over. I decided to relocate the brakes lines, as seen in the piccys. No real dramas there, the steel pipes bend okay in yer hand - you can see the 'cooling tower' drivers side pipe in the photo where it does a bit of a spiral into it's new position. Oh well.
The flexible hose chassis mount point was cut off the old strut (it had 2 rivets holing it on) and the position was chosen making sure you could fully turn left, fully turn right, and placed high so that when the suspension travels it will have clearance. I'll be sure and update this page if for any reason I discover that was a *bad* place to put it...
The toe-out I adjusted by eye, I think I still have a little too much toe-in (overcompensated).
Now for the good news:
- After the maiden voyage, the ride height settled down to ever-so-slightly negative camber, and I'd say she's sitting at most 10mm heigher than original.
- The shocks work nicely, and I can now drive over speed bumps...
-
- The springs are definately stiffer, not quite enough to rattle the fillings out, but enough to give a bit of a 'noddy' drive down the street over the little lumps and bumps.
- Although my master cylinder is still a bit shot, the 100kph heavy brake revealed that the bigger disks feel like she pulled up quicker.
- The brake pedal travel is not noticably different - perhaps the calliper piston bore isn't much bigger, so all is well there.
Conclusion..?
Yeah, why not, do it. Only 3 obsticles I had - radius arm machining, strut tower hole enlarging, and brake line relocation. Pretty much not too bad.
Braking was much better, and the suspension felt good and solid. I was pretty happy with that.
JAW, last updated 6 Oct 1998


 database