Okay, before we get started remember this: I'm not a mechanic. However you may find some of this either useful or vaguely amusing. Okay then, lets go, what's going on here JAW?
Barrel gasket blows. That's strange. Option 1: slap some silastic on it and keep going. Option 2: pull the engine to bits and replace it. Well, as you have guessed from the title of this story, I pulled the engine to bits...
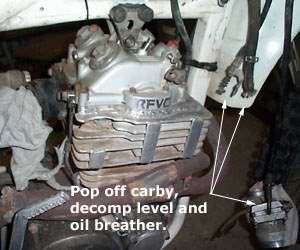
Unhook cables and the carby and leave
them somewhere, um, safe ;)
You gotta start somewhere. Push all the junk off the bench, chock the bike up on blocks and pull the plastic bits off. Typically, before doing this sort of stuff I give the shed a quick once over hanging tools up, picking up stuff off the floor, clearing space; a general cleanup.
You know that when you are halfway through, fully zoned, the last thing you want is to trip over a lump of four-be-two...
It's true, you can pull the head off while the engine is in the frame. But it sucks. A lot. It's nicer to work on an engine on your bench. This time I decided not to - she's pulled down in situ.
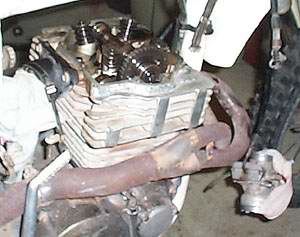
Once you've undone all the valve cover bolts you'll find that you can't quite get it off because of the cam gear. Argh! What I do is to drop _all_ the engine mounts which gives an extra centimeter of clearence which is just enough.
The best way is go pull the valve cover towards to rear and then out the side - but there is still a bit of jiggling required.
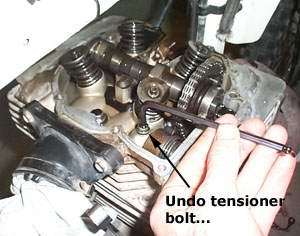
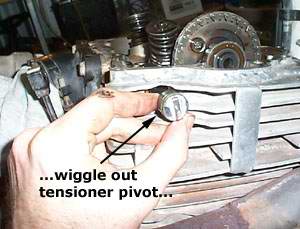
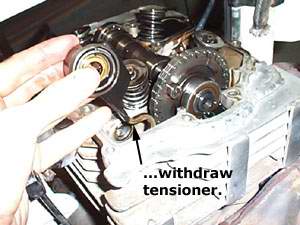
The tensioner needs to be removed so you can whip the camshaft off. The tensioner has tension. Strange that. Have no fear however, just pull the pivot out and let the tensioner twang out into your hand. It won't hurt.
The timing chain can now go slack and you can loop it off the gear. Wrap a bit of wire around it first so that it doesn't fall into the engine.
 |
 |
 |
 |
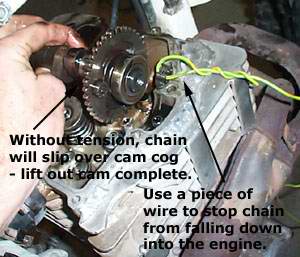
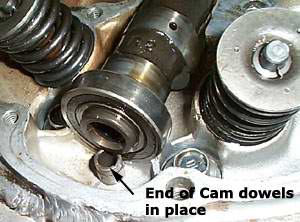
The cam assembly will come out with the timing
chain unlooped from the cam gear.
Timing chain times the cam to the crank. They were thinking when they named these parts weren't they? Unloop it anyhow, we will be retiming the engine when it goes back together. If the chain disconnects from the bottom gear don't worry about that either - it will hook back on again later. Basically, just don't let it fall into the engine - although you'd get it out again pretty easy if you had to.
The camshaft has two bearings on either end (and a guide in the middle) that are clamped down between the valve cover and the head. Since the valve cover is off, the cam will just pull out. Keep the bits together (as with everything) on the bench.
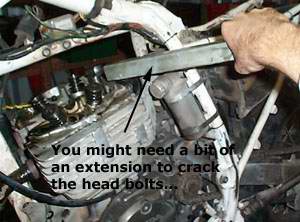
Knuckle bar and a bit of pipe'll do the trick...
This is a good point actually. As I remove parts of the engine I put them starting on the right side of the bench and working left, keeping logical groups together. Valve cover and bolts. Head and bolts. etc.
Speaking of heads, grab your 12mm socket and knuckle bar to undo the 6 head bolts. Crack each one in turn, work across the head like you would a car wheel. You know, crack this one, crack the one on the opposite side, crack the next one, etc. Once they are all cracked evenly undo them a bit at a time. This allows the head to "relax" slowly as the head bolt tension is removed rather than one side being still tight and the other side loosened.

Little gotcha bolts.
Before you start trying to jimmy the head off undo the little nuts on the side. You should have done them as part of the whole rotating loosening regime ;)
You'll notice that this engine is "big finned", that is, it has pieces of aluminium welded to the fins to increase the cooling ability of the engine. Note also that it makes getting the head off slightly more annoying. Perhaps you won't have such an issue.
Now you can jimmy the head off. First try gently pulling on it. Then try pulling hard on it. Then pull really hard.
Right, now start tapping it with a rubber mallet and pulling it. Finally, when all else fails jam a big flat screwdriver between the cylinder and head and lever it off - try not to distort the mating surfaces. Once you "break the seal" she'll come off easy.
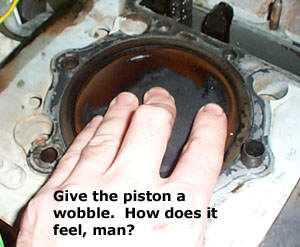
Piston:revealed.
Now that the piston is revealed, use the kickstart to wind it up to top dead centre and wobble it around. Shake you head slowly from side to side like you know what you need to do and quietly think "I wonder if I need to replace that?".
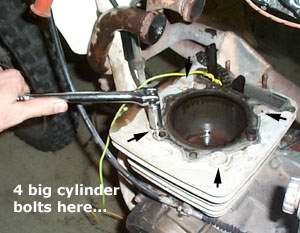
Okay, get the cylinder off. Pick up that 12mm socket and knucle bar again and sort out the four main cylinder bolts. Again, crack and then undo in a crisscross pattern.
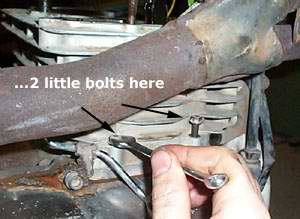
As with the head there are 2 little bolts hidden away on the other side of the cylinder that you need to undo as well.
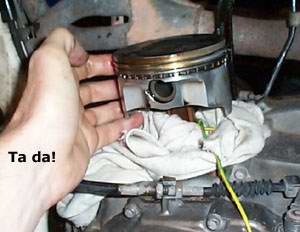
The cylinder will withdraw upwards - catch the piston as you remove the cylinder altogether rather than letting it rap on the crankcase. There's your piston, tada!
 |
 |
Don't sit back yet, lets get the piston off.
The piston pin (or gudgeon pin) floats - ie it is not pressed into the conrod. On either end are little clips, careful work with a small screwdriver in the specially cut recess will see them come out pretty easy.
When in operation the piston pin naturally rotates at half the crank speed. Aparently. That's just the way it is, the physics of the situation. There are small holes in the top of the conrod that allows oil to keep it lubed...if you're interested :)
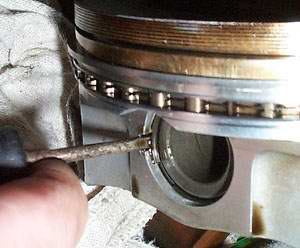
A little clip holds the piston pin in.
So the piston pin is fully floating, huh, then why isn't it just popping out in my hands? You can spin it and move back and forth, but it won't come past where the clip used to be! Good question.
While pondering that, whip up a scheme to pull it out. I used a bolt running through the guts of the pin that "grabbed" one end of the pin. The other end was braced with chocks of wood and a big washer so that the pin was pulled into the space between the wood. Once the pin is pulled clear into one half of the piston, the piston can be removed with the pin still half in the piston.
A mate of mine reckons that if you have to bring wood into the equation then you really are a dodgy backyard bush mechanic. Okay, I'll take that, but the setup worked just fine without damaging the piston :)
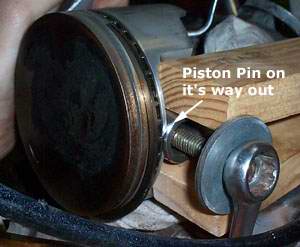
Makeshift puller to get the piston pin out.
Now we can see why the pin didn't want to just fall out into my hands - conrod small end damage!
The piston had "grabbed" sometime, this is from heat - heat from revving the bastard too high or heat from letting parts run dry of oil. Not from me, from the previous owner. I am a fastidious oil checker/changer and also known as "low-revvin JAW" ;)
Aparently conrods for 600's vary, this one is the copper-coated small end version. From the photo you can still see a bit of copper left on the front (non-thrust) side but in the lower/upper (thrust) sides not only is the copper gone but there are some grooves present.
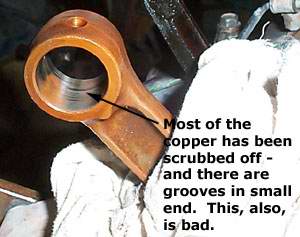
Why the pin was hard to get out...
Conrods on bikes are single piece - ie the piston pin is inserted through the top hole and the crack is assembled through the bottom hole. This means that replacing a conrod requires splitting the crank.
After talking with Hamish of Hamish Engineering (2003) he could do me a crank rebuild for $350 if I pulled the crank and gave it to him.
Perfectionists had best stop reading now.
I decided to give the small end a quick "linish" with 1200 paper and use as is. I calipered out the ovality at 0.01mm which is not a lot, and the grooves were "superficial". My theory is that "there are so many other parts of the bike that are worn, why have a perfectly running engine only to have the rest of the bike fall apart around it?"
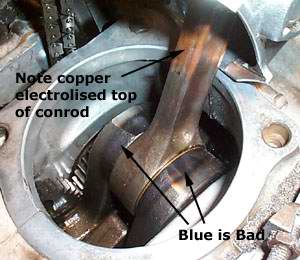
Crank has obviously seen better days
Last time I had the engine apart I saw the blueness on the crank but the conrod big end bearing had zero movement. Perhaps the bike had already had a rod kit through it already?
If you also have a slightly worn piston pin as well then I'll let you know I rode another 1000kms of hard sand dune riding after this job was complete before I sold the bike and had no dramas.
When planning on a new piston be careful. The '87 and on XR600s mostly came with a "Nicasil" plated bore that cannot be further bored. Fortunately my engine had already been resleeved with a plain old cast iron sleeve at the standard size of 97mm so I decided to chuck in a new .25mm bigger one - boring out .25mm is okay.
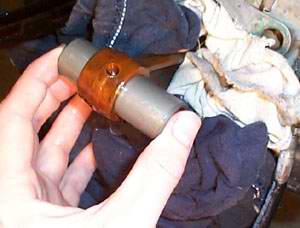
Wobble testing the new piston pin.
I gave Hamish the piston and the cylinder and he bored it for me. Car rebuilders don't bore bike engines and vice versa. After talking with Hamish for a while that is a good thing. He lovingly hand bored and hand honed the cylinder to perfect tolerances for me, based on the actual size of the piston.
There are several interesting stories from Hamish - the $50 for the rebore was a bargain because it came with an untold quantity of knowledge :)
The old piston was identified as a Wiseco jobby. While sniffing around for new pistons I got prices for kits starting from $190AUD. The genuine Honda piston was $230 so I figured that would be fine.
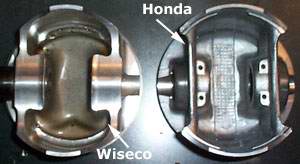
Honda - criss-cross on the bottom.
"Ah, a genuine Honda, good" Hamish says, "Honda are the only manufacturer who always get their sizes right, and that make the piston fit into the oversize bore measurement."
"Huh?"
"If I bore to exactly 97.25mm the piston will fit to perfect tolerances. Other manufacturers pistons can vary as much as 10thou from the stamped size and I have to measure the piston to know what to bore to."
"Okay!"
 |
 |
| Before the bore the ridge is pretty obvious - this is where the rings don't scrape the cylinder during operation. |
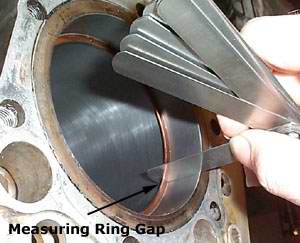
Insert a ring nice'n'square using the new piston, use your feeler guage to check the gap. |
Just checking...
On the bench test the ring gap and roll the piston rings around the piston ring landing to ensure they don't bind. You'd expect it to be okay from The Factory but best to be sure.
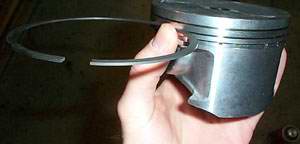
Pop the rings on. Chrome plated ring (looks different) goes in top groove. Cast looking ring goes in second groove. Oil ring + spacer + oil ring in the bottom groove. Top 2 rings have a mark on the upper size of them near the gap - that marks the top. Oil rings can go in either way up.
Thanks to an inclined cutout on the bottom
of the sleeve it is almost just a case of
pushing the cylinder down.
Use your thumbs to work the rings starting from the bottom onto the piston. You don't need a tool to do the job, just be careful to not scratch the piston skirt.
Becuase of the initial reason I pulled the engine down - the blown cylinder gasket - I used Blue RTV silastic when putting the new cylinder gasket down. I checked the squareness of the decks, they were fine. We'll see how that goes.
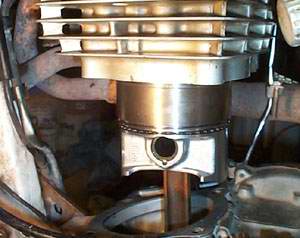
Putting the cylinder back on is a simple task with no tools required because the cylinder sleeve has an inclinded cutout underneath. This means that loosely squeezing the rings together with your thumbs as the cylinder goes down will be enough - as the angled entry point will do the rest of the work for you to fully compress the rings.
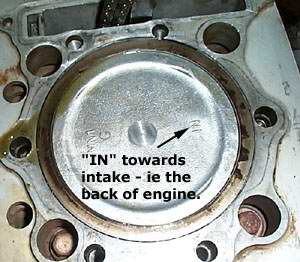
Yeah...get it the right way round eh?
Torque down the cylinder, criss-crossing again with a bit more force than before. Eventually they should be really tight. Not superhuman-strength tight, but very tight. Throw your torque wrench on if you are the nervous type.
Don't put the piston in backwards by the way!
Smear fresh engine oil on all the internals as you go by the way. I probably should have mentioned that earlier ;)
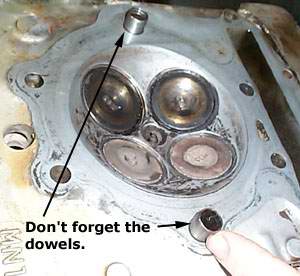
Head should be torqued down the same way. The head gasket, a three piece thin metal jobby will crush into situ as you apply the torque. Make sure you have the locating dowels in place. Oh, the cylinder didn't have locating dowels by the way in case you were wondering. It just gets slapped in. Strange. Personally I wiggled it so it sat in the middle of the extremes.
 |
 |
 |
 |
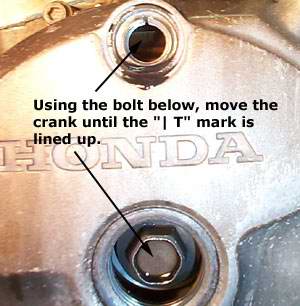
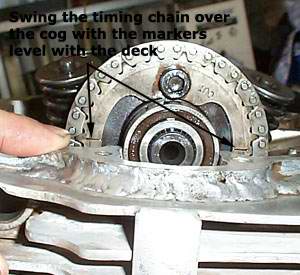
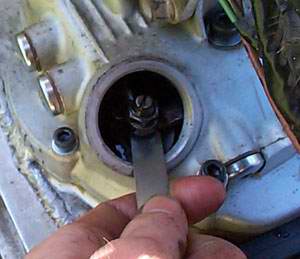
Right, now the timing. Simply line up the marks on the rotor (behind secret panel 1) and the marks on the timing gear.
You'll need to gin around a bit and move links forward and backwards and check that the piston hasn't moved, but at the end you should be able to rotate the engine a couple of times and the marks will line up. One tooth out makes quite a difference, without the tensioner in place it will appear that they don't perfectly line up, but yeah, it's fine.
There is no "180° out" by the way - the spark plug fires every rotation of the crank. Stop thinking cars/mechanical distributors. Pah to mechanical distributors.

Slippin' in the tensioner made easy
There is quite a bit of force the tensioner applies to the chain. You need to compress the spring, wrap a bit of wire around it, drop the tensioner in place and pop in the pivot. At this time cut the wire and pull it out.
Screw in the pivot bolt, give the engine a few more spins to be happy with the timing.
It's nearly all over! You've remembered to do things like put on the crank to head oil feed pipe and all that of course haven't you?
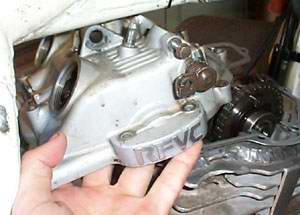
Hat back on...
The hat will go back on the same way it came out. I put new allen key bolts onto it, the old ones were getting a bit rounded. Nice lookin' they are too.
Look at the bench. You've been working backwards, putting everything back on that should be on. Is there nearly nothing left on the bench or did you forget to install the piston pin clips? An orderly approach to dissasembly and reassembly is a must.
Humour me, redo the valve clearances. I go .10mm on the exhaust and .08mm on the intake. This might be a bit aggressive but it works for me.
Set valve clearances.
Isn't doing the clearances a pain? I use a technique where I get it roughly right and screw down the nut without holding the bolt. I then measure the clearance. I back off the nut, move the bolt whichever way it needs to go and then tighten the nut again. I then check what the result was. One or two iterations is all it takes and you can get it really accurate this way.
I've never been able to wind the nut down while holding the bolt with a screwdriver and have the resulting clearance spot on, maybe it's just me...
Carbies on, exhaust is on, it's all good. Give it some fuel and kick it in the guts.
At first the compression will feel wimpy before the rings start breaking in. It will start, you'll get a plume of smoke for a while which will be the liberal amount of oil you were covering the internals with during reassembly. It will probably cough for a while, keep it going.
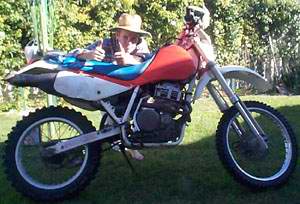
Oh yeah!
If you want to look like you know what you are doing, use a big screw driver pressed against the cylinder and put your ear on the back of it. It's like a microphone in the engine - you'll hear all the noises. There shouldn't be any unusal noises.
"What's an unusual noise?" I don't know, they all sound unusual to me, I just do it to look cool ;)
Breaking in a new engine means not treating it like a limp wristed lisping hairdresser, but also means not revving the crap out of it and keeping the throttle below halfway. The rings will bed faster if you "load it up", ie give it a _few_ herbs to accelerate, back off and repeat. Try not to do the same rev for extended periods.
Well there you have it; bike engines are small, light, simple and a whole lot more "fun" to work on that car engines. Enjoy! :)


 database