Now this might seem like a silly subject, but I get sick of paying money/waiting for paper gaskets from Japan so I usually make my own. When they get really complex some people will still buy them; so here's a few tips on how to make a perfect gasket - even if it is a really tricky one.
The tools you'll need are simple. Gasket paper - you can buy rolls of different thicknesses, look at how thick the old gasket was. When in doubt, use a cereal box. Don't laugh, they are perfect for most jobs. They have enough compressibility and what's more one side is glossy and the other rough so when you separate the thing next time they always stick to just one side for easy removal!
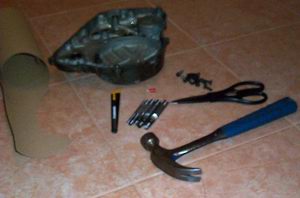
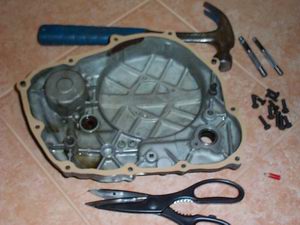
Tools required - gasket paper, punches, hammer , pencil, scissors, knife.
Hammer and punches. A set of hand punches is dirt cheap, I think I paid about AUD$5 down at my local hardware. Scissors and a sharp utility knife are good. A short pencil for scribing.
Right, grab the part the gasket is for, you will use it as a template. Clean it. I'm doing a motorbike rotor cover here. Roughly cut out enough gasket paper/cereal box to do the job, hold it in place over the mating surface on the part. Using something blunt, say the back of your punches, feel where the holes are rub the gasket paper so it makes an indent where the hole is. Use your pencil to further mark the spot if you can't see the dent well. Start with just two or three holes at the opposite ends of the part - to get you started as locators.
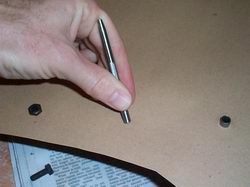
Suss out where the holes are.
Grab a punch that looks like the right size. Using a newspaper or a bit of wood as a backing, hold the punch on the dent/mark you've made, centred of course, and hit the back of the punch hard with your hammer. Viloa, a hole.
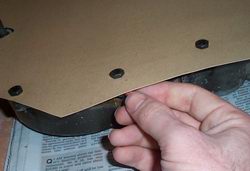
Now return your gasket to the object and put the bolts through so the gasket is held in place. If the holes were too small, use the next size up punch and make them bigger. If you need ultra-accuracy make small holes first then correct any misalignment with the next bigger hole.

Pick a punch size, whack!
Mark out the rest of the holes. See, the first few holes can have bolts inserted to ensure the gasket doesn't move while you are finding the other holes required. Again, make a dent by rubbing the gasket paper where the hole is.
With this technique you can get the holes pretty well exactly in the right spot. Make them a little bit bigger than the bolt to allow some room for error.
Little pencil scribe...
All the holes are punched, put the gasket back on the object and put bolts in all the holes. How did you go? All bolts and holes lined up perfect? Well done.
Now grab your pencil and upsidedown roughly scribe around the outside of the object. Cut with the scissors a big hole on the inside of the object don't go for super accuracy, just a rough starting hole. Use the pencil to roughly scribe the inside of the object. You can see now why I said "little" pencil; so you can fit into the tight spaces.
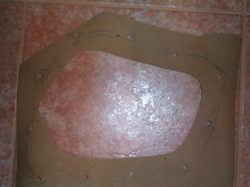
Outlines are scribed.
Whip it off and you now have a rough guide to the shape of the object. Use your scissors and knife if need be and cut it out. I find that you don't have to be super accurate - if a bit of gasket paper is popping out so what. You can always trim it when the object is bolted back on.
On the inside however, where oil and petrol and stuff is, try to keep it accurate. The last thing you want is a bit of gasket dag paper breaking off and clogging up some oil gallery.
Not bad at all.
That's it, you're done. No more driving to the shops and spending $20 each time you take something apart. Of course, make sure each surface on the object is nice and clean before reassembling to stop leaks - use your knife to scrape off any old gasket or silicone. I avoid using silicone on my gaskets, you shouldn't have to unless the surfaces are warped.
I still fell a bit silly having told you this, but maybe I've taught you a trick you might not have thought of before - Good Luck and Good Skill!
JAW


 database