I experimented with a few small solar projects in the early 2000's, if you want to know about solar panel installation for your house I have written about it here.
Well I have my "limitless" supply of 12VDC from the sun, (see solar panel project) but what to do with it? One project I really liked the idea of was a solar powered guitar amp. As in a battery powered amp, recharged from the sun. Appeals to the greenie in me.
I've built several revisions of a solar powered battery guitar amplifier over the years, and finally I believe I am close to a winner. Previously I had tried the "build everything from scratch" approach, with varying levels of success but nothing I'd hang my hat on (I've archived my old pages about this here). My latest amp is more of an assembly of modules, let me talk through them:
- Battery: the same one I have always used; a lead acid gel cell 7.2Ah. It's got enough capacity to play at a good volume level for a long while, but isn't so heavy you need a forklift to move it.
- Solar panel and charging circuits: I have a nice circuit for maximising the power out of a solar panel (see solar panel article) but really, you don't need it in Australia. It's either sunny, or night time, and when it's sunny you don't need a maximising circuit, and when it is night time, well, you just don't recharge the battery, or you *gasp* use a mains powered recharger to get you out of trouble.
- Enclosure: lightweight but strong...this part is a bit radical, read on!
- Amplifier: I've borrowed from the doof-doof car heads. Why reinvent the wheel when you can buy a 12V 150W super-fancy class XX1A amplifier with all the fruit for $150?
- Speakers: Again, I've borrowed from the car heads. You can buy a huge magnet high powered unobtanium coated car speaker with a great response curve for $100. Unfortuntately, they normally come in twos, so you'll need to part with $200 ;)
- Sound enhancement: Previous amps were always about getting a faithful flat response curve from the guitar. This time I included two guitar pedals into the system to "spice up" the sound. I like a generally clean sound, (I play acoustic) but I find that a bit of reverb adds warmth and depth, and depending on the acoustics of where you are playing some frequencies will resonate terribly and the normal 3 band guitar equaliser is not specific enough to fix them, so I've added a 7 band equaliser as well.
This time I've taken the amp one step further - it is also a seat. Huh? Well if you are planning on using a solar powered amp you are probably busking, or playing in a paddock, so you need a seat. why carry a seat when you can sit on the amp? It introduces other problems however...
I'm not going to talk through the construction techniques so much, I'm going to talk concepts (I didn't take many pictures during the construction phase, sorry!) Rest assured you need to have woodworking skills, some very simple electronics but mostly wiring skills, and, well you do need to be generally handy with your hands.
Construction
Guts of the issue
Previous amps were made from 18mm medium density fibreboard. Great stuff for an enclosure, stiff walled, easy to work with but you know what: *heavy*! You don't want to lug around a heavy enclosure that also has a heavy battery, heavy speakers and a heavy amp in it as well. But at the same time you want the walls to be stiff so they don't flex - which would put resonance frequencies into the mix. Remember, what we want is a flat frequency response from the enclosure - the sound going out should be exactly the same as the sound coming in, at least until we tweak it with effects.
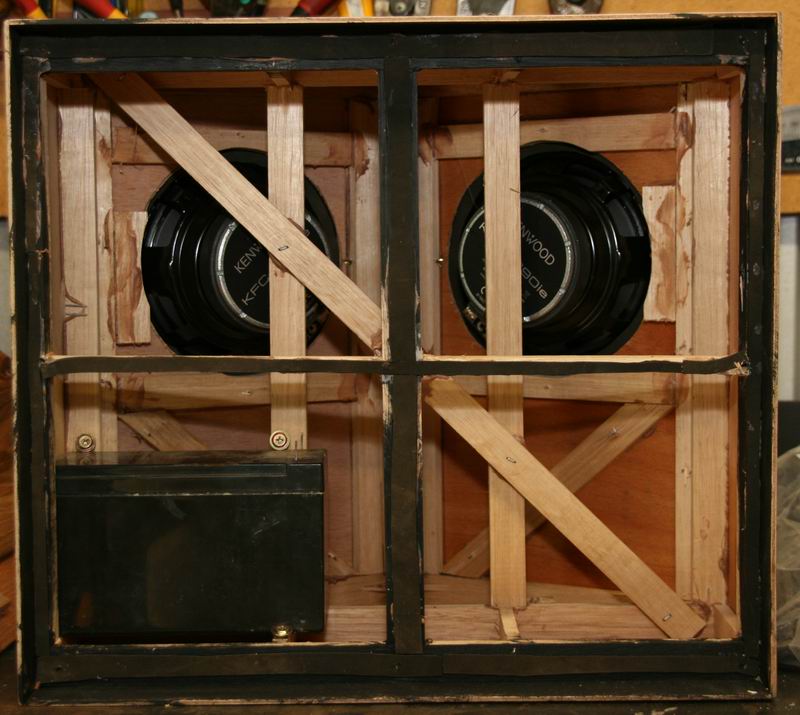
I decided this time to make the enclosure out of 3mm marine ply and a lot of 20x8mm hardwood ribbing. Stapled and glued throughout. It needs to be tough, real tough, because I'm going to be sitting on it and lugging it around. Braces, crossbraces, diagonal braces - it's all good because for very little extra weight you can make something incredibly strong.
The dimensions are more about ergonomics than speaker enclosure desing. The unit is 350mm high because that is a comfortable guitar playing sitting height for my stature. It is 430mm wide, to provide enough space for two speakers side by side, and 250mm deep to fit gear in and enough room for my butt. I put four big rubber stoppers as legs, to get it off the ground, to sit on uneven or slippery surfaces and to decrease vibration contact with the ground.
Now a problem with sitting on a guitar amp is that your legs are in the way of the sound projection. I decided that the front panel would angle in, from the middle, so that the two speakers point not straight out but off to the sides. Sure, there is a dispersion angle that a speaker naturally achieves, but I figure that it is better to have the straight line not directly at your legs but off to the side. The other advantage of this is you can get a wider coverage to your audience rather than just normal speaker dispersion. There are two speakers used because car speakers come in packs of two; the signal coming out of them is identical, it is mono signal, so everyone is getting the same thing. Don't think stereo!
As you can see from the first photo, there is penty of ribbing, and the 20x8mm ribs are mounted in the direction where the most loading is across the 20mm side. This is to give the maximum rigidity, firstly so the thing can take my weight, secondly so there is little to no movement as a result of the speaker producing sound. Ideally the speaker should be 100% rigid.
Note the back is recessed and has a rubber gasket, this it to allow access into the guts, an airtight seal, and so that the electronic modules sit external to, but within the amp body.
Note also that this sealing is because I've gone for the closed box style enclosure, not ported. Closed box simply means that there is no reaction between the front of the speaker and the rear, they are isolated by the enclosure, all speaker movement is done by compressing the air behind the speaker - and of course pushing out frequencies of air pressure from the front! Closed box tends to have a flatter frequency response, my goal.
Electronics

Electronic trickery
In the next photo you can see the modules I used. The main amp is a 12V 150W two channel unit. It has a couple of nice features - for starters, it is 150W RMS, so it has the capacity to go extremely loud. I would have settled for a lot less, but there was nothing with less power available, besides, when you start to push amps out to their rating, the distortion increases. So by having 150W but only using the bottom end of the capacity you hopefully are in the optimal sound reproduction end of the band. To date, the most power I've seen used is about 25W continuous, and the "resting" current ie when no signal is present is only about 300mA ie 5W, so it is reasonably efficient. Remember also that having plenty of power means that impulses will be better - as in a big boom on the bass will come through load and proud.)
The amp is designed for stereo with two amplification channels into 4 Ohm speakers. If you were going to use one speaker only you could bridge the amp, that is, have both channels drive one speaker. Alternatively you could parallel two 4 Ohm speakers to get 2 Ohms and use one channel. I figured why fight the design, I've got two speakers, two channels, so one channel one speaker and use the same signal for both. You can see the patch lead from the graphic equaliser splits into two inputs to the amp.
Another nice feature of the amp module is the variable input gain. I guess the manufacturers were thinking in the event that there was an impendence mismatch between the amp and whatever sound production device is used, you would simply adjust the gain to account for it. Since a CD player has typically a much higher output than a guitar, you can wind the gain right up to compensate. Direct from the guitars (active) pickup I found that a gain setting of 200mV (it's actually called "sensitivity", and ranges from 200mV to 600mV) it was okay. A bit low, as in you could max out the guitar and it was lound enough, but not enough to pop an eardrum. However the 7 band graphic equaliser has a master volume setting, which yields a higher gain than the guitar. This also acts as the amp volume knob - remember that a car amp just amplifies, it is the sound production device that controls the volume - without the graphic equaliser that would be just the guitar.
The amp is wired via a switch and a fuse to the battery, and there is a capacitor about the size of a red bull can across it - it was the biggest capacity I had laying around. The capacitor helps with the current draw from the battery; if a big impulse hits the amp, but there is a current limit from the battery, the capacity fills the void. I doubt if it is doing much other than taking 5 seconds to charge up when you first turn the amp on, but I had it, so installed it.
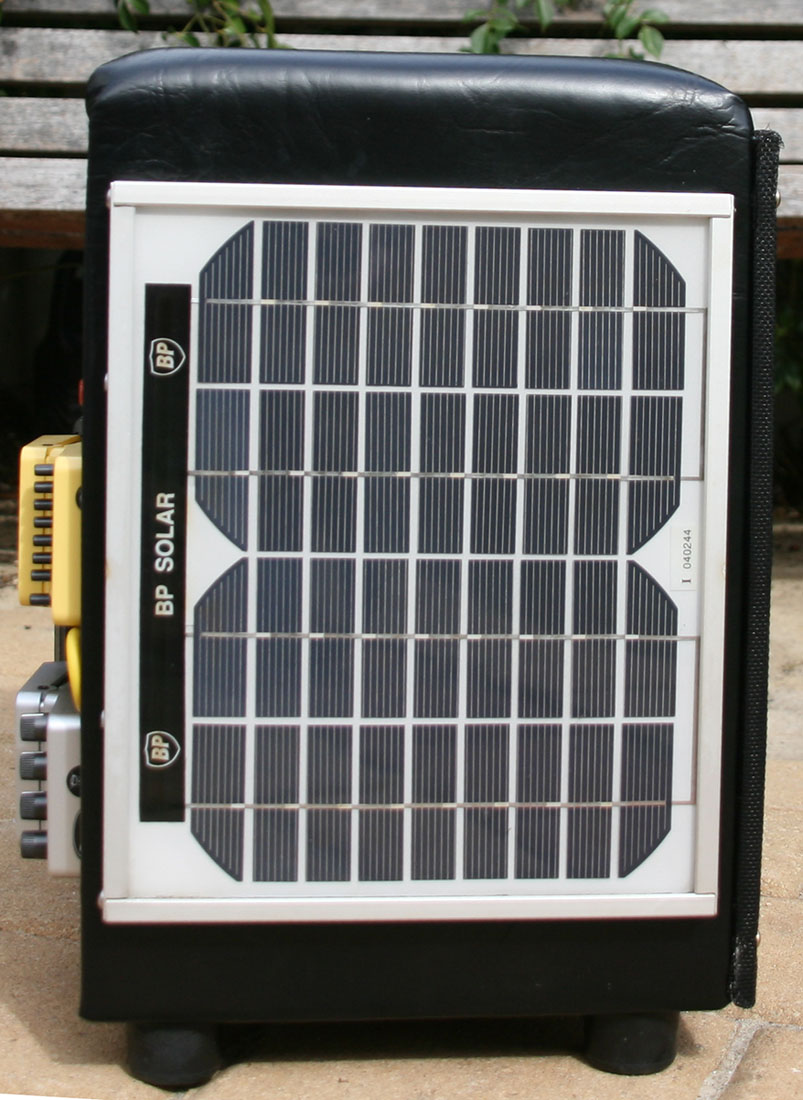
Solar panel side
On the other side of the power equation is the solar panel. Over the years it has lost efficiency, it is rated at 5W but is now only good for around 4W. This time I installed it with just a 5W 14V zener to stop battery overcharging, and a diode to stop back flow from the battery into the solar panel at night. I went with a 1A schottkey diode, they are more expensive ($1 versus 5c) but have a very low forward voltage drop. A normal diode has around 0.7V volt drop which means about 6% efficiency loss, whereas the schottkey diodie I used was around 0.25V, bring efficiency loss down to around 2%.
I put in 3 panel meters - the battery voltage, consumption current and charging current. Not necessary, it was more for curiousity and the fact I already had them. When I see the voltage max out at around 15V I know the battery is fully charged. You can see in the picture the charging current is around 280mA at around 13V, so getting around 3.6W from the sun when I took the photo.
Two switches - top one engages the charging circuit, bottom one turns on the amp. I could have gone a toggle switch, as in the amp is either running or recharging, but I wanted to be able to turn off both circuits giving direct access to the battery for external recharging, done via the banana clips, refer to the photo. It's all well and good to be a greeny and only recharge from the sun, but I'm not going to knock back a gig just because it hasn't been sunny for a few days! ;
Power consumption at a loud volume, where loud is such that you need to speak up to talk over it, is around 1A. Based on this, for every hour you play you'll need about 3-4 hours of sunlight to recharge it.

Front
The speakers are two way units; the car heads don't do single cone speakers. You'll mostly find from the guitar amplifier manufacturers that normally the speakers are big single cone low impedence. Guitars don't have very high or very low frequencies, the sound is very mid range. Pitch frequencies range from bottom E at around 80Hz, up to about 1kHz for the highest fretted note you can play. Sure, there are harmonics and subtleties that extend below and above that range, but essentially the guitar is a midrange instrument and speakers are designed around that. Whereas a car speaker, for playing music, needs to be able to handle from sub-audible (to pound your body) up to in-audible (to annoy dogs). So the design of that speaker is trickier than a guitar speaker, that's why the usually do more than one cone. The tweeter part of the speaker deals with the very high frequencies. Again, just roll with it. The guitar sound environment is less stringent than car audio sound reproduction, what we are really looking for is just a flat linear response, so if we can do it from 1Hz to 25kHz then chances are our guitar primary frequencies of 80Hz up to 1kHz is going to be beautiful and flat.
The two guitar pedals are powered from the battery. Normally, guitar pedals require a 9VDC power source, usually achieved with a mains AC transformer and rectifier or battery. To drop the 12V on the battery to 9V I used a couple of diodes. Each diode drops 0.7V forward, so 2 or three will do the trick - typically a pedal won't mind an extra volt. Not need for fancy voltage regulators here.
Another advantage of battery powered is there is no AC hum. As in the 50Hz, or 60Hz depending on what country you are in, coming from the mains supply. Only really expensive guitar amps have high quality AC to DC power convertion, but with a battery you don't need one at all. This is not just for the amp, but also for the guitar pedals. I found on mains power the pedals had a tiny bit of hum, or high pitched squeal if you are using switched mode supplies, but on the battery, quiet as a mouse.

Schematic
Bringing it all together
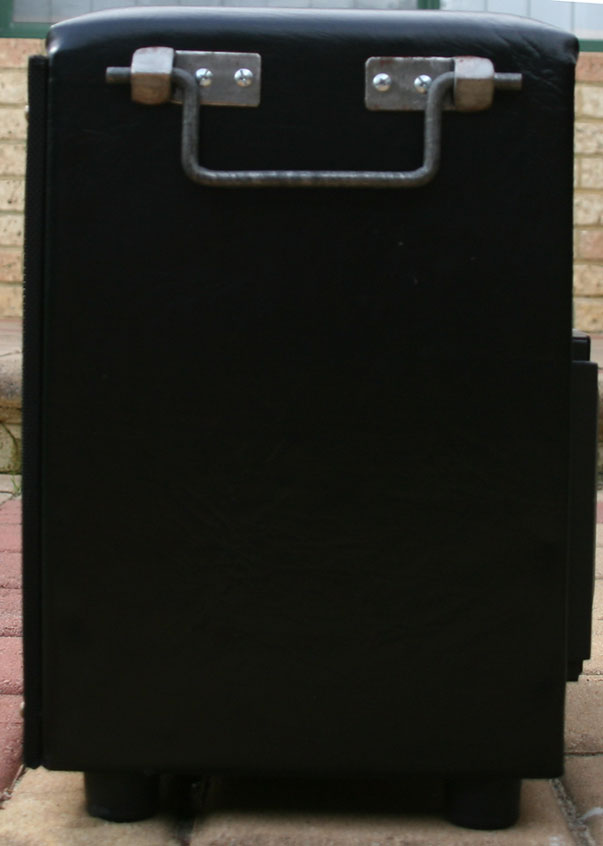
Heavy duty side handle.
Making it look nice is kind of important as well. I bought some marine grade vinyl and some 50mm medium density foam to make a cushion on top. The vinyl is simply stretched over the foam and glued/stapled to the box. Comfortable enough, you can sit on it for hours without getting a sore butt.
Carrying it is also important. It's still a heavy unit, so I wanted something strong. Off the shelf handles didn't appeal to me so I knocked up my own. Basically some 10mm rod bent to the right shape, and some angle welded to a plate and screwed to the box. I specially put some extra ribbing where the handle is, last thing you'd want is the handle pulling through the screws when carrying it. So far so good.
I made a front panel out of the same wood I used for ribbing and some metal flywire. This is mainly to protect the speakers from getting kicked. It's removable with four screws. Once it was done, it looked so plain I decided it needed a logo. So I made a giant "JAW" out of 3mm aluminium using a jigsaw...and now it looks lairy...oh well, at least people will know who made it!
Now, I've mentioned flat linear response several times like it is the holy grail of sound reproduction, what do I really mean? With amplification it's all about taking a sound that you can hear, and making it louder, but it sounds the same. Sounds the same frequency for frequency; it's not boomier in the bass or lower in the trebles, it is exactly the same, ie, the overall response is flat - pitch for pitch, amplification is the same. Well that's nonsense really, isn't it? ;)
What really happens is that when sound is louder, you hear it differently because of your eardrums, the environment around you reflects sounds differently and other subtle physical effects. So if everything changes, what's the point of a flat response curve? Well I think it is a good starting point. If your speaker design accentuated the bass (ie by say porting the box) then there is already a bump in the low end of the frequency spectrum. By keeping it as flat as possible, once you crank up the volume you can then tweak the frequency volumes on the graphic equaliser to compensate for the environment; for example if you were in small room with concrete walls and floors you might want to drop the midrange, if you were outside you might need to boost the bass, if you were in a big room full of people absorbing the high frequencies you might need to boost the trebles.
How does it play?
Well I think it plays great. I've played it in several venues so far, and each venue required different tweaks to the previous, but in all cases I've been able to get the sound to something I was happy with. I put that down to dialing just the right amount of reverb - not too much, just a little bit to add warmth - and then sweeping out the frequencies I don't like. Typically I will leave the guitar EQ flat and take away the more resonating frequencies on the 7 band EQ. Note that the guitar EQ is *before* the reverb pedal, and the amp EQ is *after* the reverb pedal. The primary reason is because the amp EQ has a variable and higher gain so I can use it like a volume knob, but it does offer some flexibility this way - if the EQ is way out you can tweak it "coarsely" on the guitar and "finely" on the box. If you are playing outside, or in a well damped/soft room, then a nearly flat EQ is good (I tend to sweep the midrange out, mostly due to my playing style) but you'll need extra reverb because there are no reflections. Inside, especially where there is a lot of concrete, tiles, bare walls - tweaking gets hard. Playing in my shed is probably the worst; not only are there terrible resonances, but there are a few harmonic frequencies where the walls themselves actually start to rattle!
Basically I play with the box EQ raising and lowering each band and listening to the resulting sound, and decide on how much of that frequency I want to keep, and how much I want to drop out. Purely a subjective thing, but the reality is you are the player and you know what you like to hear, so see if you can find it. If you can, then success!
This amp is on par with some of the nicest amps I've played through. It's not the best, but it is about my 4th revision; I think I'm starting to get somewhere.


 database