Some things you look at and say "I can do that". Some things yes you can and some things, well yes you can, - BUT DON'T!
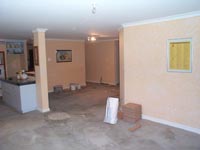
Back at home a plan was formed to get the house full of floor coverings. Neither the missus or I like carpet and decided that no carpet was going down. When you delete carpet it doesn't leave many options other than tiles, lineolium, wood in both its pure form and other 'synthetic' forms.
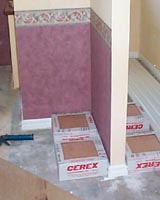
It was decided that the main open-plan living area should be tiles and bedrooms/lounge to be some form of wood. There was some discussion on whether or not to do the tiles myself. The missus wanted a featurey diamondy pattern and even ummed and arred about cutesy little contrasting colour tiles. In the end a choice was made: simple diamond pattern in the main areas with a half tile border, cutting into the hallways which are laid straight.
Comments: The deal is that yeah you can have pretty contrasting tiles, you can have speccy patterns and different coloured grouts but really I recommend plain old straight laid. Why? You notice feature pattern tiles for about a week and then you'll never notice them again. You notice diamond laid tiles for about as long. And keep the grout dark - so that you don't notice dirt ;) Features will capture the attention of first time viewers so there is a resale value in doing it but...
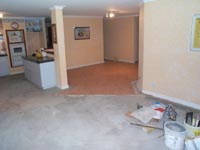
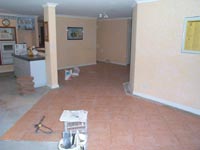
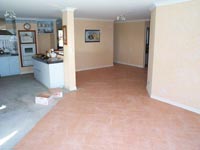
There is a day in between each of these shots (last one is grouting). But when laid by a professional "tile artiste" you'll quickly forget the extra couple of hundred dollars spent on getting the right job.
On the grapevine we came across a bloke who would do the tile laying for AUD$30/m2. This is a bit more than the cheapest price but it is money well spent. We did not want to see any imperfections at all. Hence why I did not do it ;) Considering the guy (who was a veritable "tile artiste") took 2 weeks to lay the 65m2 imagine how long it would take you...

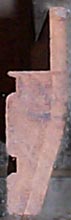
Skirting board profile
But we've skipped ahead; there are skirting boards to be laid first.
There are theorys on skirting. There is the school of skirting on top of tile and the school of butting skirting up to tile. Some Pros and Cons:
- Skirting on top will always have a gap between the skirt and the tile due to uneven tiles and unlevel floor - butted skirting will be tight sealed.
- Butt the skirt and you will lose some of your skirting profile in the tile
- Butt the skirt and the tile cuts near the skirt have to be more accurate because you see them - they aren't hidden under the skirting.
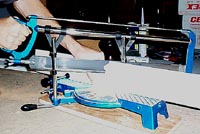
A hand mitresaw, not a bad unit for AUD$25. Note that after the first 50 or so cuts it starts to "wear in" and loses its perfect up-and-downness somewhat. Will be good for the life of your skirting job though.
The main concern from the missus was having the whole thing tightly sealed and that dust could not hide anywhere so the answer was simple, skirt first, tile later. The skirting board job was tackled personally - armed with paint, a mitre saw, some no-more-nails and of course the boards - you are ready.
The boards were sourced at around AUD$2.50/m. They are an MDF profile & primed. Being primed is a huge advantage - get 'em primed I tells ya! Brush on you choice of paint or if you are finniky hit it with the spray gun; we were happen to brush 'em.
No tricks to skirting, accurately measure the wall you are about to do. Keep thinking in the back of your mind on each corner if this is an "inner" corner or and "outer" corner - ie - which direction is the 45 degree cut required to join a corner. On an "inner" corner the back is the long side, on an "outer" corner the back is the short side. Think this over in your mind a few times and you won't make _too_ many upsidedown cuts ;)

Prepare the area for boards and don't be afraid to "level off" some plaster - it's all hidden once the skirting goes down.

No more nails'll do the job.
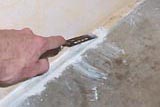
Prepare the surface for the boards - it is more than likely the floor will have chunks of plaster on it, scrape it off with something like this old chisel. The wall itself will probably also be out of true. Hold the piece of board you have cut in position and see if there are any areas that need to be "tweaked".
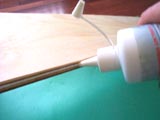
Glue the boards down. Use something like this silicone gun loaded with no more nails. If you were going to do it "properly" you would also nail gun 'em to the wall. This is mostly because you need them held in place while the glue sets. However it also means you have to go around afterwards and bog the holes up. You also need to make sure the nailgun is able to penetrate the wall. And that you have a nail gun...

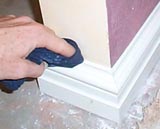
Put on the no-more-gaps, then run a wet rag across to smooth it in.
Alternatively use heavy objects to hold everything in place overnight in order to let the glue set. Give it a good dosage of glue, she won't be going anywhere in a _long_ time ;)
Finally I decided an excellent finishing touch would be to hit the top of the board where it joins the wall with no-more-gaps. The concept is two-fold; it seals the board so that dust and stuff won't fall into any small gaps (from uneven walls) and it also hides any minor errors in cutting that I made ;)
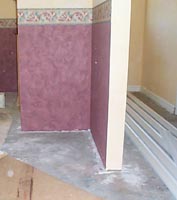

Measure the walls and keep thinking "inner/outer" when making the cut. Note the boxes of tiles that made very handy weights to hold the boards in place while the glue dried.
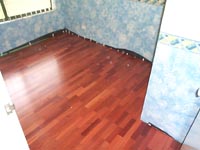
Moving along we are into the bedrooms. Wood was the choice, the type being Karri - a native Australian wood which grows in forest in the south west of Western Australia. Karri is in fact the 3rd tallest tree in the world next to the Australian Tasmainian ash and the American Sequoia. But enough of the tree-talk already.

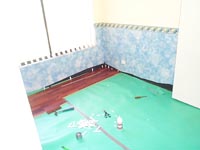
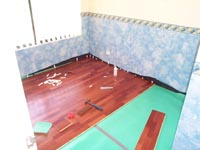
Lounge/dining room during construction phase.
Times have changed since you'd have a floor consisting of beams in one direction and the floorboards nailed to that, tounge in groove(TNG) if you were lucky. These days you can have 9mm TNG glued to your concrete slab directly (still needs nails - one of those magic catridge type nailguns). Or you can have a substrate nailed down such as chipboard and the boards onto that (if your floor is a bit, ahem, "wonky"). Then there is the floating floor variants.
The floating floor consists of sheets of TNG pine/cheap wood with a layer of the feature wood on top. They are carefully machined and prefinished with laquer so basically you just join them together and you're done. This is in contrast to solid wood glued down - that needs to be sanded and sprayed after it's been laid. Fair bit of inconvienience there, best to more out while it's being done I hear.
For $AUD66 we scored enough "fastwood" prefinished floating floor to sort out the house. The Finland made (with Australian wood...I didn't ask...) boards are quite simple to lay if you are that way inclined.
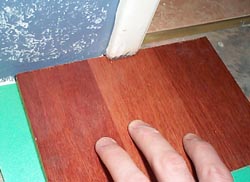
Use a piece of test board on the foam to check your undercut.
Floating floors do just that - float. You put down some black plastic to prevent moisure from coming up through the slab, then a layer of 2mm foam and then the floorboards on top of that - no nails. The whole floor has a 10mm gap around the edge to allow for expansion/contraction; this time the skirting boards *must* go on top. Hmm.
So get out your angle grinder and hack out any door frames, the floor must be able to get in underneath for that 10mm, ahem, "x"mm gap ;)
Read the instructions you get given, it's straight forward. Lay the boards starting from the corner that has the grooves to the two walls, the tounges facing out. Measure off how much more board you need to reach the wall remembering the 10mm gap. The cut does not have to be a work of art - rough jigsaw is fine because the cut is always going to be under the skirting, *and* the piece you just cut off it the first piece in the next row. Think about it, Mmm.
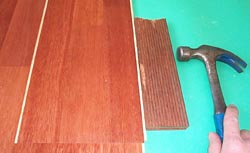
Use any piece of hardwood as a knocker, and slide the hammer across the floor to bash the board into place.
Note: You'll find that the boards are as a minimum a "matched pair" if not a continous flow. Doesn't mention that in the instructions. When you peel each board from the pack look at the next one and see which end should join up. This was look much nicer as each board join "flows" into the next.
Carefully bash the piece into the groove and swing the hammer across the floor to ensure you hit everything fair and square.
Do yourself a favour and buy the installation kit. It has handy wedges and a sort of crowbar - used for getting that last obnoxious row in.

Tap a wedge in to make sure the board is hard up against the previous piece groove.
Handy trick 1: I found just before you were about to finish off the next row if I bashed a wedge in against the wall it would push the board up hard against the previous piece. This way as I bashed the board _into_ the long side of the previous row you ensure there is no gap between it and it's mate... get it? Check out the photos and you'll see what I mean.
Handy trick 2: When you don't have the luxury of doing the above because the board doesn't reach the wall, put it in place and give it some stiff stamping with your foot to knock it home. You will be able to knock the piece into the previous piece easily. From the non-join end knock the long side together while you are standing on it and work back to the join. Fast, effective & ensures the pieces are butted up at the end-to-end join.
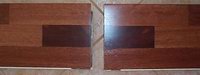
Take a look at the pieces in your packs. Most will have a "partner" for one end if not the other end. Use them in the correct order for less conspicous joins.
Oh and don't forget the glue! Using PVA glue run a bead of glue in the top of the groove. Just a thin line, I held the board upside down and ran along the groove as show, works well.
The last row you use the crowbar to hook in behind the board (because you can't swing anymore) and use the hammer in a slide-hammer sort of way. You can't get as much of the force as you could normally, but persist; you'll get there. I made myself a longer bar than what came in the kit to whip up a bit of extra force for those stubborn last pieces.
Handy trick 3: Ease off somewhat on the glue use for the last row - it will knock together much easier. The small bar will be more than adequate with a bit less glue.
*All* grooves are glued.
The cuts around doorframes can be quite difficult. Keep thinking 100m expansion gap, but more importantly thing that you have a tounge and groove arrangement. You can't just cut out the piece and plonk it on top like a tile could, you have to get it into the 5-6mm groove. I advocate the "technique" of cutting out the bottom of the groove but only in real sticky situations; try to avoid doing this. It will allow you to "tile drop" the board in at the price of sacrificing the TNG join strength.

Trimming profile put to good use.
The final trick is making the transition from tiled surface to floorboard surface. Grab yourself some of this nice profile - build to clamp down the wood at the transition point and taper down to the tile level. The wood + foam = 14mm and the height of the profile is 19mm. The tile is 11mm - but the profile tapers down to 10mm. doh. No fear, turn your circular saw against it and buzz down the bottom edge until you are left with a 11mm height. Ah, good thinkin' ;)
Use some screws and wall plugs and screw/glue to the concrete. Once it's done wood putty up the screw holes and laquer the trim.
 |
 |
 |
 |
 |
 |
Your final mission is to put the skirting boards down & same rules apply as before. Happy flooring.


 database