I've been recording videos of guitar playing for youtube and a few people asked me how I do it. You'll be pleased to know the only software you will need is all free, but a little bit of hardware is a good idea. Your spend could be as low as $20-$30, more realistically aim for a $50-$100 budget. What I'm after is a *good* video with *good* sound, if you want a *great* video with *great* sound then I can't really help, I haven't yet felt the need to spend that much money.
Software
- Virtualdub for video capturing and editing.
- Audacity is audio editing software. Optional, can be used to tweak the audio for a better sound.
- Xvid codec is something you load onto your system so it knows how to compress and decompress the xvid flavour of video.
- LAME ACM is something you load onto your system so it knows how to compress and decompress the mp3 flavour of audio.
Hardware
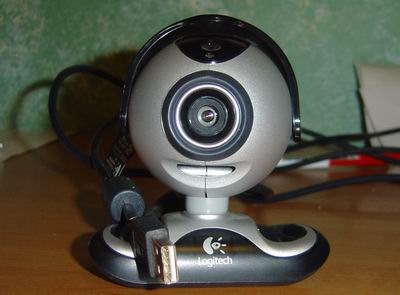
Webcam
A webcam is used for capturing just the video. Spend as much as you can, generally the more you spend the better the picture you will get. Pay attention to how well it performs in low light, generally your videos will be recorded inside with a light on, we want to see what you are doing!
Install the drivers you get with it and get it up and running.
- We won't be using the software that comes with your webcam, but we need to install it for the windows drivers.
My guitars all have pickups, but this process will work fine if you have a good microphone - just substitute the pickup cable with your microphone cable.
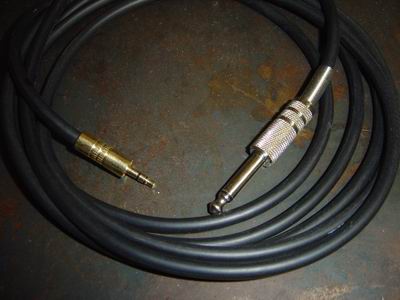
There are two ways to plug directly from your guitar to your computer - A cable with the standard 6.35mm guitar jack on one end and a 3.5mm into your soundcard, or a USB guitar cable that has a 6.35mm guitar jack on one end and a USB plug on the other.
You can buy or make the basic cable, it's a bit hit'n'miss with soundcards - sometimes you can plug it into the line-in socket on your computer and it will work fine if you turn up the recording volume, sometimes you'll need to go through the microphone socket. Sometimes the level will be too high, sometimes too low. I think you get the idea.

These days I recommend searching ebay for a USB guitar cable. Just get a basic cable, for recording you don't need the touted fancy low latency drivers. You can get one of these cables slow boat from China delivered to your door for less than $20.
- I've discussed latency and other issues about USB guitar cables on my blog if you want to know why I don't consider the fancy low latency driver to be required for recording good quality videos.
Right, we've got a webcam for capturing video and a guitar lead for capturing the audio. Now it's time for the hard part!
Virtualdub - video capture device

Run Virtualdub, and then File->Capture Avi to get into capture mode. From Device->select your recording device; it will be your webcam. Make sure Video->Overlay is selected and you should now see the feed from your webcam. Give it a few moments to come up.
- If you can't see the video feed from your webcam, shutdown Virtualdub, go to the software the webcam came with and make sure you can get it working there. If it works there but you can't get Virtualdub to use that device it might be a webcam that doesn't have generic Windows drivers. You're outta luck, perhaps try downloading new drivers for the webcam or buy a different webcam!
Virtualdub - video capture format
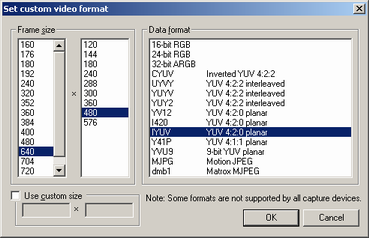
From File->Set Capture File let Virtualdub know where you want it to store its capture files. 'C:\capture.avi' sounds good to me. Go to Video->Set Custom Format and choose the picture size, 640x480 is okay, fancier webcams might be able to do better than that.
- If you choose a format the webcam doesn't support, it will let you know - choose a different format.
Virtualdub - video compression settings
Choose Video->Compression. Choose xvid, click on configure. Press "Load defaults". Click on Other Options and uncheck Display Encoding Status. This stops the cute but annoying bar graph and statistic pop up it normally will show you while capturing.
- The world of video encoding changes pretty rapidly. If there is a different compression format you are comfortable with then choose that.

Virtualdub - audio device
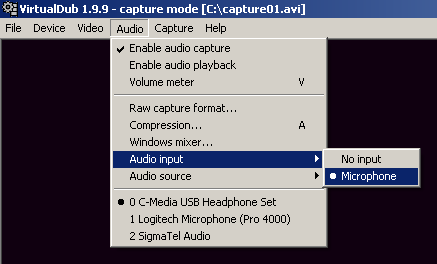
From Audio, at the bottom of the menu there will be all the audio recording devices listed. Select the right device.
Each device may have different sources, from the same menu select Audio input and then the right source. A soundcard might for instance have line-in and microphone; whereas a USB guitar cable like this example is microphone (the cable uses a microphone driver for the USB chipset).
Virtualdub - audio format and compression
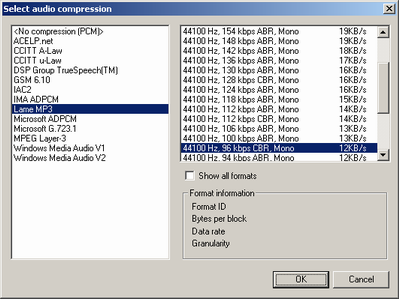
First select Audio->Raw capture format. I stick with 44.1kHz, mono, 16 bit. Basically CD quality but mono - because your guitar *is* mono! Select Audio -> Compression, select LAME mp3. I tend to go for 128kbps mono CBR (constant bitrate) because it's a simple well-support compression.
- Don't choose the Microsoft built in mp3 formats, they aren't as good as the LAME formats.
Virtualdub - audio mix
Again under Audio, tick the Volume meter. This gives you a realtime volume meter at the bottom of the screen. Strum the guitar, you should see it go up and down. Now if it gets all the way to the right turn down the guitar volume until you can strum as hard as you would when playing and it does not reach the right hand side. Alternatively, from Audio select Windows mixer and adjust the volume there - see below.
- Make sure Audio->Enable audio capture is ticked, for obvious reasons! If you still aren't getting any sound in the volume meter, check you have selected the right audio device and source. If there is still no sound it might be a Windows mixer related issue, read on!
Windows Mixer
For us tormented by Windows, it's time to understand the Windows mixer. It seems like a simple thing, but when you have multiple soundcards with multiple sources, it will start to hurt your head.
Firstly, make sure you have the little speaker in the system tray, far bottom right. It makes it easier to get to the mixer. If you don't have it in the system tray, go to Control Panel->Sounds and Audio Devices, click on "Place volume icon in the taskbar". Now you can double click on the little speaker to get the mixer or you can right click, then Adjust Audio Properties to bring up the Sound and Audio Devices properties again.
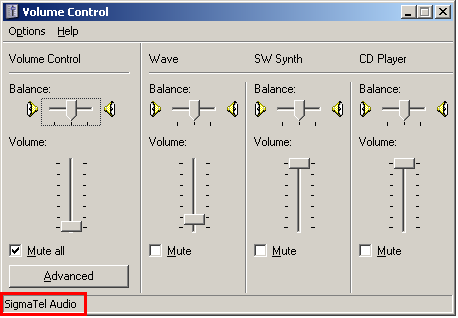
Double click the little speaker to bring up the playback mixer. As highlighted in red in the picture, this area shows the audio device that is being used to play sounds. This should be the soundcard that you are listening through - in this case, SigmaTel Audio is the laptop built in soundcard that I normally plug my headphones into while processing my audio.
- If you have several sound devices (remember, a USB cable is it's own sound device) then one of those may appear here. You might find you are playing something back and hearing no sound - that is because the computer is outputting sound to something that has no speaker. Ensure that the soundcard shown is actually the one you are expecting sound to be coming from - read on.
The windows mixer shows all the available playback sources for that sound device. You can adjust the volume, mute channels - but remember, this is for playback control only, not for recording.

To change the default playback device, go back to the Sounds and Audio Devices Properties (right click on the little speaker in the system tray, select "Adjust Audio Properties) Click on the "Audio" tab. The Sound playback Default device should be selected to whatever you are using to listen through. While you are here also check that the default sound recording device is set to what you are planning on using for recording.
- As you plug and unplug soundcards such as a USB cable, these defaults may get changed. If for some reason you are suddenly not hearing any sound, or nothing is being recorded, go through this process again.
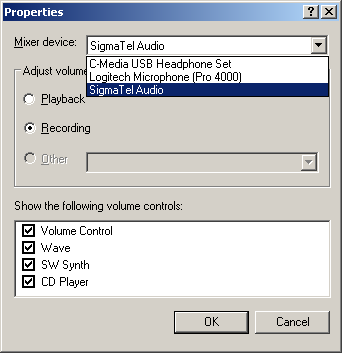
There are two things that need to be "mixed" - playback, which we have discussed, and recording. Double click on the little speaker to get the playback mixer, then select from the Options menu Properties. For the Mixer device you are recording from, select "Adjust volume for" to Recording, and press okay. You are now looking at the recording mixer. Make sure the source you want is selected, and adjust the volume. Again, take note of the bottom left hand corner that it is showing the sound device you are expecting.
- Often a recording source will have an "Advanced" button, which will have a checkbox for extra gain/boost. Try it out, check or uncheck the box to get your levels in an appropriate range - you don't want to have to turn the volume slider to max or min, use the gain/boost to get you somewhere midway in the volume range, with the guitar on a midway volume setting. It is never a good idea to run anything - guitar pre-amp, amp volume, software gain - at min or max, that will normally introduce noise.
As you can see, the windows mixer is not particularly helpful or intuitive when you have multiple sound devices. Audio programs tend to have their own mixers built into the software for this very reason - to make it easier for the user to get what they are after. Virtual dub just uses the windows mixer, it wasn't specifically made for fancy footwork with audio creation. However by understanding how windows deals with sound playback and recording, it will actually help you understand playback and recording through multiple devices and sources in general.
Virtualdub - capture settings

Under Capture tick Autoincrement filename after capture. If you don't tick this then everytime you capture you overwrite the original file you selected - let it create lots of files, you can delete them all later - or you'll be sorry if you had a great capture and then accidentally overwrote it!
Under Capture select Timing, select "Sync video to audio by adjusting video timing." This means that if the computer is struggling to keep up with the video, it will drop frames or add frames basically space out the video and keep the audio captured in realtime. The otherway round - the audio adjusted to the video - will speed up and slow down the audio to match what the video is doing. What we are after is primarily good sound, it doesn't matter if the video is a bit choppy in places because the computer couldn't keep up!
- If your video is getting a bit choppy because it's a bit old and slow, you can drop back on the format (ie use 320x240 instead of 630x480), reduce the compression bitrate or even reduce the framerate; just generally tweak the settings to be a bit easier for the PC and the webcam to keep up.
Virtualdub - capture!
Position yourself in the webcam frame, and press F6 to start capturing. Note that F5 also does capturing, but this is a slower, more compatible mode which might lead to poor capturing, use it only if F6 isn't working for you.
Play something short first as a test! Press Esc to stop capturing. Review the file - I usually just use the windows media player in the background for reviewing.
When you are satisfied with your test, play your song. You are done!
For those of us who are a bit perfectionistic, let's devote a bit of time to "tarting up" your video. For those who are totally happy with the result, skip to the Trim and Final Compression section!
During recording, your tempo is the most important thing at this stage, it doesn't matter if you have missed or fumbled a few notes. If you miss a note don't stop and start again, you'll be there all night. Play on, don't let the tempo waver, don't drop a beat, we'll fix afterwards. Of course the less mistakes you make the better, it is much easier to get it right the first time than to fix it later, so if you are making mistakes all over then stop and try again. When you have a take you are pretty happy with, let's fix it up eh!
Virtualdub - Demultiplex
What we are going to do now is strip the audio from the video so that we can play with just the audio. Exit capture mode, taking you back to the main Virtualdub window. File->open to open your video ready for editing. Check it out, use the play and stop buttons down the bottom. To demultiplex the audio select File->Save WAV. Choose a place and export the file. You now have a Windows PCM raw audio file, ready for Audacity.
Audacity - Punch in
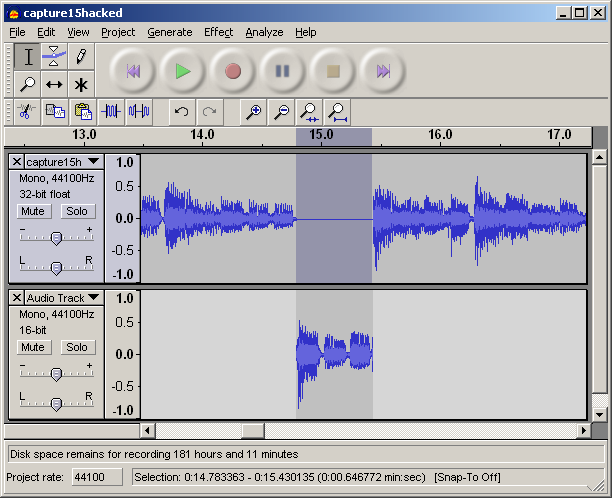
Run up Audacity and File->Open the file you just exported. It will look something like below. You can navigate and play the track by clicking on it and pressing play.

Look for any parts that you didn't like the way you played it. Put the cursor 10 seconds or so before the problem. Pick up your guitar, put your headphones in press the red record button. The track will play and you can hear it and play along, but another track will be created containing what you are playing. Since nothing has changed with the Windows mixer, all the levels should be the same so try to play it similarly to the first time. I find that I must complete a song including error fixes in a session, it wouldn't sound the same if I redid it at a later date.
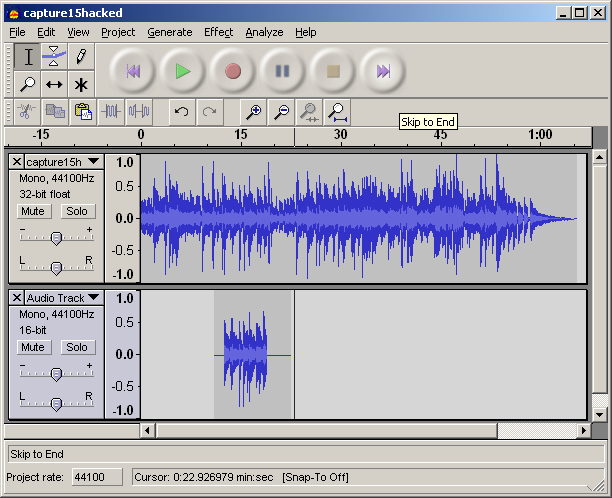
Zoom in closer to the section in question by clicking and dragging a region. Press the toolbutton with the magnifying glass and two arrows point out, the "fit selection in window" button. Get close to the bit you want to fix, but not too close. Now make the final punch selection - the bit you want to remove and replace. The trick is to make your selection off the beat, at a low amplitude so the punch in start and end won't be noticeable when you playback. Once you have made you selection from Edit select Save Selection.

Click on the original track and selection Edit->Restore selection. Press the Silence Selection button and it will remove the target piece. Now click on the new track you just recorded and perform Edit->Restore selection to highlight the target section again. This time press Trim Outside Selection button, everything other than the target section will be removed. It should look as below:
Now press Edit->Select->All (or Ctrl-A) so select everything. From Project select Quick Mix. Viola, the new bit of track has been punched into the original track, correcting your error! Click on the Fit Project in Window button to zoom back out again. Continue this process for each error you are targeting. I recommend you save a lot each separate stage as you go in case you need to go back.
Warning - at no time ever change the length of the track - that is, never delete a section or add a section, just punch bits in and out. If you got the tempo wrong you can't fix it - because when you put this track back with the video it will be out of sync!
Audacity - Clean up the track
Once you are finished, save the track as a new name first. Now play with some of the tools Audacity has. Press Ctrl-A to select all, and from Effect try some of the different sounds. Perhaps a bit of reverb or delay, use the graphic equaliser to drop some mid and boost some bass for example. Do some compression to bring some of the really loud sections down and the really soft sections up (but don't compress too far, guitar playing should be dynamic!) Finally - do this one regardless - Amplify. The default number is the amplification to make the loudest selection the very peak without clipping. If your recording was very soft you can get it up to a normal level using this.
Virtualdub - Remultiplex
Back to Virtualdub, what we need to do now is make the new audio track fit with the video. Open up the capture file. Under Audio select Full Processing Mode. Under Audio again select WAV Audio. Point at you new audio file. From now on, Virtualdub will substitute that audio file instead of the audio that was recorded with the video.
Virtualdub - Trim
Now is the time to trim anything off the front and back of the video...and if you are getting good at this, stuff out of the middle to! Let's start with trimming the front. Press the got to start button |<. Click on the <_ button on the far right of the bottom toolbar. This is the start marker. Now drag the selector up to where you want deleted. Use the left and right arrow keys to fine tune the frame. Now press the other _> end marker. You will see a section highlighted. Press delete. That section is now gone. Repeat the same for trimming the end.
Virtualdub - Final compression
Finally it is time to create the final file. Under Video make sure Full processing mode is selection. Now choose Video->Compression. Select xvid again and press configure. I normally get all smart here and do a two pass render but you're probably too excited now to finish, so I would leave single pass but click on Target Quantizer to change the video to kbps bitrate. The default of 700 is a bit crunchy for my liking, I normally use a final bitrate somewhere 900-1200 depending on how big your original format was and how big you want the file to be.
From Audio select Compression and go back to LAME MP3 and select again say 128kbps mono. Now everything is in place, choose File->Save as AVI. Choose a new filename, sit back and wait for it to render.
Done!
Check your file. Marvel at how "professional" it has turned out. Get onto youtube and upload it for all to see.
Now I know that all seemed rather long winded and unnecessary, but once you understand what you are doing at each step it becomes second nature. Lets revise:
- Use Virtualdub to capture video - choose video from your video recording device and audio direct from your guitar, plugged somehow into your computer.
- Choose a virtualdub video and audio format and flavour. Test the levels, record your video.
- Split off the audio, use audacity to punch in new sections where you made errors and clean up the track with EQ, delay effects, compression, to get the sound you like.
- Recombine the edited audio with the video, trim the video and recompress the video into the final product.


 database