My bestest oldest mate Steve races offroad cars and goes through a lot of tyres. Most of the time when he chucks a set of tyres there is still a lot of tread left, just the edges have been rounded off. That is no good for racing, but fine for wearing down on the road.
In the past I've used some of his smaller rejected tyres, but on his new car he runs 33x12.5 15" on the back. They are huge and very cool. Ever since I got the 4runner I have wanted to be a "hilux wanker" - that is, a hilux with big wheels and high suspension. Now seemed like and appropriate time! :)
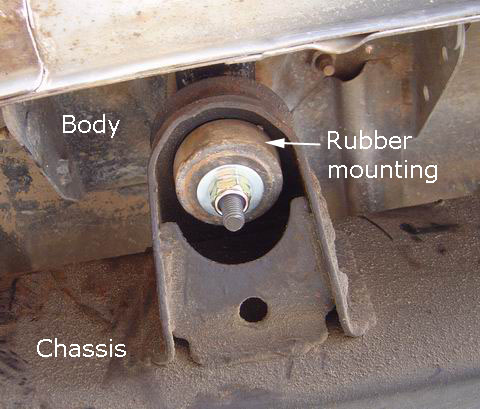
Body bolted on a full chassis.
33's are too big for a normal hilux, they will rub on the body. Taller suspension would help, but I was already running bigger springs on the back and the front torsion bars were wound up to the top (my 4runner has independent front suspension). The next step is body lift.
Let me just mention again that just because I make these modifications doesn't mean that I am an auto design engineer, nor have I put these modifications through crash tests - so just because I have done this doesn't mean it is sensible. All the advice offered here is to be taken at your own risk!
Anyway, Hiluxes (and 4runners, which are just Hilux wagons) run a full chassis and the body is simply bolted to that chassis. There are 10x75mm high tensile bolts for each mounting point, through a rubber chock. By inserting a block between the body and the rubber chock then basically the body is lifted by the height of the block.
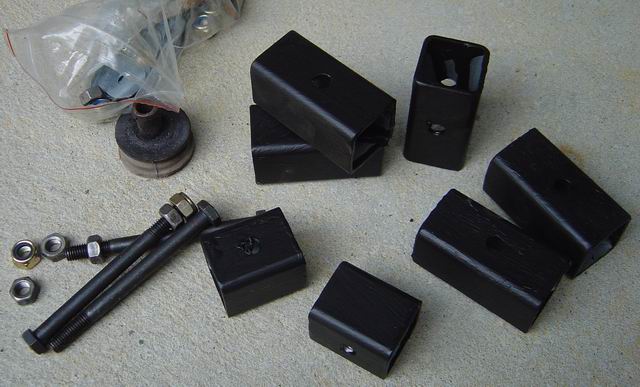
Bits and pieces for a body lift.
There are kits to do body lift but I decided that a block and some longer bolts are pretty cheap, so why bother. I had read not to go up more than 2 inches, you start to run into trouble, so I opted for 40mm. For the chock I used some 80mm lengths of 40x40mm square tube, 3mm wall thickness. Drill some holes through the middle using your drill press and paint them black, done!
The existing bolts are 75mm long M10s so I grabbed some 120mm M10s. 110mm, maybe even 100mm would be adequate in hindsight, the original nuts turn down quite a long way on the original bolt. I used nylon locking nuts; I was a bit concerned because although you can buy high tensile normal nuts you cannot get high tensile nylon locking nuts. I decided that non-high tensile nylon nuts would be better simply from the point of view that they are less likely to vibrate loose - even over a spring washered normal nut.
The existing bolts have a large thick welded on washer to distribute pulling force over a greater area on the top. Make sure you find some big thick washers to replace them - I couldn't find anything so I used to thick washer from underneath the welded on washer. The new chock replaces its function leaving it free to be used elsewhere. Essentially what you want is a big washer above the hole in the body floorpans and a big washer underneath. That way and force up or down won't rip through the body floorpans. I hope that made sense!
I went down the "suck it and see" path ;)
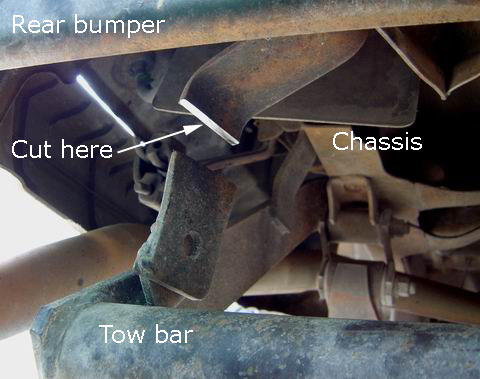
Oops, towbar!
Once the bolts were undone, I put in two of the new long ones, loose. Just in case the body decided to go somewhere I didn't want it to... I put a jack under the body and started lifting. The body started raising, not particularly level, I guess it is big heavy bits of tinplate spot welded together - there will be plenty of flex. I slipped the first couple of lifting chocks into the middle, no dramas. The back however didn't go up so easily. Upon closer inspection I discovered that the towbar was connected to both the chassis *and* the body.
Now the towbar on the hilux is pretty dodgy; a previous owner must have tried to pull a stump out with a chain - and bent the towbar. So it didn't bother me too much to cut the link between the chassis and the body. Maybe one day I will weld a chunk of metal back in the gap.
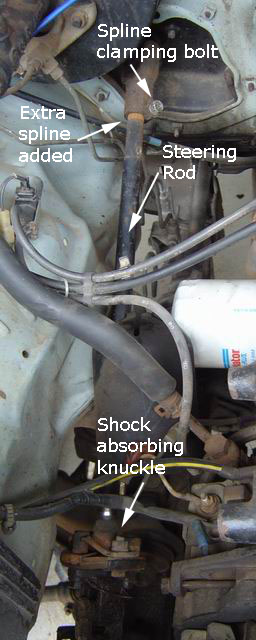
Steering change.
Well other than the towbar, up the 'lux went by 40mm. When the body goes up but the chassis stays put, anything that is connected to both is going to have an issue. For instance any wiring between the chassis and the body has to be able to be extended by 40mm. Brake lines need to be able to take it too. Pretty much everything was happy to take the 40mm, except a few things.
The steering took it but I decided to give it a helping hand. There is a spline clamp connection between the steering rod and the steering head. By backing off the clamp and letting out the steering rod a little the tension of the lift was released. The steering knuckle down the bottom has a rubber mount, probably for both steering shock absorbing and when the adjustable steering column is adjusted. That too takes a bit of slack. Steering sorted.

Gearstick will require a bit of bending.
The gearstick is another issue. There is a big kink in the shaft so that the stick is closer to the driver. With 40mm lift that kink now hits the body. Hoick it out and put it on your anvil. The trick is to belt some of the kink out of it. Put it down against the bend and smack it with a gympie like you were straightening a bent nail.
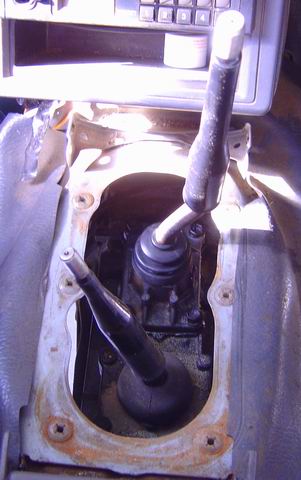
Gearsticks location.
Okay, a really really thick bent nail, one that you wouldn't just throw over your shoulder and reach for the next ;)
It will take a lot of heavy blows, don't aim to completely straighten it or you will be banging your hand against the dash when you ram 3rd gear. Aim for halfway towards straight. As you can see in the photo (click to enlarge, as with all photos on this page) with the gearstick in neutral there is plenty more clearance - which you will need it for 5th and reverse. Gearstick sorted.
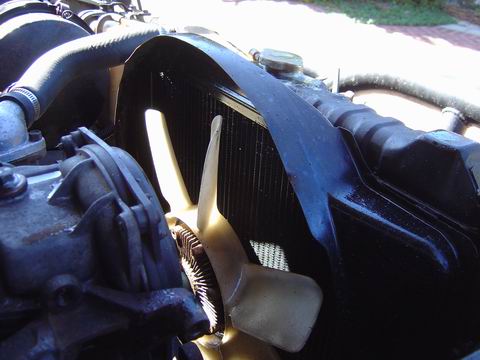
Fan now 40mm down from the shroud.
Onto the engine bay, fan specifically. This one got me unexpectedly. I had fitted a shroud on the radiator a few years back which hugged the fan nice and tight. Engine attached to chassis, radiator and shroud attached to body. Fan now locking up against the shroud. Oh dear.
Fortunately the shroud is a two parts and upon removal of the lower the fan no longer contacts the shroud. Lucky. The radiator hoses also have the same problem but they are long enough and rubber enough that they took up the slack. All the electrical cables also had enough slack, no dramas there. Engine bay sorted.
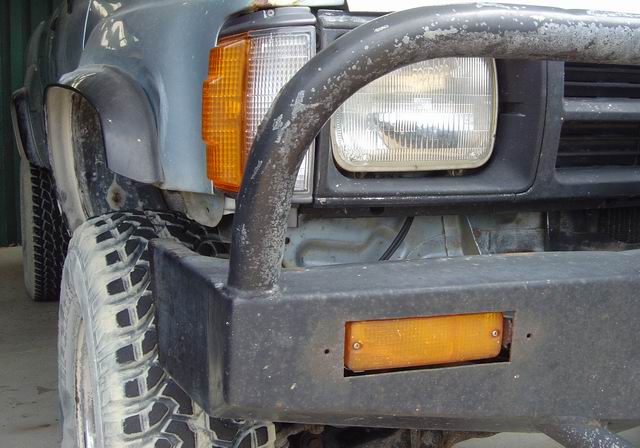
Bullbar is mounted to the chassis.
On the front there's another issue with the bullbar - it is connected to the chassis. Not a specific problem, it just looks silly. The fix is to take it off and make a new mounting bracket for it, one that is 40mm lower (so it mounts 40mm higher). However I've never really liked the bullbar, it is steel and therefore heavy, it is bent from an accident from the previous owner and the existing mounting is flimsy. So for now, I'll leave it and keep an eye out for a nice aluminium one, or even just a plain 'ole standard bumper.
Finally, time for the wheels. Sadly although the rims on the car were 15" in diameter, they were only 7" in width. 8" are required for 33" tyres. Fair enough, I mean, they are 315mm wide!
Be careful, there are many models of cars that have the same 6 stud pattern as a Tojo, however they have different offsets. If you put a Nissan rim on a Hilux the tyre will pop out of the guard quite a lot, making it illegal unless you fit some big guard extensions - and with 33"s, we're talking really big extensions. As it was I had the 33"s fitted to boring steel painted white Sunraysia rims for Toyota and even then they nearly popped out my rubber guard extensions.
Most importantly, the wheels did not rub on the body from lock to lock.
So all in all, fitting big wheels to Hiluxes isn't as straight forward as simply bolting them up, but if plod your way through and you too can be a Hilux wanker ;)
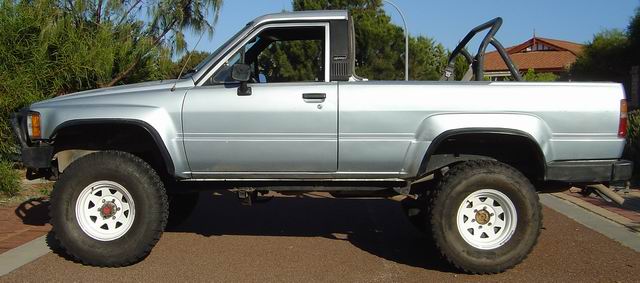
Big wheels on the Hilux.


 database