So I'd nipped out by myself one Saturday to test some changes aimed at improving the "ease" of starting the big bore. While testing a ugly new problem reared its head - the bike was stuck in 2nd gear :(
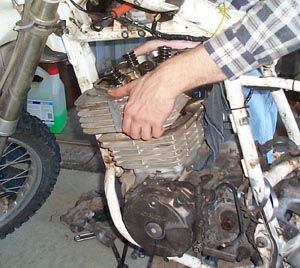
On arrival home closer inspection was undertaken. The foot selector moved up and down okay, it just didn't do anything. The clutch cover was whipped off for a closer look.
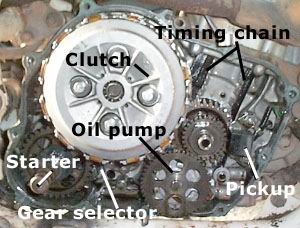
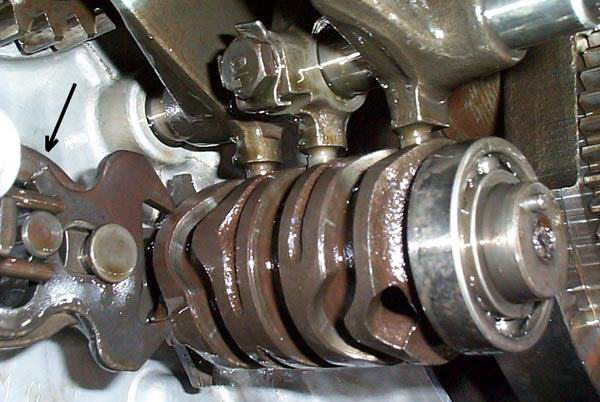
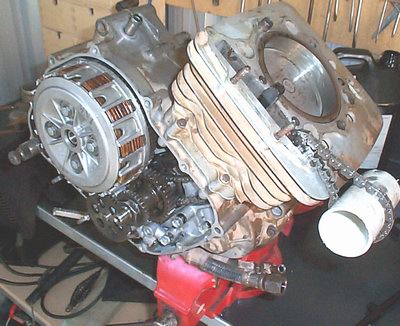
Under the clutch cover.
A socket on the back of the gear selector drum reveals all cogs are working, selectable and accounted for. *however*, the foot selector shaft did not be connected to the drum anymore.
It sounds pretty simple but XR's use an internal gear selector mechanism. You have to split the crankcase to get to it. In order to split the crank case you have to remove the barrel. In order to remove the barrel you need to remove the head. In order to remove...
I think you've got the gist now. For the sake of a circlip or a nut that has unwound or some other petty nastiness you have to do the equivalent of a rebuild.

The end of the gear selector, the stopper plate and shift pawl. The guts of the selector (the shift drum and spindle assembly) are *inside* the engine...
So remove all the bits that join the engine to the frame; clutch cables, wiring, carby, exhaust, levers, etc. The exhaust proved to be a bugger, the muffler didn't really want to separate from the headers. Dropping the monoshock off and removing the airbox allows the full exhaust system to be removed.
It was close, but no. You have to drop the engine mounts to get the cap off.
Removing the top end while still in the frame seemed like a good idea. However no amount of wiggling and repositioning will give you enough room to pop the cylinder head cover off. With all the engine mounts removed the engine dropped a centimeter and she slipped out. Saves having to fuly remove the engine.
Spend a few moments to examine the timing marks. There are two obvious ones on the cam gear, the crank timing mark is cunningly hidden on the harmonic balancer, on the other side of the engine.
With 4-stroke engines timing is a part of life. If you don't know what timing is, I'm surprised you made it this far. Head off for a while and read up about the operation of 4 strokes, then come back here ;)
Take a couple of photos so that you know what it should look like when you chuck it back together.

Have a quick study of the timing marks before dropping the cam out.
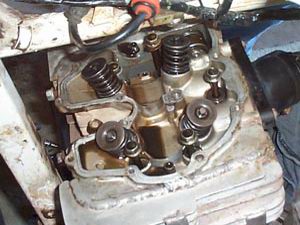
The top end engine configuration consists of an over head cam spinning in two end roller bearings and an integral cast centre bearing. There are four cam lobes, one for each valve. A rocker sits above the cam and an assisting sub-rocker arm pushes down on the top of the valve.
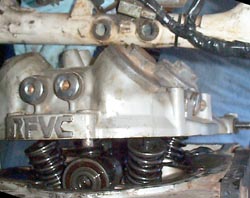
 The top view of the head. |
 Underneath the cap. |
JAW grabs the head, wobbles it off the locators and plonks it on the bench for inspection.
With that out of the way it's time to nip the head off. Watch out for the two little nuts on the outside of the engine.
This engine alledgedly had been bored out and this troubled JAW. How easy is it going to be to get parts for it? Once the head was cracked and removed I was greatly relieved to see a nice copper head gasket.
Copper gaskets can be re-used - the technique is to anneal it first. This means
heating it up red hot and then quenching it in water. They go hard in operation,
annealing will make them go soft again.
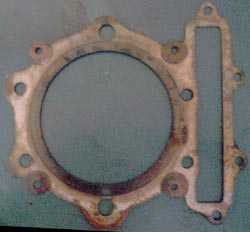
The copper head gasket. Anneal it and reuse. And what's the real capacity JAW? bore=96.89mm, stroke=80.17mm giving a total displacement of 591cc. It's not a 630 afterall, she's just a stocker.

There is is, but still only halfway to the problem...
The engine is now fairly simple to remove from the frame and pop into the vice on the bench. There is something very, very cool about having a single pot big bored air cooler 4 stroke engine sitting in your vice on your bench in your shed. "UG!".
Time to inspect parts, write up a list on your white board. For me it was "valves out and re-lap. Separate the exhaust. Reweld that broken engine mount. Lightly sand the clutch operating shaft, it's a bit stiff. Get some new bushes in that shock."
The clutch plates are okay but the clutch housing and pressure plate are a bit worn. Since the clutch hasn't felt shuddery and the cost of new parts is likely to be expensive, it will have to do.
Besides, the clutch is a reasonably easy job that can be done any time.
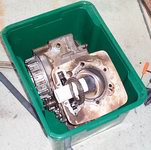
Boxed up and taken away for a good rattlegunning.
The main clutch bolt proves difficult however. Jigs and braces and Wile E Coyote hare brained schemes cannot break the nut on the cutch housing. Always a pain these things as the engine spins while you try to undo the nut.
Fortunately a mate has access to a rattlegun. "Leave it JAW, I'll take it to work and rattle gun it off. I'll do the harmonic balancer and crank nut while I'm at it, undoubtably they will be hard to remove as well. I'll drop it off Monday, you pull the rest down and I'll come past for another look after that."
Good to have mates in the game!
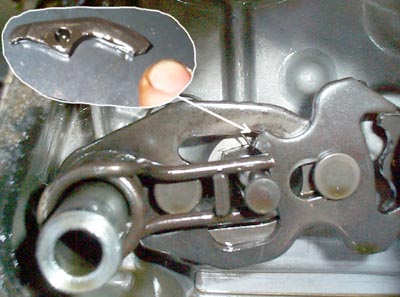
ah HA! An important piece is clean broken off the gearshift spindle.
With the clutch and crankshaft nuts rattle gunned off things were looking brighter. Until it was time to remove the alternator rotor. Sure the bolt comes out easy but you need have a puller to remove the rotor. Not one of your normal claw type put a wind in bolt arrangement.
I didn't have one but that didn't stop the crankcase being separated. Make sure you find every last one of those pesky 5mm allen key bolts, and drop off the shift pawl and the stopper plate. I was convinced there were a few other parts trying to keep it together but no, it was just the dowel/locators being stubborn. A bit of unheeded hammer and screwdriver violence at the engine mount points (where the 3 dowels are) soon saw an end to the crankcase being one piece.
So what was in there JAW? Why were you stuck in second gear? Well as the photo plainly shows a piece of the gearshift spindle assembly has clean snapped off. Bad luck that. May have been my continous stand-on-the-selector to change down a gear, but it has always been more difficult to go down gears than up. Probably a long time pre-existing weakspot, half bent already, I just happened to be the one to finally finish it off.
Fortunately the broken piece didn't go anywhere nasty and do further damage.
What does the gearshift spindle do? It transfers foot selects from the selector shaft to the shift drum. If you are familiar with the operation of car gearboxes then it will be apparent what the shift drum does. As it rotates, the worm holes in the drum itself force the selector rods backwards and forwards, working either up through the gears or down through the gears. Cogswapping is otherwise the same. Nifty huh? :)
Now comes the hard part - deciding what else is going to be replaced or tweaked up while the engine is completely dismantled...
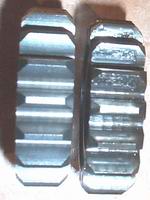
New gear, Old gear.
With all the pieces neatly piled and organised on the bench it was time for my mate to do an inspection. Check all bearings. If when you rotate them you feel anything - bumpiness, grinding, notchiness - replace them. Bearings are cheap. Replace seals that seems stiff. Just have a good hard look. An interesting one I found was the second gear cog - it was like it was coming apart. On fuirther research it seems that Oil surface tension from "bad" oil can cause the case hardening to come off. I'd been wondering why second gear made a nasty grinding noise. No doubt failure was on it's way!
So the list added up (AUD2003) to $130 top gasket set, $90 gear selector spindle, $70 in assorted bearings, $150 for new 2nd gear set, $30 in some oil seals. The inside was suprisingly good - rings were as new, main bearings as new also. It would seem the engine had been down not that long ago. Since this is just a "cheapy" bike (?!) I kept the cost to what was needed only; the nice to haves will stay nice to have.
Replacing bearings scared me at first, but in hindsight it was a snap. I used my little propane blow torch to warm the area around the bearing up a bit, hot to touch but not so that you are going to get 3rd degree burns. All bearings can be tapped out from the back, and when when the surrounding area is warm they come out with a few sharp knocks. I did both the balance shaft bearings and the counter shaft non drive end.
To put new bearings in, freeze them overnight. Grab yourself a socket the same size as the outer race of the bearing. Line it up in the crackcase sitting square and with the socket and a hammer knock it home. With any luck being much colder it will practically drop in like mine did.
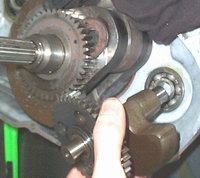
Fitting the balance shaft back into the freshly popped in new bearing.
"What's the balance shaft JAW?" Larger capacity engines generally have them to counteract some of the vibrations that would otherwise shake your engine to bits. Basically the big counterweight on the back of the crank takes the main brunt of the out-of-balance action that is in a piston engine, and the balance shaft takes out most of the other harmonic vibrations that the counterweight does do. Make sense? :)
The balance shaft must be timed correctly to the crank - otherwise it it would cause worse vibrations than it fixes! The balance shaft has a direct drive to the crank drive. It uses a very cute split & sprung gear that puts force on the leading *and* trailing edge of the crank cog. To stop any backlash I guess. Line up the timing marks, use a big screwdriver to force the cogs apart and slot it back in!
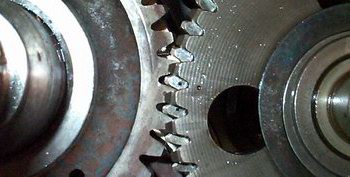
Too easy - the marks on the split balance shaft under gear (right)and the marks on the top gear line up to keep the balance shaft timed correctly.
(As with any balance shaft you could leave it out if you want to take a gamble - it has mass and therefore the engine can't rev as fast with it in place. However with it out there is a chance the engine may vibrate itself into oblivion - but I bet it would have a really cool lumpy idle though ;))
With much fiddling around the gearbox goes back together in one half of crankcase. Yes, you will fiddle about. Mind your thrust washers, keep 'em in the right place. Which of course you kept together and took photos of anyhow didn't you?
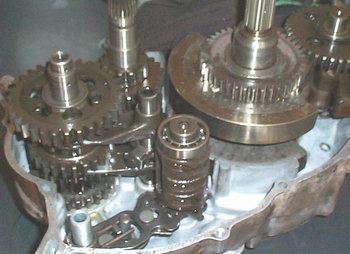
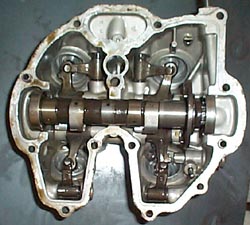
The internals, just before putting the crankcase back together.
A nice shot here of the completed internals. You've got the balance shaft far right connected to the crank, and far left is the counter shaft with it's gears next to the main shaft with its gears. Selector forks just below that with the shift drum underneath and that pesky gear selector spindle in the bottom left. Grr! You little bugger!
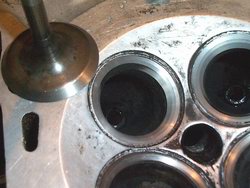
The nicely refaced valves and 3-cut seats.
In the meantime the head was stripped down. Standard stuff, use your valve g-clamp to get the valves out. Clean up the coke in the head and lap the valves back in.
When you find, like I did, that after you have been lapping back and forth, back and forth with your little suction cup lapstick it hasn't quite touched all of the valve seat then get it down to the head shop. For $40 you'll get some fresh 3 cut valve seats and some nicely refaced valves. Pop on the new valve stem oils seals, pour oil over everything and put the valves back in!
How do you get valves in an out? What have you been doing all your life! You'll pick up a valve spring compression tool like this one for around $20. It is like a g-clamp except it has a quick release handle - you wind the valve face adjustment up until when pushed together it has pressed the valve spring down far enough that the collets can come off. Putting the valves back in is simply the reverse procedure...
A valve spring compressor
...sadly when the coke was removed there was a tiny little crack between an exhaust and intake valve. This caused me great concern. While speak to Heads'r'Us the guru got out his magnifying glass and basically said "pfft" and explained that it was nothing to be concerned about. It was superficial and there was no way the valve seat was going to let go. If it was water cooled then water might have found a way in, but being aircooled I got the "pfft" call.
Skipping ahead, the crankcase is back together and the clutch, starter and main drive is back on. The barrel gets bolted up - don't forget to loop the timing chain through!

The underside of the head. Note the extra fins welded on for "more cooling". Desert racing anyone?
The clutch and starter are such interesting clever little things that I will save them for their own stories. You'll probably forget the order in which things go back on, but don't worry, when you've put the main gear on, torqued that nut up, put the clutch on, installed all the plates and springs and cover *then* realised you needed to have the timing chain on first - you'll get good practise at these things ;)
Examination and measuring up the ring gap showed the rings to be close on brand spankers. A light hone of the barrel was performed to make sure she's not shiny - just enough honage (did I just make up a word?) to scuff all surfaces.
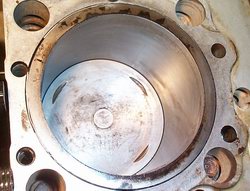
Looking down the bore...
Sure, there will be some deeper scratches but don't try to take them out - leave that for the next rebore. Whats a hone? Man, I'm not going to explain everything to you this time...
We're getting close now. Just a matter of bolting up the head, and popping the rotor, clutch and valve covers back on. In fact I was so excited at this stage I forgot to take any photos. Woops ;)
The complete engine is not all that heavy and slotted back into the frame easily. A bolt tighten here, and oil line there, here a connector there a connector everywhere a connector. "Kick her in the guts Barry."
Not being a n00b to the whole engine teardown scene a great concern of mine was seeing oil pressure at the head before it starts. kickedy kickedy kick. and some more kicks. With the spark plug out of course...
Clutch and stuff back on, barrel torqued up.
And did you think I could see oil pressure coming out of the end of the external head line? (which I had left unconnected) Nup. So I ring up my guru mate "Hey I'm kickin' but I'm not seeing any oil pressure?!" "Yeah JAW, you probably won't. Start it, it will be okay for 30 seconds with no oil pressure."
She fires up easy. I've got no exhaust and only barebones bolts are back in - just in case I need to pull it out again. She's sounding good. I'm happy. I'm watching for oil to start pissing out the end of the head pipe. I'm counting. I'm waiting. I get to 30. D'oh! I shut her off.
I ring my mate again. "Doesn't look as if it is priming? Any thoughts before I pull it back down again to re-check the oil pump?" "Um, pull out the oil filter and pack as much oil in there as you can. That's about it, they don't need to be primed as such."
Boomphf, she's alive again with oil packed in. I'm waiting. I'm counting. Again. Then suddenly I see pressure. Yah!
I bolt all the rest of the stuff up, and jump on her for a spin around the block. What can I say, she's back to her old self again and I'm ready for the next big ride.


 database