LEDs as ceiling down lights have a lot of great features - highly efficient, run cool, good light...but are they the way of the future? I put some in my house, and learnt some stuff that I'll tell you all about!
Design
All the halogen down light fittings in my house were corroded and needed to be replaced; I decided rather than putting in new fittings, I'd try LED down lights. The first problem - how many watts should you use to replace a 30W or 50W halogen? There was no definitive guide when I started looking, so some rough calculations from light/energy specifications for the two types of lights showed me you need around 9-12W of LED to do the job of a 50W halogen. In 2010, you couldn't get 9 or 12W LED down lights in Australia. So I turned my attention to our neighbours - China.
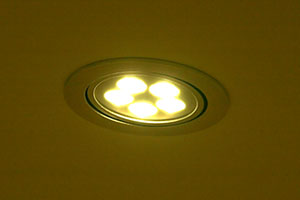
A 5W LED down light - 5 x 1W LEDs in a neat aluminium package.
I found a website that not only sold up to 18W LED down lights, but were reasonably priced too. For example you are looking at AUD$36(2010) for 12W and AUD$20(2010) for 5W. Delivery added about $10 to each. They look quite schmick in an aluminium can, but there are important considerations besides power - beam angle and colour temperature. Colour temperature for me was a no-brainer, I went with "warm white" (3500K) instead of "pure white" (6500K). To me all the non-incandescent style lights are too blue, so getting them to be more yellow is a good thing.
Beam angle is the problem. LEDs by their nature are very directional, and it is the lens they put in front of the LED that spreads the light. I can report that the widest angle they do, 60°, is still pretty directional, you won't get as good coverage as a 60° halogen - it will be spotty and bright in the middle and then fade off fairly quickly on the perimeter. It's not bad, but you will need to have them closer together than halogens for an even distribution.
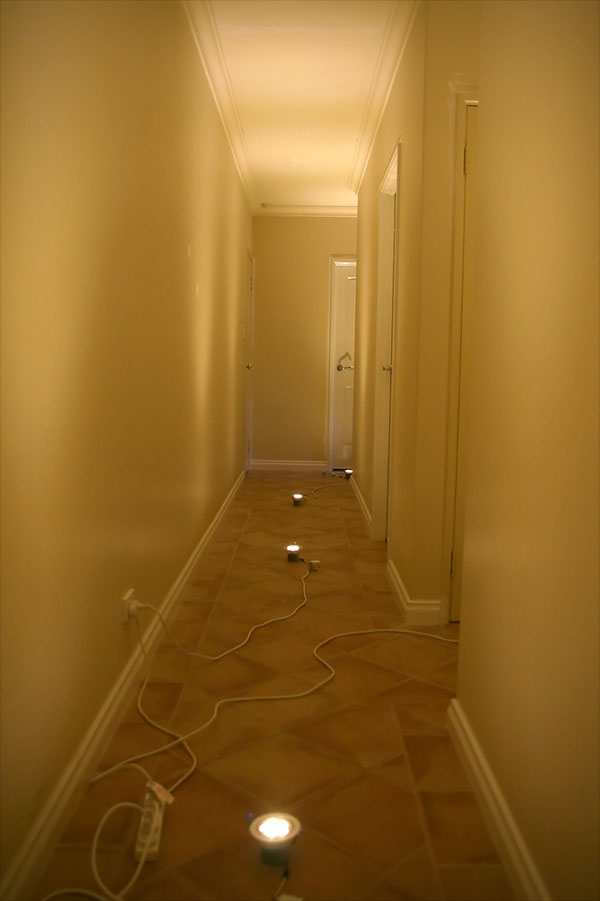
Hallway upside-down test to work out spacings.
The first set I installed were to replace 6 halogens in a void (5m high roof), I went with 12W. They are slightly brighter than 50W halogens; I'd say for a 5m high roof stick with 9W at 2m spacings. No problem with the beam spread for that distance - so, success.
Next I tried a trickier install, a hallway. The existing lighting consisted of two incandescent oyster lights which didn't reach around corners, or into cupboards along the hallway. For a normal ceiling of 2.5m I calculated that 5W would be sufficient. It is. But to get a good spacing, well, I just wasn't sure. No problem, do an upside-down test!
I temporarily wired them up and switched them on, on the floor pointing up. I observed how the light looked on the ceiling - what was the coverage like? It turned out it wasn't amazing, but the geometry of the hall meant that six lights with a maximum spacing of about 1.8m was a better call than nine lights at 1.5m spacing. I made the right call - any more than six would have felt too many and too bright, but the light is still "patchy" - there are slightly darker areas, the coverage is not consistent. If you are thinking of a hallway, I'd say 5W at about 1.6-1.7m will give you a good coverage, but it will be quite bright. I reckon a 5W LED is about the same as a 40W olde school incandescent.
Note that if you were putting downlights above a bench you will need to do the upside-down test with the lights on the bench of course...and the LED power requirement will drop off...but the spread angle will cause you to need closer spacings for even coverage.
Implementation
Okay, you know how it works. You must be a licensed electrician to work on the fixed wiring in your house. Okay? Interestingly though, if you are doing a direct halogen swap out, I believe it *is* a DIY job. Basically you are plugging a device (LED down light) into a socket. And if you had to wire your own plug onto the LED down light, well, that's just like replacing the plug on your fridge. You don't need to be a licenced electrician to do that.
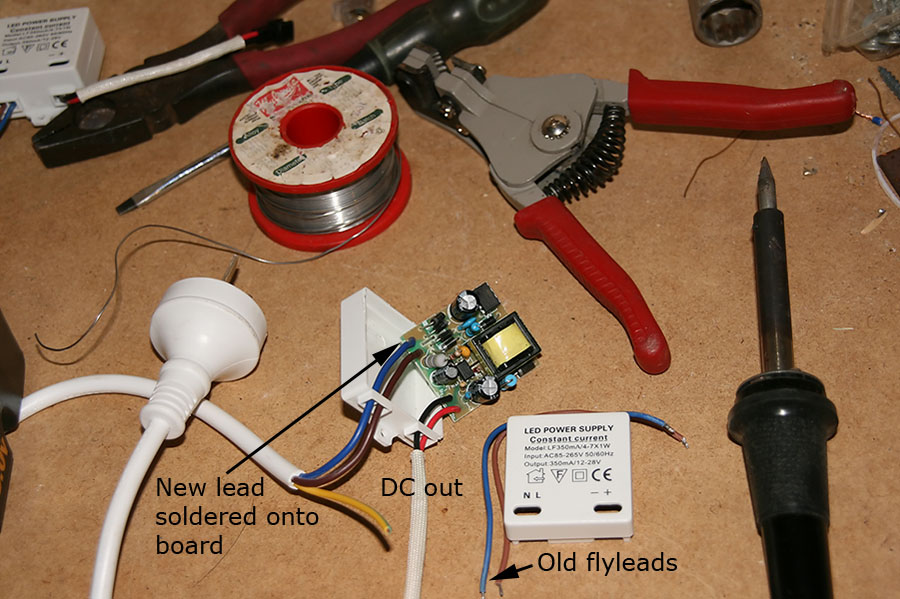
Some minor modifications to make the unit plug'n'play.
The LED down lights come with a driver - it's just a solid state voltage converter that will drop your 110-250VAC down to the say 12VDC needed to power the LEDs. Unfortunately, it has some tiny fly leads on it for connection to 250VAC. Now you _could_ use a death lead and join it onto the fly leads with connectors (death lead is, um, I know, pretend you cut the lead off your kettle, and bared the ends. In the days before RCDs you could plug that in the wall, turn it on holding the exposed ends, and, well, death. Well okay even with an RCD if you were to hold only the active and the neutral and be completely shielded from earth you _could_ still kill yourself, please don't. But I digress.) AS3000 doesn't permit joins in flexible cables except with "proper" cable connectors...so, de-solder the fly leads and solder a death lead straight to the driver!
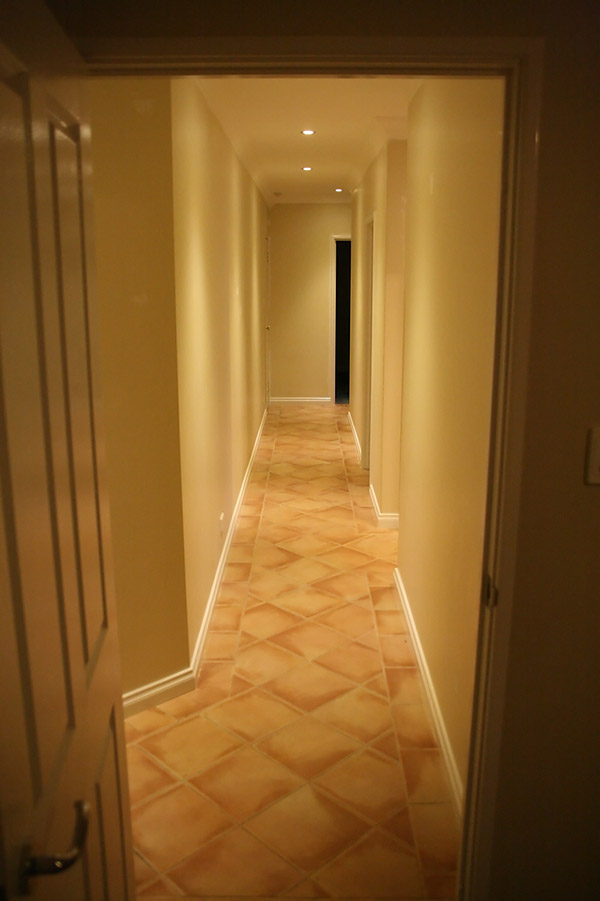
The finished hallway - some patchy areas, but the light is now getting where I want it to be.
There are a few issues in doing this which will push the AS3000 friendship. Firstly, a lead longer than 2.5m is to be considered as fixed wiring. So don't use longer than 2.5m. Where a 250VAC lead comes out of a piece of equipment it is supposed to have a torturous path or something that means you can't pull on the lead and have force pulling on the connection to the board. Well these drivers didn't give me enough room. But, they are so small, and don't need to be bolted down so you would have to hold the driver and pull - unlikely - so I'm going to let this one slip.
Riddle: What is the cheapest way of getting a death lead? If you answered "cut the lead off a broken appliance (still in serviceable condition)" then you answered correctly. If you answered "I've run out of broken appliances so I'll make my own", buh bahm. A socket alone will set you back $5, plus cable, plus time to make it. The correct answer should be "$3 extension cords from your hardware supplier and cut the female end off"! They are pre-wired, moulded plastic, cheap, a "heavy duty"(?!) one is 1.0mm2 which is the lighting spec (AS3000 states a minimum for flexible leads of 0.75mm2, and 1.0mm2 for lighting) and even though it has an earth just don't use it if you don't need to.
So with your lead soldered on and ready to go, make a hole in the ceiling. For a direct halogen replacement, the can will be bigger so use your knife to open up the hole a bit. The down light has two little sprung clips on the side, fold them up, push the down light into the hole, clips pop out and hold in place. If the ceiling is bare and you are cutting a new hole, here is my formula:
- Measure out where you want the centre of the hole to be
- Drill a hole, say 5mm into the ceiling.
- Go into the ceiling, look for the 5mm hole. If the hole is in the middle of nowhere, no battens, all clear, then you are good to go, that hole is the centre of the down light.
- If however you are really close to a batten or something else then the hole isn't the centre, it's off to one side. When you make the big hole, make sure you have this little 5mm hole being on the edge of the main hole.
- Use holesaw/knife and template to cut hole in right spot.
Make sense?

In the roof space...
Now if you are replacing some existing bayonet lights where there is no socket in the roof, then you'll need to have some batten sockets installed. They are fixed wiring, remember what I said about fixed wiring. You get something like I've got here, note that I use 1 socket/one lead/one LED down light, so on this particular end there are three batten sockets series'd up for three down lights. A batten socket costs about $4 from a hardware supplier, electrical wholesaler or you know what, just order them online. For goodness sakes if you _are_ going to do it yourself turn the power off first, double check there is no power before cutting anything. If you don't have RCDs on all circuits in your house, look just don't do it, get RCDs installed first. If you don't know what A and N stand for and which one is blue and which one is brown, just don't do it. If you've never written isolator/breaker phase sequencing logic for 40MW power stations 100km apart connected by a 133kV transmission line, don't do it. Okay maybe that last one is a bit extreme.
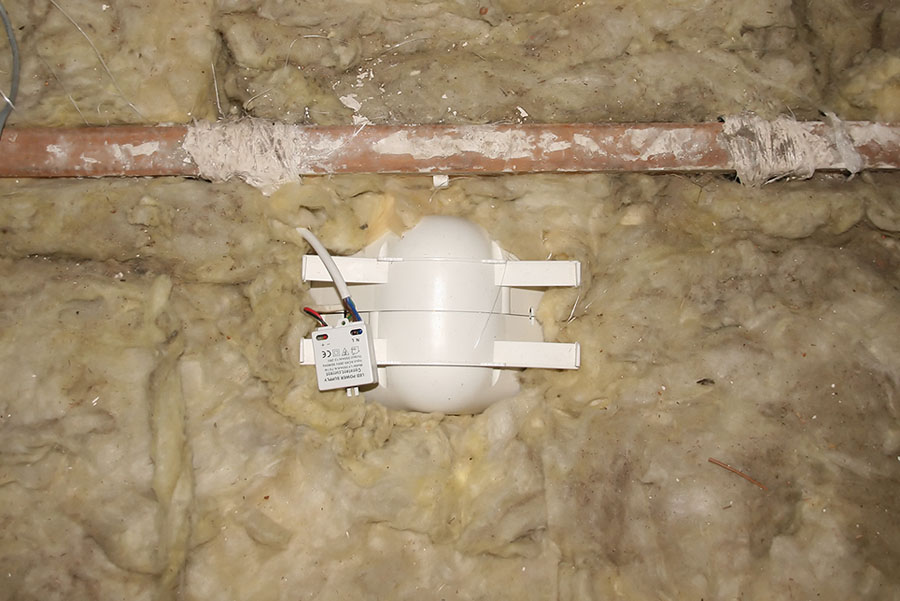
...and tucked away in an AS3000 compliant cover, notice there is room for the driver on top to air, it warms up too.
Another important AS3000 requirement, since the housing insulation debacle of the late 2000's, is clearance around down lights. In 2011 the clearances changed to 200mm. Which is crazy - you are removing way too much insulation! Doubly crazy because AS3000 says "down lights", which the LEDs are, but unlike a halogen that gets to hundreds of degrees, an LED gets to maybe 40-50°C. My roof space is hotter than that in summer!
A great alternative I found were AS3000 complaint shields that once installed over a down light can have insulation packed up to the edges. Excellent! I bought them online for AUD$7(2011) each. Easy to install, in fact they are a great retrofit to any existing halogens, I recommend them.
Conclusions
So there you have it - I'm giving the LEDs one thumb up. They are good, not quite there yet, they need to have a better spread. I don't know why manufacturers insist on putting each individual LED in the same plane, by putting the LEDs on a slightly spherical surface you could get a greater spread. My LEDs are not dimmable, so you need to select power carefully. I'm calling 5W for a standard 2.5m ceiling at around 1.6-1.7m spacing giving an even enough spread. They still feel directional and cast heavy shadows (I installed one in a toilet, looks pretty, but for a bloke standing for number ones, you cast a noticeable shadow). Stick with warm white even though you get more efficiency from pure white, and stick with 60° spread, even if only one photon per hour will actually go out at 60°. Suitable for halls and small rooms, but for a big room needing 20 for good coverage...hmmm...
I await the day when I paint my ceilings with a special white paint that when dry you plug in electrodes and the whole ceiling luminesces, dimmable by remote control! :)
JAW


 database