I made a 2011 new years resolution to ride a push bicycle to the train station and catch the train to work. For reason of exercise and apparently it's "nicer" on the environment.
Problem is, I hadn't ridden a push bike for years and no longer had one. Another problem is I didn't like the idea of buying a shiny new bike and leaving it at the train station.
First build - a bit too small (and girly).
Well, no problem at all - my local "recycle station" (rubbish tip) usually has bikes, I'll get a junky old banger. If it gets stolen in the first week, no great loss. If I discover that my new years resolution falls by the wayside after a week, also no great loss.
As it turns out I "built" a few iterations of junky old bikes and got right into riding. The great thing about bikes I discovered is that they are like cars; they are mechanical, you can chop and change parts to customise them - and they are a lot cheaper and simpler than a car...good fun!
Select a bike

Second build - better, some work required.
When you go to the rubbish tip, or where-ever you find old junked bikes, snoop around for a good frame. Almost universally, wheels are interchangeable between bikes, at least when you stick to the same size rim. You could use smaller or bigger wheels, but getting brakes to work on them would be more trouble than it is worth. I found a nice enough mountain bike frame with a back wheel but no front wheel. Looking at the sidewall of the tyre, the wheel size was 26 inches. I found another bike, with the same size front wheel - so I bought both bikes, $5 :)
The first frames I bought were a bit small, I kept my eyes open and several months later I came across a bigger frame, much better. Try to get a bike that is the right size for you. A good rule of thumb I reckon is if you can raise the seat high enough so that when you are standing over the seat you are on tippy toes, then the frame size is about right.
Wheels
There are alloy wheels and steel wheels; aim for alloy. They are lighter, making riding easier. They also rust less. Squeeze the spokes to make sure there are no broken spokes. On the first back wheel I didn't realise there were a few broken spokes, over a period of time the rim warped to a point where I had to chuck it. If you tap each spoke with a spanner or something, they should all make the same "ting!" sound. I haven't done much experimenting with spoke tension, you can tighten up any dull ting sounding spokes...but really, at $5 a bike, just buy another one, even if it's just for the wheel.
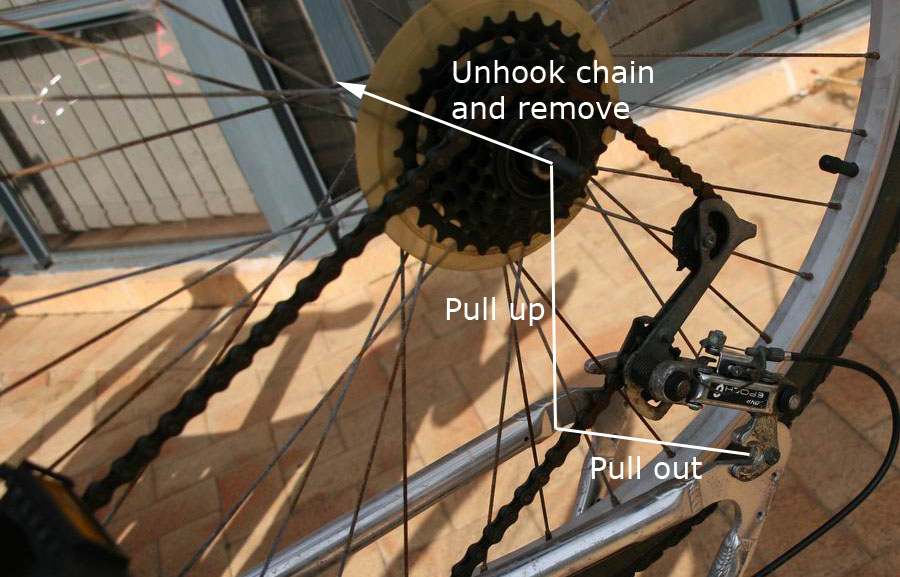
Invariably, the axle will be loose and the tyre will be flat. Pump the tyre up, see if it goes flat overnight. If it does, tubes are pretty cheap - or grab a tube of one of your spare donor bikes that holds air. Turn the bike up-sidedown and take the wheel off. Back off the brake first - usually you can squeeze the brake together, pop the cable holder out, let go and the brake will be loose. Much quicker and easier than undoing the cable. Undo the two nuts on the outside of the axle. On the back, don't undo any of the gear selector nuts and bolts, the wheel will come forward away from the chain - it is just as simple as taking the front off.
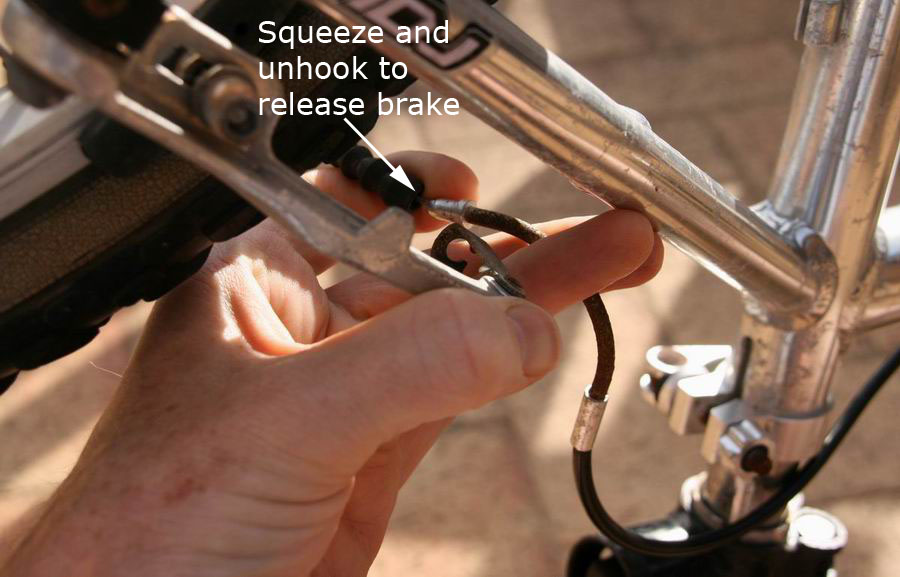
With bike upside-down, squeeze and unhook
to release brake...
...undo outer axle nuts and pull wheel
out, up & off.

Axle setup.
Typically there will now be a bearing retainer nut thing, with another nut that locks it in place. On one side of the axle, undo the locking nut and take it off, the bearing retainer nut thing will come off easily by hand. Carefully undo it, some axles just have loose ball bearings, you don't want them going everywhere. Some axles have sealed bearings, much nicer. Either way, put some grease in, both sides. You don't have to undo the other side, just pull the axle through the other way. Now tighten the bearing retainer nut thing back up by hand, until it is quite tight. Hold the axle on both sides, try to move it sideways/wobble it. The axle should be tight, you should feel no sideways movement. However, the axles shouldn't feel bitey or gritty when you rotate it. If you hold the axle on both sides and spin the wheel, it should spin freely for quite some time.

Crank arrangement - similar. Check for sideways movement and tighten accordingly.
Now screw the locking nut back on. Be careful; use a spanner to hold the bearing retainer nut thing in place, otherwise when the locking nut is getting tight it will turn the retainer in as well. Then the bearing will have too much force and be bitey/gritty.
The crank (where the pedals meet in the middle) has a similar arrangement. There will be a big locking nut (probably more like a sleeve with a couple of cut-out sections in it) and a wide bearing retainer thing. Same deal, undo the locking nut, unwind the bearing retainer, chuck in some grease both sides, tighten it back up until the bearing is nice and tight but not bitey/gritty. Screw the locking nut into place.
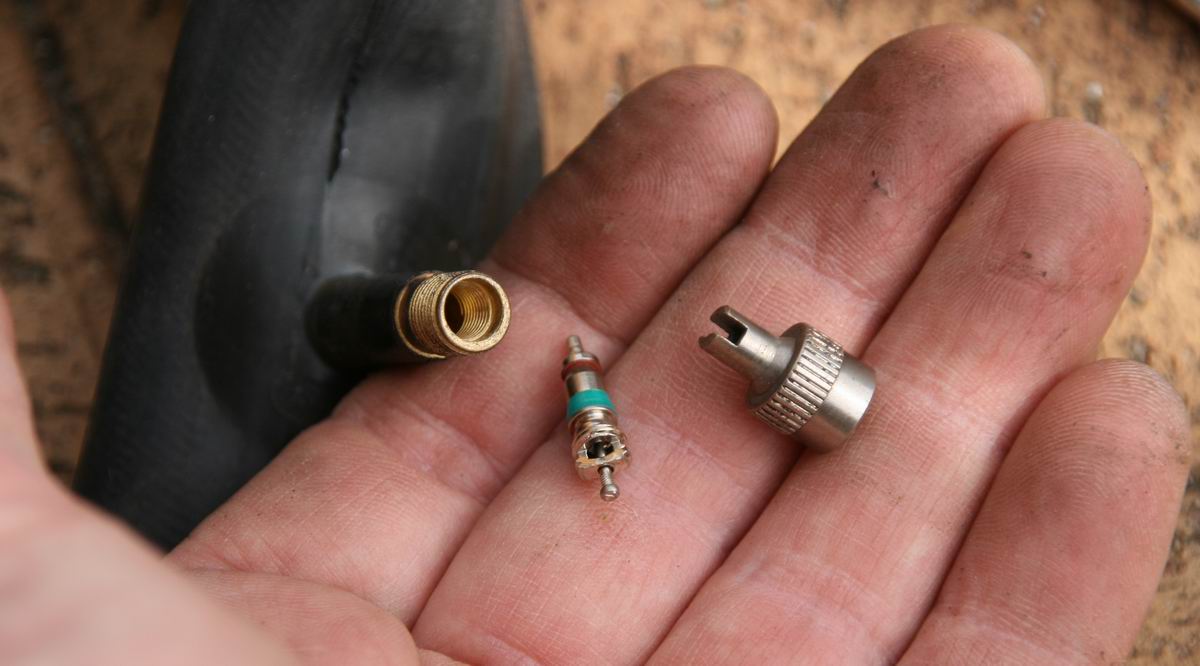
Unscrew valve when taking tubes in and out.
If, like me, you are just going to be riding on roads and pavement, use the skinniest and slickest tyres you found. Throw away those big lairy knobby mountain bikes tyres, they just make a lot of noise and create drag. Changing tyres is really easy - use two blunt levers, the back end of two spoons is good, screwdrivers if you must but don't pierce the inner tube. Use them to force the tyre past the rim, once you've got about 20cm off you'll be able to do it by hand. Remove the tube.

Get the tyre past the rim beam with a tool,
then pull off with your hands.
Tip - get yourself a tube valve socket to make removing tubes quick and easy - I usually buy a couple of metal valve covers that have a valve socket on the back. Push it into the valve and unscrew the valve guts. Air comes out real fast, and makes working the tube easy because air can come in and out as you pull and push. Now take the tyre off completely, you'll probably be able to do this by hand. Do the reverse procedure to put the new tyre on! Careful not to pinch the tube.
Pump the tyre up *hard*. Start with a bit of air, give it a squeeze all way round to make sure the tube isn't geting pinched. When fully inflated, you should be only just able to push the tyre down with your thumb. When you sit on the bike, a tiny bulge where it hits the road. The harder the better - the easier the ride will be - well, to a limit :) I pump my 1.95 inch wide tyres up to 60PSI.
Brakes
Also invariably, the brakes will be poorly adjusted. Have no fear, nothing to it.
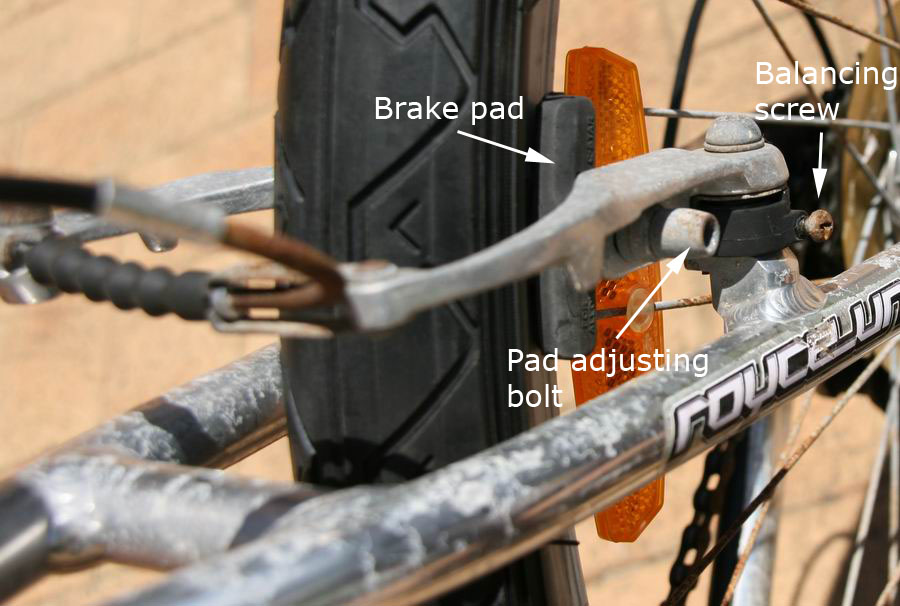
Brake arrangement.
Generally there will be a pad on either side held in position by a bolt. First up, back off the pads, and realign them. They should be running in the same line as the rim, and should contact the rim nice'n'central when squeezed. Back off the cable clamp on the outter brake arm, and squeeze the brakes with your hand so they aren't touching the rim, but are reasonably close. Tighten up the cable clamp, that's a good start. You can trim the cable length with the handlebar adjusters if you need to.
Now in any system like this there will be a bit more resistance one side or the other; when you squeeze the brakes and release, one pad will probably be still rubbing against the rim and the other one pops right off. No worries, on all bikes I've ever seen there is an adjustable spring mechanism to adjust the balance. More modern brakes are really easy - tighten/release the balancing screw, pull brake on/off, observe the balance, re-adjust, repeat. In no time you will have the brakes backing off nice and central. Other systems are out there - look carefully at the brake mechanism, work out how the brakes are held in place, so if you can work out how to get a good balance!
Note: if you are using steel rims and they are rusty, give the brake contact surface a good rub down with sandpaper. You brakes won't last a month if you don't, I know!
Gears
Pretty much all bikes worth taking from the tip have a gear derailleur mechanism, on the crank and on the rear wheel. You'll probably need to adjust it :)
First up, get the cable tension right. It will be easy to adjust so you are able to change gears so that you can go from the smallest cog to the biggest cog. The problem is usually the end stops. On the derailleurs there are two screws, each on controls the limit of the derailleur. Select top or bottom gear. Turn one of the screws - you should see it will bring in the derailleur, or push it out. If it doesn't, you are on the screw for the other limit...
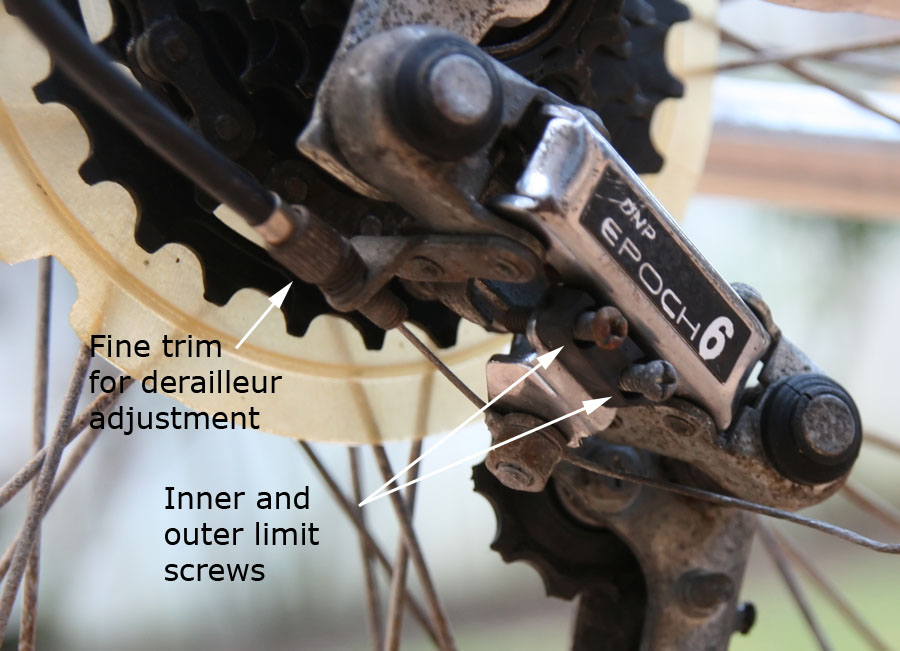
Derailleur adjustment.
You can set it with the bike upsidedown and pedal, but what I do it ride the bike with a screwdriver in my hand. Go all the way to the lowest gear. If it doesn't make it, pull over, adjust the limit out. It goes too far, pull the limit back in. Ride some more, change gears up, change gears down. Did it make it exactly onto the last gear? Adjust again. Repeat for both limits on the front derailleur, and both limits on the back derailleur. Easy!
Because I was riding on the street but all my donor bikes were mountain bike style with low gear ratios, I looked for a wheel that had a higher gearing. The front big cog was 50 teeth, the smallest on the back was 14 teeth. This gives the highest speed/gearing for that bike. Rear cluster gearing fortunately seems to be pretty much identical across bikes, sadly I couldn't find anything smaller than a 14 cog, but I swapped a very worn cluster for a much newer looking one. Even though they were made by different manufacturers, there were interchangeable (it's probably all made in one Chinese factory!) The only problem with changing cluster gears is the hundreds of little ball bearings you'll need to keep your eye on, and the "nut" that holds it all in place. It is a wide circular "nut", with two holes in it designed for a special tool to pull on and off. However, with a drift (say, a strong nail) and a hammer, you can break the seal and then it will unscrew easily. Important note however - IT IS LEFT HAND THREAD. That's because if it was right hand thread, the bumps and vibrations of normal riding would naturally cause it to unscrew...left handed thread means it will naturally screw on...so generally, they are _really_ tight. Careful changing clusters - you are better off just changing full wheels!
Handlebars
The first bike had handlebars with some cool outrigger bull horns on the tips. Because that first bike frame was too small for me, it helped me stretch out a bit more holding on right out the front. I liked riding like that so much I decided to swap them onto the next bike.
First up, disconnect all the cables. Ideally, do this before you adjust everything! I swapped the cables that were on the old bike onto the new bike. You may find however that the way they run down the frame might be different. No problem, so long as you have the length, swap the different sheaths from one cable to the other.
Removing the handlebars is easy. Usually there is a hex bolt on the top of the handlebars, which pulls up a little wedge in the fork tube, which locks the handlebar stem tight in place. Back off the bolt , then push the handlebars _down_ a little bit first to break the seal, then they will pull out easily. Simply fit the new handlebars (isn't it great how everything is the same measurement!) and then readjust all the cables.
Forks

Handlebar arrangement.
Then I started to get carried away. Forks on a mountain bike have suspension, which probably lasted as long as leaving the shop floor. Buy the time bikes reach me, suspension is stuffed - it's just basically a bouncy spring that bottoms out hard when you pull up the front to go up a kerb or something. Suspension adds unnecessary weight to the bike. When you are pushing energy into riding, some of it is wasted compressing the spring. You just don't need front suspension for road biking, the pneumatic tyre is plenty enough suspension.
Same deal for rear suspension, at least however you can wind the spring up until it is almost rock solid. Avoid them for the road I reckon! The first bike was rear suspension, the second was solid. But one of the donor bikes had solid front forks...and whaddaya know, also very interchangeable!
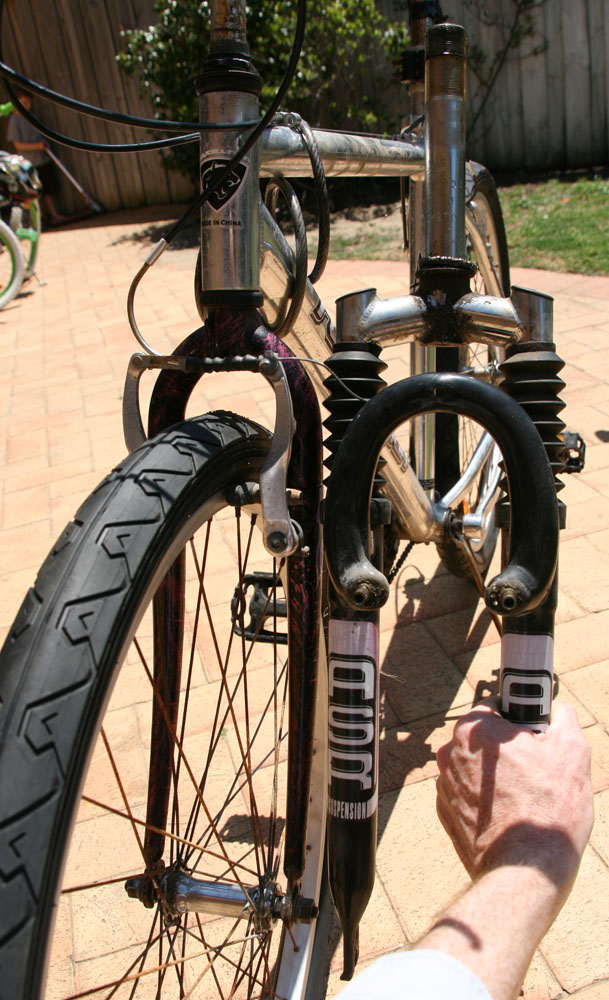
Fork comparison.
My donor forks were slightly shorter (I'm now riding closer to the road) but the stem tube was exactly the same thickness so a direct swap. The threaded part on the top of the tube was longer, so I had to modify the locking nut on the top so it would screw all the way down.
Pulling them off is yet another example of bearing-retainer-locking nut arrangement like everything else that rotates on a bike. Pop the handlebars off. Undo the locking nut on the top of the forks, then undo the bearing retainer thing. This one is a full circle with grips on the edges, no tool required, just twist. The forks will come out the bottom; there is the same bearing setup on the bottom. Swap them over, add some fresh grease top and bottom, screw it all back together so the bearing retainer is tight for no sideways movement, but not too gritty when you turn the steering.
When I was holding both sets of forks in my hand, the extra weight in the suspension ones was quite noticeable. You can feel extra lumps and bumps in the road with a solid fork, but I kinda like that. You _feel_ the road.
As with pretty much everything else so far, the brake mounting pins on the forks were the same on both forks. The brakes on the donor forks weren't as nice as the existing brakes, so no worries, swapped them over too.
Conclusion
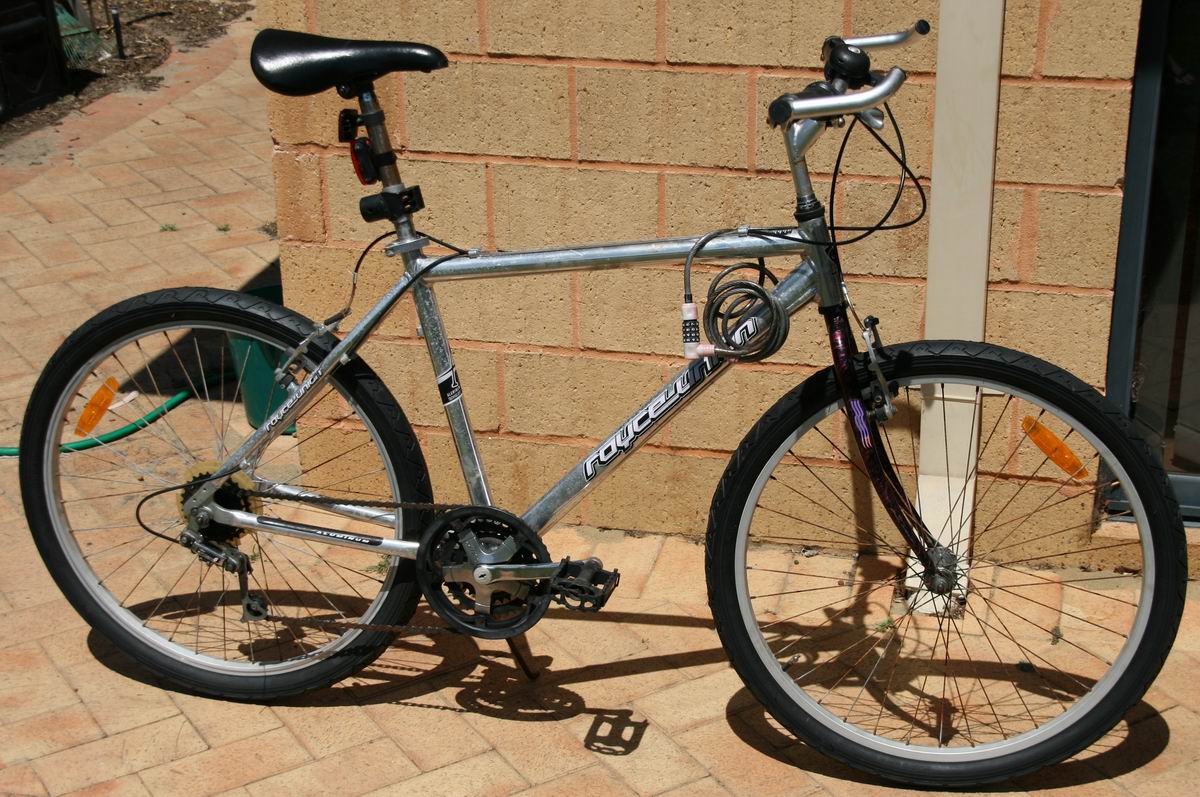
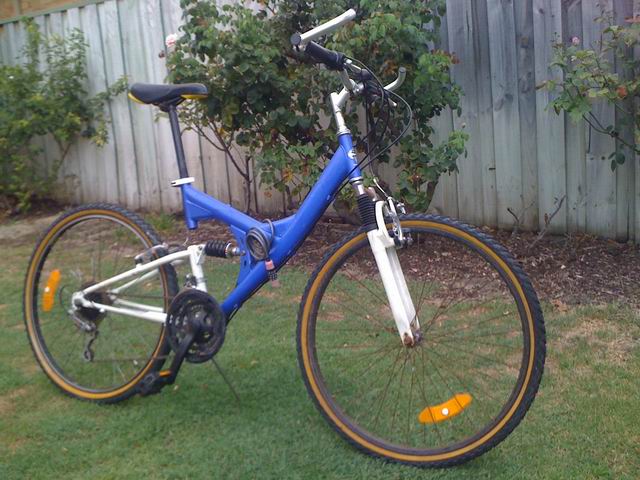
Transformation to "hybrid" (mountain bike crossed with road bike) complete.
What started out as a cheap test actually turned out to be quite fun, and really got me back into riding a pushbike. I learnt that roadside rubbish collections and the recycle station at the rubbish tip are a gold mine for surprisingly good and cheap bikes - if you too are worried about them getting stolen or trashed parked in public places. Maybe don't clean them up too nice!
I hope this has been an entertaining anecdote for you - I'm sure there are plenty of other mods and tricks I didn't write about (or didn't realise, I'm not a bike expert, just an experimentor), but perhaps you got something useful from this. "Doing up" a bike is actually good fun, as is riding them, highly recommended. At the time of writing I'd ridden the blue bike for 8 months, and the second one for a month - my legs have never been so strong! I must admit I'm close to buying a brand new roadbike, set up exactly as I want it (big frame, road gearing, light weight), but only when I'm ready to ride it all the way to work and not just to the train station :)
JAW


 database