Wifey tells me that Bubby says "I need a cubby house in the backyard."
Pretty good going for an 8 month old I thought. So I say, "No worries, I'll start drawing up the plans for one." "Oh no you don't, I will organise a kit cubby. I want this to happen now, not in 10 years time."
Note: I built this in 2004, prices of everything has gone up, a lot.
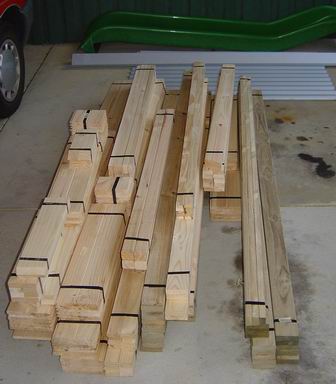
A kit - just a ~$AUD500 (2004) pile of pre-cut wood, delivered. Fibreglass slide was an extra $AUD200.
I'm a bit taken aback, after all, I'd just finished building a proper house (see project:pembee) so how hard would a tiny little cubby be?
However it turned out to be a pretty good call, the kit cubby Wifey ordered was fit for purpose. Let me explain.
Okay, I've just built a house out of big structural pieces of wood. Translate this into a cubby - build it out of big chunks of wood, clad it in expensive fibro cement, etc etc. Basically if I designed a cubby it would be over-engineered, built for cyclonic conditions, and cost _a lot_.
Upon receiving the ~$AUD500 (2004) cubbykraft kit I labelled it "flimsy" - untreated wood, cheap tounge'n'groove cladding, basic flooring - but, really, just what you need. The finished product turned out to be super-strong; no way kids are going to break it, contrary to my original opinions.
I'm estimating around $AUD300 (2004) worth of wood in the kit, the rest of the price being delivery and profit. So although "I could have done it cheaper if I bought the materials myself" I would undoubtably spent more than what was required. To be honest, I wouldn't have designed as good a cubby as theirs either...
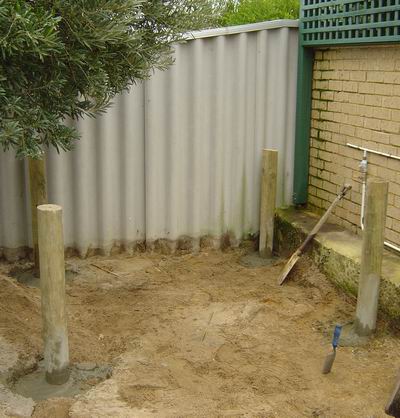
Footings.
The kit is designed to sit on concrete/pavers, you are looking at around $AUD350 (2004) for a 1m raising kit from the manufacturers. I decided I could bring the price of that down myself so I grabbed some CCA H4 150-175 treated pine logs to use as piles with some 90x45 CCA H3 to make the floor joists. Total cost: $AUD150 + $40 (2004) in concrete.
Since the cubby was going to have a sandpit underneath, I spent some time excavating about 1 cubic metre of existing sand. As a footing for the piles, I went a 300mm diameter hole about 300mm deep. Not much really. I used "postcrete", which is basically ready-to-go concrete that you just pour into the hole and add water. To be honest, I wouldn't use it again, simply because I didn't like the fact that I couldn't tell if the concrete was wet and mixed throughout like you can when you are stirring it in a wheelbarrow. Sure, you poke it with a stick to mix it, but you don't get any feeling that it is a good consistency mix. I'm sure however that is taken into account as part of the pre-mix, it is an extra strong brew based on the fact you might not get it fully stirred.
I used a similar technique as I did on the pembee house to build the floor system. Put the first pile in and make sure it is plumb, using your spirit level. Concrete it in. Put in the second pile the correct distance and angle from the first - I went parallel to the fence, again should be plumb. Put the next in at the right distance from the other two, now check the included angle is 90° by either a big setsquare, or calculate what the diagonal should be (a2+b2=c2) and measure it. Jiggle it around until it is plumb *and* square.
The last one then is measured in on the other corner, it be square if the first three were square but measure the diagonals anyway. I had the outside edge of the piles spaced so they lined up with the outside dimensions of the cubby - ie, none of the pile sticks out beyond the cubby floor.
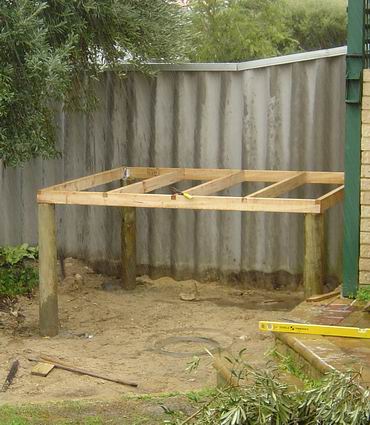
Floor system.
Once the concrete was set enough, I chainsawed them all off level. First work out the lowest one. Using your spirit level from that one to the next, make a mark the height it should be at. Do this for all piles, then cut. If your spirit level is too short, use a length of flat wood with the spirit level on top to check it.
The floor system I made was a 90x45 box on top of the piles, with 3 joists through the middle. I notched the joists into the front and rear bearers to keep it all nice'n'strong.
A bit of metal strap holds the floor system to the top of the piles - it's an uplift thing. If a strong wind gets under the roof, it could pull the house off the piles. By strapping it down, all the nails are *perpendicular* to the uplift force, so they can't get pulled out - like in the case of the floor being nailed down from the top. In hindsight it's probably overkill, a big coach screw through the wood and into the top of the pile - maybe two - would suffice. See - always over engineering. It's in my nature ;) The metal strap+nails was around $AUD20 (2004), whereas 4 big coach screws would probably have been a buck each. Ah, the costs of over-engineering...
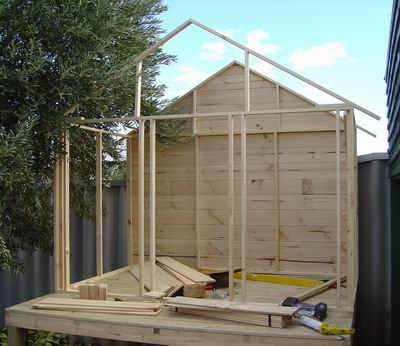
Stud wall style - frames go into place...
Now we're into the kit side of things. I whacked down the decking, using distorted shaft galv nails (50mm galv Timberlok nails). 2 per joist intersection, keeping the lengths of decking 5mm apart.
You make up wall frames, stud wall style, on the ground. Stand 'em up in position, get 'em square and plumb on the floor held in place with clamps, once you are happy screw them together, and to the floor. Everything in the kit is glued and screwed. I think that is what made it really strong - the screw pulls wood pieces together unlike a nail, and once that glue is set, whoa, it's not going *anywhere*. Use a tube of "no more nails" in your caulking gun. A tube will cost you $AUD4 (2004) and a caulking gun $AUD4 if you don't aleady have one, stop thinking about it.
I did have the problem of the back wall being hard up against the fence. Thus I cladded it, stained it, 2 coats of varnish then erected it as a completed unit. The other 3 frames went up uncladded.
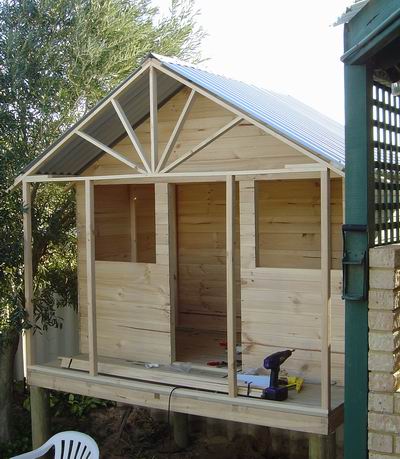
Cladding and roof on.
Four purlins for the roof with some corrugated galv roof sheets tek screwed down. The last sheet needed to be cut narrower which was a pain. I kind of cheated, I cut one sheet in half (in the line of corrugations) and then overlapped it more than usual so that the front lined up with the front. Saved me from having to cut two pieces of sheeting up to the "right" size.
I made the front rising sun/start gable end thingy by copying the kit demo picture. The little balustrade (ie front fence/handrail) is part of the kit, arranged so that I could have a ladder on one side with the slide on the other.
To be totally honest I'm sorry to say but the kit instructions were pretty poor. Fortunately there were pictures in the instructions, so I based my construction on the pictures rather than the notes. I think the manufacturer sells most of his kits pre-assembled. The extra cost was I recall $AUD200 (2004) - probably worth it ;)

Bubs having a quick test run.
There was a heap of "trim" wood included in the kit, but no instructions on its use. I decided to cut it up, in my mitre box, so that wherever there was a butting edge, a piece of trim went over it. A fair bit easier than trying to 45° butt join everything - especially cladding. The trim really finishes off the windows and around the door nicelt. So too did the cute little crosses in the window, which I made from spare wood.
I made the door on the ground and cut it to fit in the door space with a bit of a gap around the sides. Hanging doors is a bit of an art which I haven't yet mastered, so it was a case of plane down, hang, mark tight spots, plane some more, until eventually it fitted nicely. A little door handle, couple of small galv hinges, done. After a few months I took the door off; kiddies like to slam doors a lot and they haven't yet learned the concept of not putting fingers in a door jam. I later saw a much better way of hanginig kiddy use doors that prevents crushed fingers - use big plate fence-style hinges and make the door about 20mm too short on the hinge side. The big plate means 20mm of hinge is exposed, but the 20mm means there is no door jam to put fingers in.
Note the "Bargeboard" ie a strip of wood on the the gable ends of the roof tidies things up nicely. You could use some tin flashing but bargeboard is what came with the kit.
Getting through the varnishing...
So the construction is done. Now, the most hated part - paint it. Argh! I detest painting!
I like the wood look, but pine is too light, so I've gone the stain+varnish path. Since all the pine supplied is not treated for rot or ants, it is essential I seal every last bit of exposed wood. Hence firstly I ragged on the stain (baltic pine colour) until I couldn't find a single piece of pine still looking like pine. Then I applied a coat of varnish to _everything_, inside and out, so no trace of raw pine was exposed to the elements.
The exterior and floor copped two coats of varnish, the interior just one. Because I'm slack, because paintbrushing on 4 litres of paint by hand drives me to despair. Did I mention hate painting?
Paint is expensive too, 2L of stain cost me $AUD50 (2004), 4L of exterior varnish around $AUD120 (2004). I had a little bit of varnish left over which after a year applied another coat to the cubby.

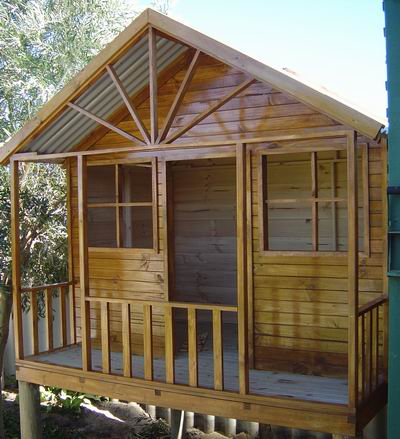
...finished, complete with door, slide, ladder, sandpit.
The slide is bolted up to the front of the deck, and I put some spare CCA pine poles into the ground for the bottom to be bolted to. I don't think slides should just sit on the ground, it should be fastened down. For windy conditions, and so the kids don't try to lift it up! I decided concrete was optional at this stage...
Finally, I got 1m3 of white sand delivered for $AUD44 (2004), and shovel/wheelbarrowed it into position.
Note that the dog dug holes in the sandpit mixing some original dirt back in with the clean white sand, yuk. I suggest you put down some cheap shadecloth prior to filling the sandpit to help prevent this occurance. It will also deter kids from trying to dig to China.
Overall it scrubbed up really well. You can grab it and try to shake it, nope, she's solid as. The varnished wood look is good, hopefully it stands the test of the weather. The kids love it - there are chairs, a table, a pretend oven, kitchen utensils and lots of other things kids love to play with. Hours of entertainment, a highly recommended project.


 database