I highly recommend these if you live in an area that can get a bit warm in summer but has a gentle breeze from time to time. It will help drop the temperature inside your house on hot days. The concept is that as the wind spins the unit which draws hot air out of your (hot from the sun) roofspace, sucking in ambient (cooler) air from lower down to replace it.
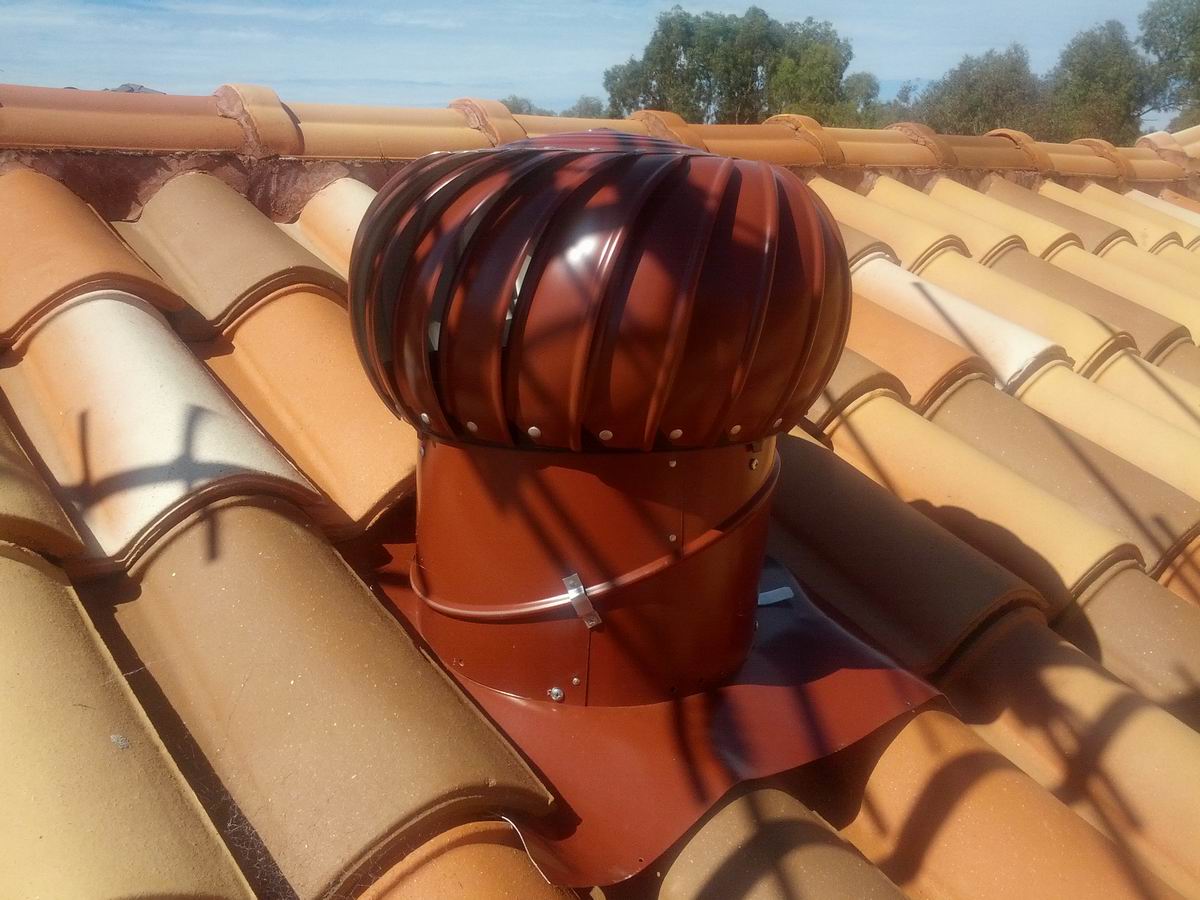
Wind powered roof ventilator.
I'm sure they aren't for everywhere in the world, for instance if there is never any wind ever where you live it won't work. As well as reducing the roofspace temperature they also reduce the amount of moisture, and it never seems to feel as "dusty" when you are in there. But the bottom line is they will keep the temperature in your house down when the weather heats up, they are cheap, easy to install, cost nothing to run and make no noise at all - I can't think of a reason not to DIY one into your roof!
I have previously installed these on tin roofs and to be honest I think it is easier - cut hole, screw ventilator down, silicone around the edges. This one I installed on a tiled roof, which is easy enough, but didn't have that same "positive" mounting process as the tin roof has. I have two roof spaces in my house, so I installed one in both areas. If you have one absolutely gigantic roofspace then maybe you need to install two, but just one on a normal windy day here in Perth can turn over your entire roofspace of air in something like ten minutes, so I don't see the point.
On a tin roof, install vents in the eaves. This creates a nice cross-airflow from under the eaves up to the ventilator, ensuring the coolest air is sucked in. Tin roofs are reasonably air tight, so you need to open up the roofspace anyway to let some air in. Tiled roofs aren't as air tight, there is plenty of room to draw in from, so vents in the eaves is not necessary.
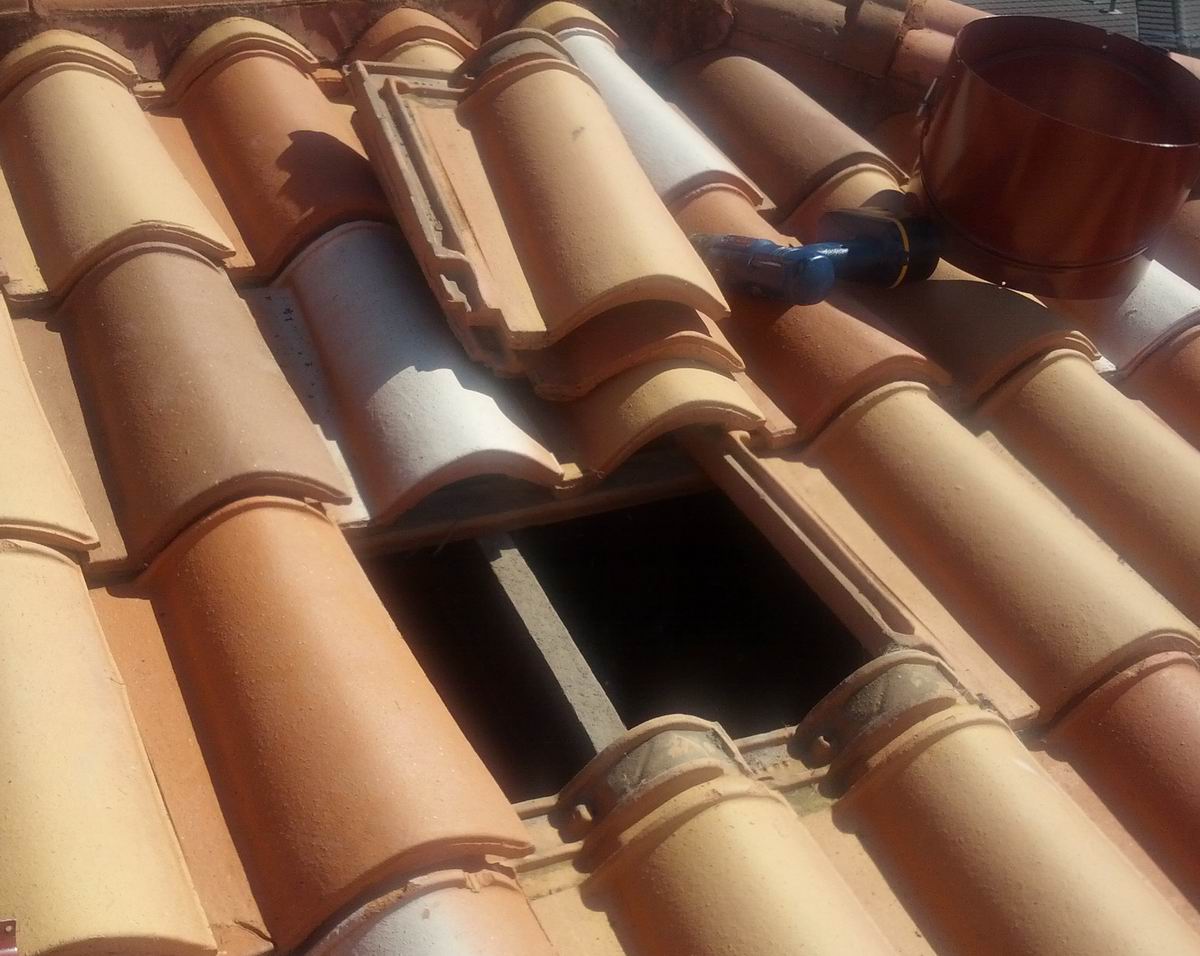
Two tiles lifted to make space for the ventilator.
Three rows down from the top is the recommended place to install the ventilator - enough to catch a bit of breeze, but not sticking up so far it is an eyesore. Don't put them on the front side of the house...and choose a colour that roughly matches your roof!
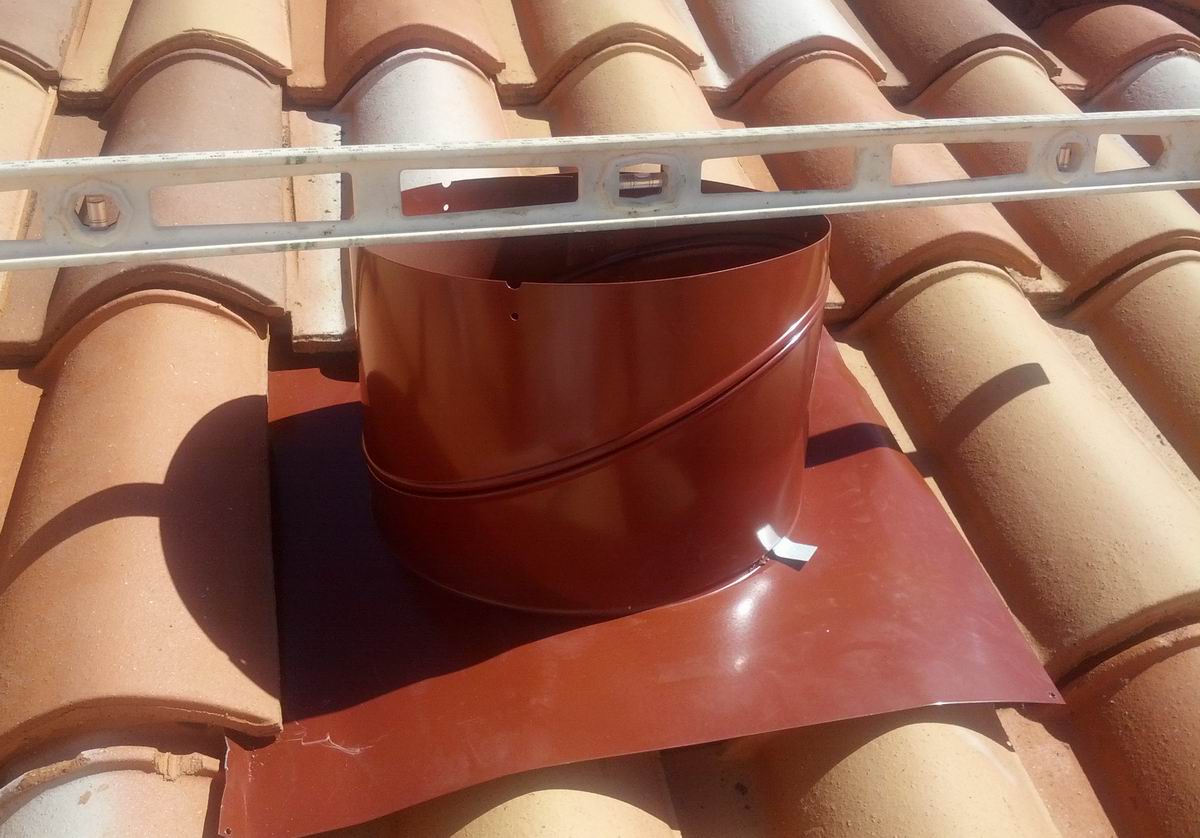
Depending on your tile type and size, pop one or two off. If you have never popped a tile off your roof, you will know how by the time you are finished this job :) Some tiles will be nailed down - generally one every now and then is nailed - but it is normally a single nail and when you pull on the tile it will come straight out. Wiggle, jostle, cajole the tiles out until you have an area available big enough for the hole in the ventilator, but small enough for the base plate to cover up. I pulled off two tiles. You can see there is a rafter in the area - it doesn't matter, it won't be in the way. Additionally each tile hooks onto a wooden roof batten; the base plate will be screwed down to those battens.

Edges bent up.
The base plate is what is going to give you the most grief. The important thing is to think about how water runs off the roof - not forgetting that on a windy rain day the water can be blown back up and across the side of the tiles. You can see here I've roughly bent up two edges. The left side because that is the way the tiles over lap and drain water, and the upper side to stop blow back. Stop, think a bit, experiment a little. Test fit, remove extra tiles, reassure yourself that it isn't going to leak afterwards. I don't use silicone on the base plate - if you have made the base plate mesh nicely with the tiles, you won't need to. They don't silicone tiles together do they?!
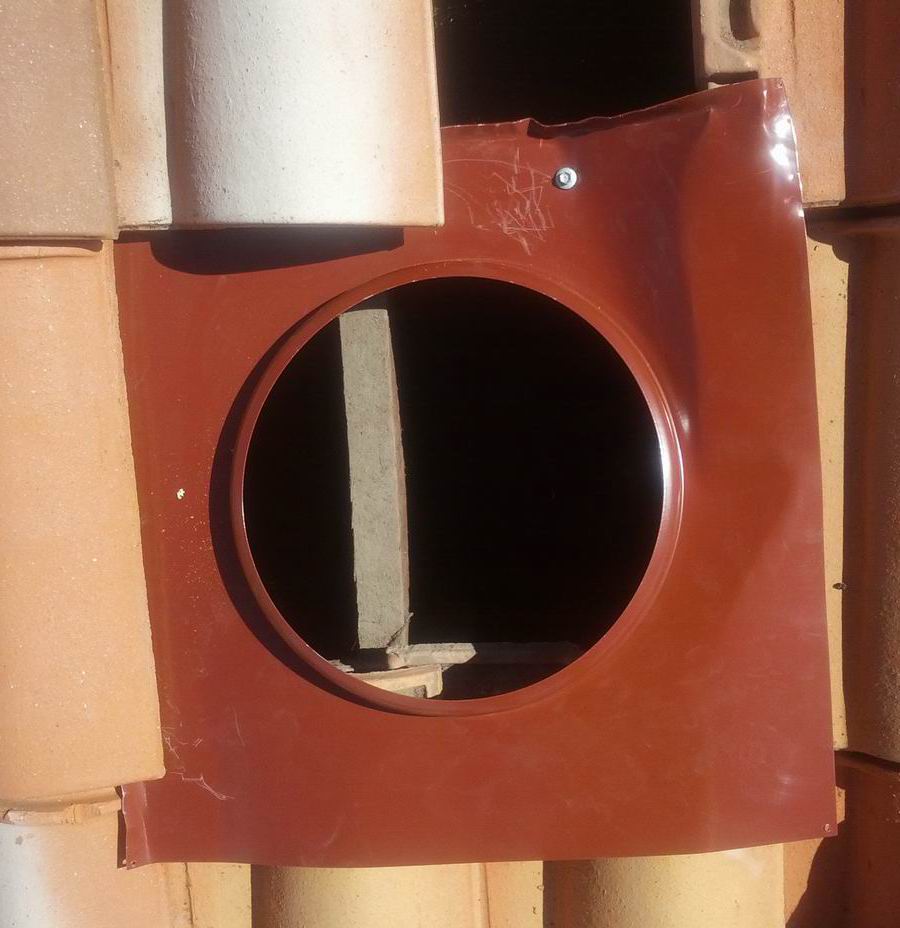
Roughly fitted with one screw in the top.
A bit of beating the plate will be required, but you can see here that the left side has tucked under, the right side has gone over, and one tek screw is pinning it in place on the top side. Yeah, it's rough, I scratched it up a bit trying to find where it fit best, but this installation is not going to leak as it overlaps the tiles just like a tile would...and no-one will ever see it!
One tek screw in the top isn't going to hold it firm in a storm. The fact it is in a wedged between tiles means it is held down fairly well, but you don't want it banging around in wild weather - or being clean ripped off in a wild storm - you need a bit more securing on the bottom side. Hopefully they have given you a little strip of tin or aluminium, if they haven't, cut one up yourself. What you can see here is that the strip is secured to the roof batten on the bottom side, and it comes up over the lip of the base plate. It doesn't need to be screwed down at the top, once the ventilator is attached it will be held down. You can be slack like me an not trim off the excess, or you can take up your tin snips and do professional job :)
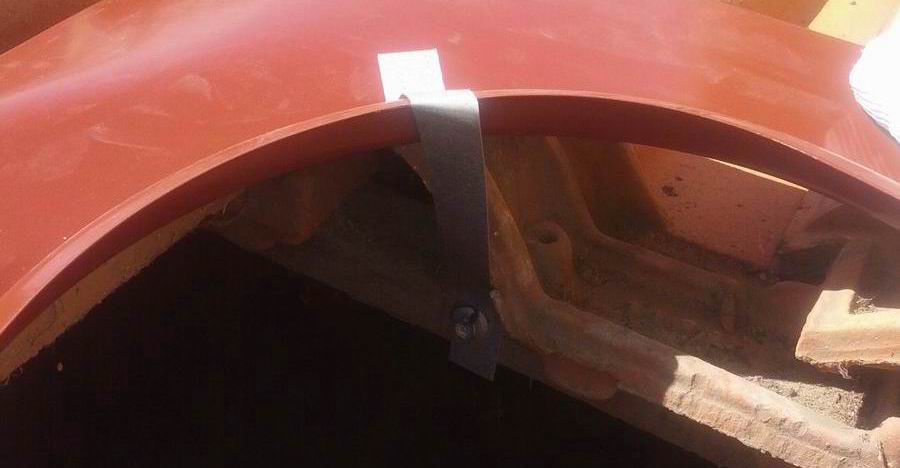
Strapped on the bottom edge.
Get it level.
Did I say the base plate install was going to give you the most grief? Well getting the vent level will give you the most frustration. How it works is you can "twist" an elbow in the vent pipe, and then put the vent pipe on the base plate such that your spirit level says it is exactly level, North/South *and* East/West. I'm not going to give you the maths for working it out...I don't know the maths for working it out...I'm sure we could, but just fumble your way through. Start by twisting the elbow a little bit off straight (approximately the pitch of your roof) then rotate it on the base plate and see if you can get it level in both directions. If you can't, twist the elbow a little bit more, rotate it on the base plate, keep going. Once you realise you have gone too far, start twisting the elbow back towards straight. Every time I have done this I found it really difficult to achieve level in both directions, but you get there in the end. It just isn't an intuitive thing to do! The guys who put these in for a living, well, my hat is off to them :)
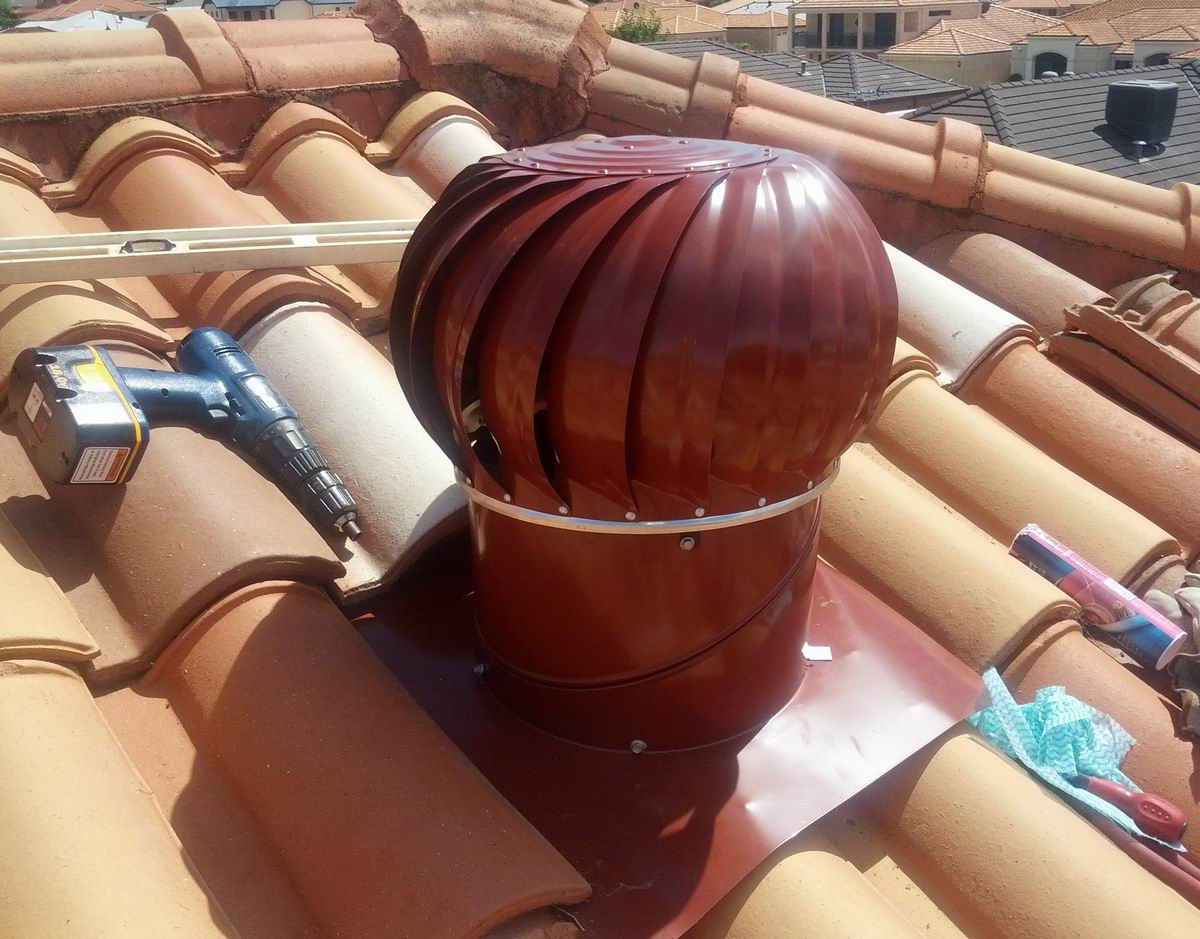
Complete! Pat yourself on the back! Watch it spin!
Screw the elbow tight once you have it level and then screw the pipe to the base plate. You'll probably be annoyed to find that it has come out of level during the attachment...ah, don't worry. It is close enough. The screws that go through the side holding the pipe down should have rubber washers to keep it sealed from the rain. However the elbow joint in the pipe isn't water tight, so put a heap of silicone on the inside to all the joints. Now finally screw the fan to the pipe. Let it go, watch it spin, whoo hoo!
These days there are solar powered roof ventilators - if you don't have enough wind to drive a wind powered ventilator that would be an option. But since I live in the third windiest city in the world, a wind powered roof ventilator is just the ticket for me.
Good skill to you!
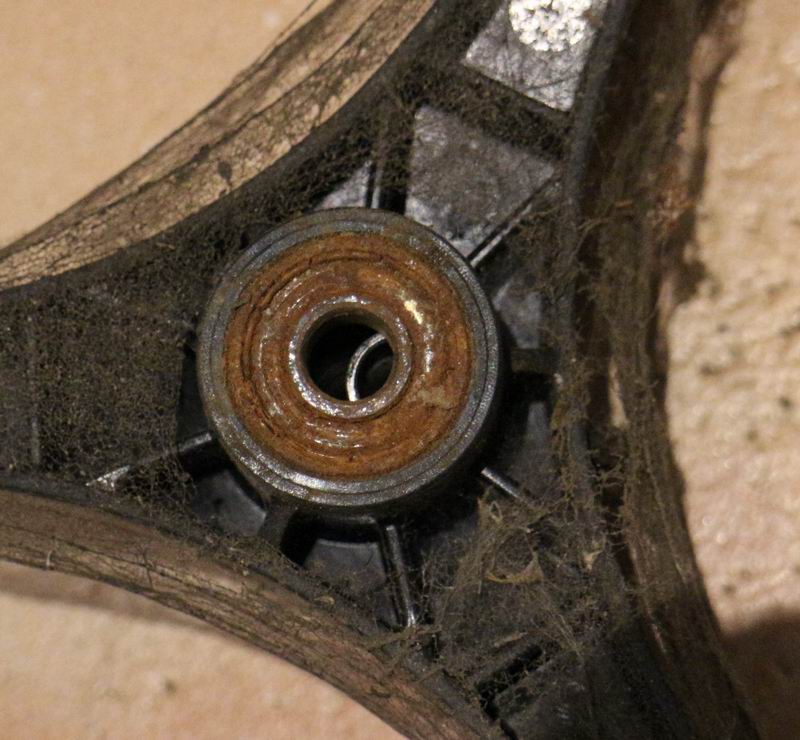
Bearings don't spin well when they look like this.
Update: after several years of use you might notice it has stopped spinning. Some quick math tells me if it is rotating on average 1 rev/s then in 5 years the bearings have spun 157 million times, that's a lot of times. Add in moisture for corrosion and you are asking a lot from a cheap bearing. But no fear, we can change bearings!
The spinner has two bearings, separated by a spacer. The factory bearing is marked Z809 VENT which is fine, but the Internet barely has any hits for that number bearing. Must be a custom job for the vent manufacturer. Out with the calipers, turns out it is a very common bearing, 8mm x 22mm x 7mm used in skateboards and 3D printers and the like. For that it is called a 608, with many variants, I went for the 608ZZ which means it is shielded on both sides - might last a little longer in the weather. The bearing proudly states it is ABEC-7 which is an American tolerance standard, with the "7" meaning +/- 5 micron tolerance. Maybe it's true, but I bought a few on ebay from China for AUD(2019)$0.60 each, so I wouldn't bet my life on it.
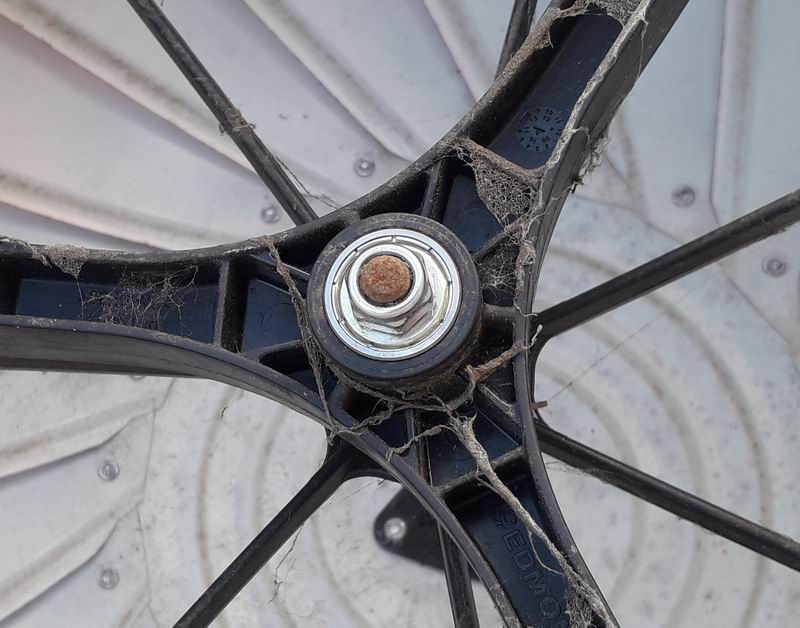
Shiney new skater bearing.
Skate bearings must bear a high radial force - the weight of the rider on the wheels. However in a vent the force is in the thrust direction, like your weight on a rotating bar stool. But skater bearings will have to withstand a certain amount of thrust force during cornering maneuvers, so I'm fairly confident the skater bearings will last the distance from a force point of view...maybe even out to 300 million revolutions! :-)
Pop one bearing into the bottom housing, push the shaft through, insert the metal spacer, pop the other bearing in the top housing and screw the nylon washer nut down until it just bites against the metal spacer. Try to twist laterally - you should feel no slop. Don't screw the nut down too tight, it will put unnecessary pressure on the bearing sides (I noticed the nut is pressing slightly against the sidewall, a little washer to make sure only the inner bearing race was getting pressure would be a good upgrade.)
JAW


 database