Late 1997, the lads at work discovered M.A.M.E. It is an arcade machine emulator, supports heaps of 1980's games, and runs them direct from a copy of the original machine ROMs. A mighty fine effort it does too.
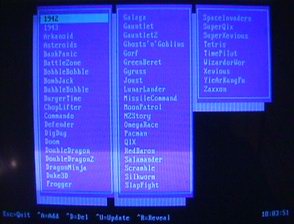
Anyway, we played 1942, Galaga, Gyruss, Timepilot, etc until we were almost gamed-out. But we wanted more than just software emulation...
Two workmates went all the way - bought themselves working machines and some of that 'groovy' 80's gameboard technology. I on the otherhand had different ideas - get a non-working machine and do a PC refit...
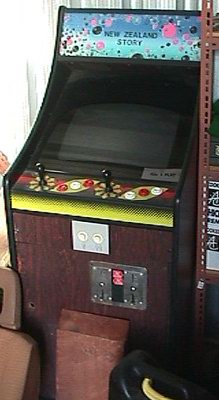
AUD$60 not working
AUD$60 in 1998 got you out of the local paper a low-boy Leisure and Allied (Australian) arcade machine, not working, no game. For those interested, here are the dimensions.
The project went through many iterations and to be honest, it isn't that hard to do if you have a bit of knowledge about PC hardware and electronics.
The final result is an "authentic" 80's arcade machine that plays *lots* of classic games. In the 20+ years I've had it I have been through *many* iterations. As computers and laptops reach the end of life they end up in the arcade machine. The software keeps getting updated and the controls and displays too!
Here are my latest notes on how to do this converstion - this original article is out of date but I'm keeping it here for posterity.
Display: you can use the existing RGB tube, it is possible but these days I wouldn't unless you wanted ultimate authenticity. I never tried it. The first monitor I fitted was a 17" CRT, an easy job. I later came across a 21" CRT, so big I had to strip away the case so that the tube could fit without hitting the back. My suggest now: flat LCD. a 4:3 ratio would fit best but they are hard to find now, so a 16:9 will do, as big as possible is your best bet.
Computer: whatever you have. If you run older versions of MAME then you don't need much power. My original computers were pentiums, then whatever box I had spare, and finally laptops.
Controls: my original was a keyboard hack. This worked okay back in the PS2 keyboard days, not ideal because some key presses would "ghost" a keypress based on the way the keyboard matrix works. It is cheap, but I no longer recommend this. When keyboards went to USB the limit of simulataneous key presses went to 6 which isn't enough. You'll press a button and it doesn't do anything, yuck. These days for a few bucks on ebay you can buy a USB joystick controller that is automatically recognised by Windows, has all the buttons you could ever need, no delay, not ghosting, no missed presses, fully supported by the software and easy to wire in. Trust me on this.
Software: over the years I had run many different emulators, mp3 player jukebox, video. Now, it's just about MAME for arcade games. Frontends - I have used many. Originally it was all DOS, these days all windows. Right now? An old version of MAME windows 64 bit and "AttractMode" frontend.
With that out of the way, press on with my original build.
1. Rip out everything from the box! I left behind only the top mounted speakers, flouro and wiring.
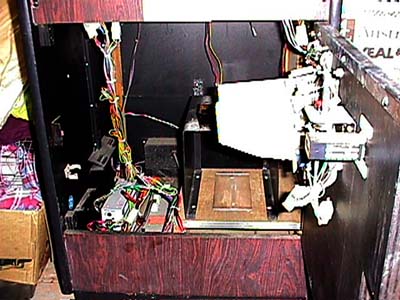
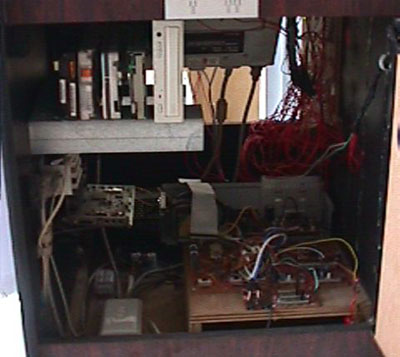
Internals before conversion.
Pictured here is what was inside *before* I started hacking - the coin mechanism, the power supplies (internally arcade machines are US 110V systems) the gameboard and control wiring.
2. Rewire the buttons. Everything on the arcade machine is a microswitch, so arm yourself with the smaller type spade connectors. Buy some terminal strip, and strap it to the inside of the cabinet somewhere easy to get at. Run two wires (from either side of the microswitch) to the strip, and label them. This way, when you want to chop and change your keyboard-to-controls layout, you simply have to disconnect and reconnect the wires as required.
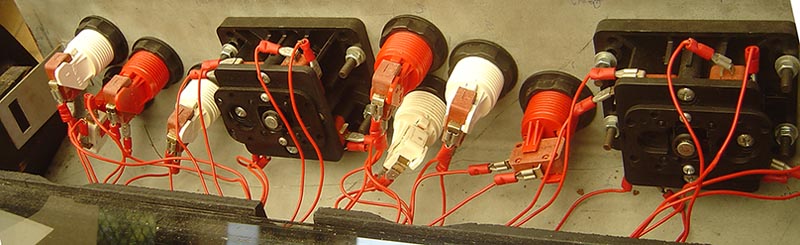
Control panel rewired first time.
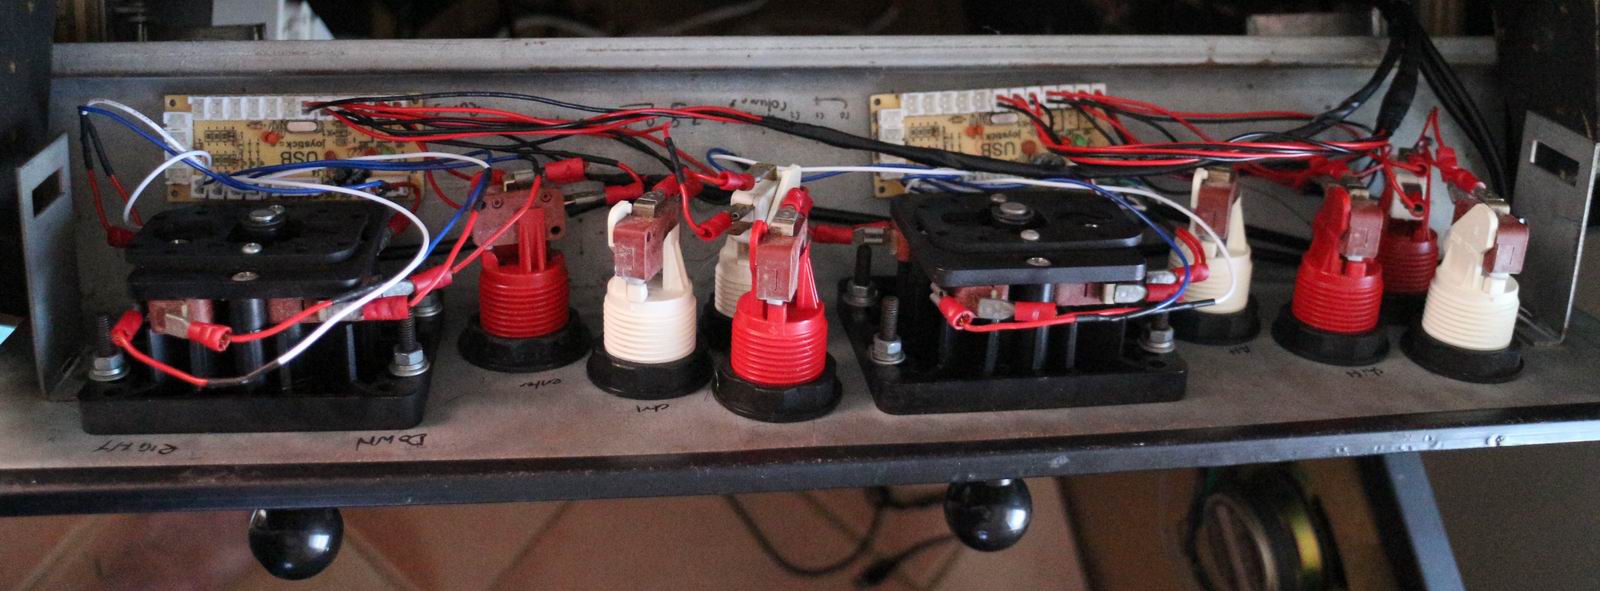
But this is the best way to go - a few bucks for joystick controllers for each side.
Original PC install - 300MHz Cyrix.
I've seen a few ways of getting the keyboard wired to the arcade machine, each one has its advantages. I did it the "easy" way; find an old keyboard, pull out the PCB board and solder wires directly onto the keyboard contactors; one wire on each side of the contact. The two wires then connect via the terminal strip to the controls microswitch. So, if you press the player 1 fire button then that would be the same as pressing the keyboard enter key (for instance.)
The advantages is you don't have to think too much you just look at the keyboard layout and choose keys. However the disadvantages is that it is very messy, you'll have wires going everywhere! Note that the first keyboard I cut up had metal shielding around it and once removed it didn't work very well - so use a more modern day keyboard. Note also that you will have to scrape the coating off the keyboard contactors to get a good solder connection.
Cleaned up a bit, same PC though.
A different way is to ditch the keyboard PCB board and just use the tiny little "brain". It has a switching matrix, eg column E row 7 when connected would generate a "Q" character. So by connecting the right column/row matrix to your terminal strip, you can select which key you want pressed. Advantages are a very tidy job, there will be only a few wires and the "brain" is so small it can sit right next to your terminal strip. Disadvantage is it's not all that easy to work out which matrix combination is which.
Yet another way is to use the existing JAMMA connector, which means you won't have to chuck out the existing wiring harness. However the JAMMA connector is common-grounded whereas the keyboard is expecting a switch. You'll need to build a little circuit to turn the JAMMA system into keyboard switching. There is information out there on the net about this, I won't go into details. Advantages are that you don't have to "ruin" your cabinet by pulling out the existing connectors (and thus you can still connect up old game cards", disadvantages are you need to build some electrics.
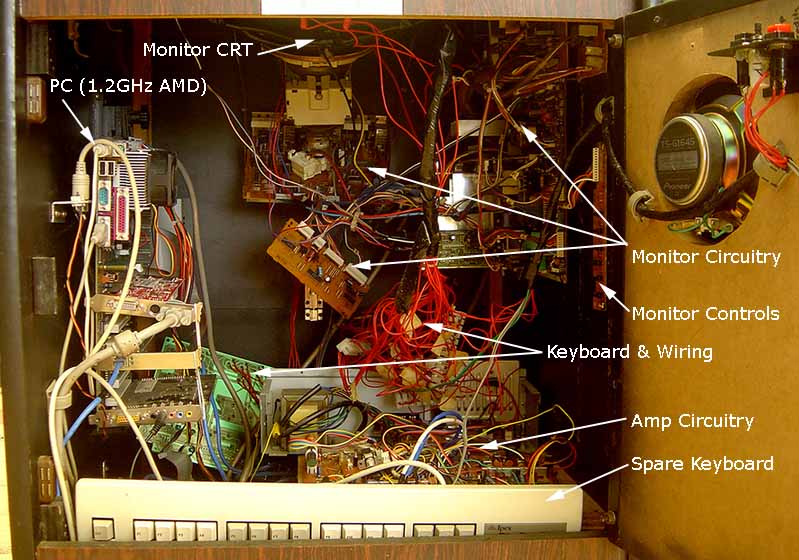
Latest install... It has gotten a bit messy
over the years!
My favourite way I've seen so far is a variation on what I did - use a keyboard, but rather than cutting it up, carefully solder on the back of the PCB board the microswitches as an "additional" keypress. Mount the keyboard in the door of the arcade machine. So, you can one moment be playing a game, the next moment be typing stuff into your internet browser! I find on my machine I have to unplug the "controls keyboard" and replug in a normal keyboard quite a lot...
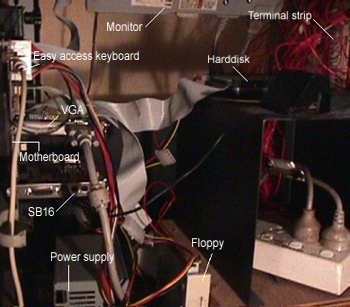
3. Get your PC in there. If you have room, it can just be a box on the bottom of the arcade machine box. Or you can go crazy like I did and put the motherboard where the old game cards used to mount, mount the power supply and the harddisk on one of the internal walls.
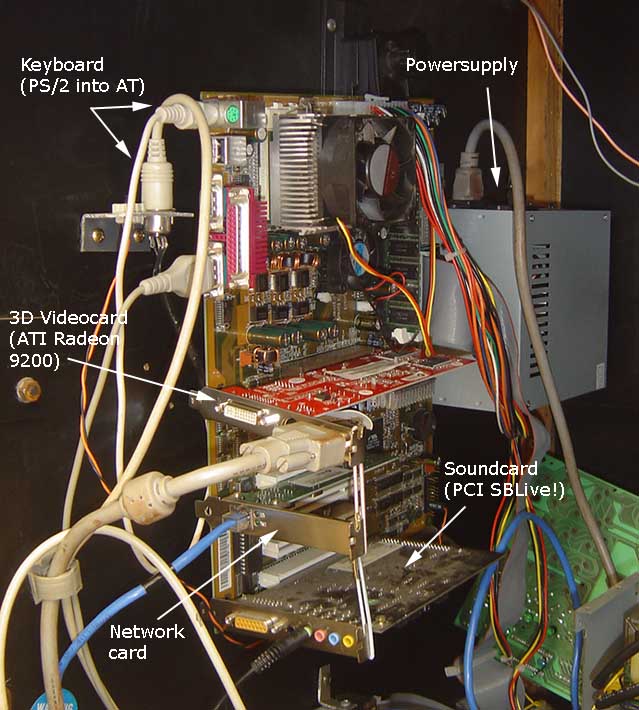
Current PC - 1.2GHz AMD.
I've been through about 3 different motherboards, various cards different harddisks, I've had floppy drives, cdroms, network connections. I've had different monitors, I've had different sound systems. That is why the guts of my arcade machine looks so messy. So, if I were to do it again, it would just be the PC sitting in the bottom of the cabinet :)
Note: first hardware was a Cyrix MII 300MHz with 32Mb RAM (not enough). This became a P3 600 with 128Mb (okay) and eventually is now an AMD 1.2GHz 256Mb RAM (good). Basically the dregs of each upgrade on my home PCs became the new internals of the arcade machine - a good way to go!
4. Here's the heavy part - monitor fit. I started with a 17" CRT monitor that slotted in (with the back plastic guard removed and a MDF template to hold it down) and am now running a completely dismantled 21" CRT, cut'n'shut wiring to all the various boards it needs. The 21" is *excellent*, better than the original 19" tube and much better than the 17". You won't get a bigger CRT in there, and it only just closes the back panel.
NEC 21" monitor, nice.
I had to cut the arcade machine to fit the giant 21" tube, but once home and screwed down it was perfect; like it was ment to be there. Careful to ensure the degauss loops stay in place; I siliconed them to the back of the glass. You really need those degause loops to stop the colours going funny. In fact the speakers in the front panel cause colour distortion - put some metal shield between them and the tube.
Be careful with tubes. There is 20kV, that's right, 20,000 Volts running them. Even when they are turned off they store that charge. It *will* give you a good kick. You should know a little bit about what you are doing if you are going to pull apart a monitor.
I was once of two minds about monitors over the original tubes, but these days with cheap flat screen monitors...or even TVs with PC input...I'd use a monitor every time.

Original NEC XV17 Monitor.
- Monitors (used to be) expensive.
- Monitors aren't supposed to turn away from the horizontal, I'm lying them nearly flat. So far so good for both monitors I've used, but for how long? The 17" took a while to fire up which I used to put down to being mounted nearly vertical. All good now with LCD though!
- MAME wants 60Hz and more for the running frequency. This means that a really old VGA won't do.
- You have to mount it in a sturdy fashion. Again, much easier with flat screen LCDs.
- A monitor is far more flexible than getting the right NTSC modes to run MAME, it also will run non NTSC programs. Yep; the old tubes are a low frequency NTSC RGB tube.
Early days - simple batchfile menu. These days I just use the built-in GUI.
4. Sound. Originally I grabbed a AUD$25 set of PC speakers, with transformer built it. Straight out of the box, cut up and mounted in the door. They drove the original speakers up near the flouro light, and were adequate for the job. Note that I use a SB16 in the motherboard - it is supported by MAME. Last I looked other soundcards were not, unless they had soundblaster compatible modes. Check first!
Later on when I added the mp3 jukebox function I replaced the whole front panel with a piece of MDF and two 4" car speakers mounted. I also used the amp out of an old mini hifi system, good for about 30W RMS of power. A good setup, not quite enough to upset your neighbours, but okay for a big sound.
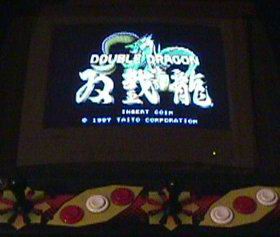
Double Dragon, oh yeah...
7. The boring bit - software. Originally, I ran MAME from DOS. Some chap on the old archie.au gave me the piece of freeware that ties it all the games together as a menu. Thanks whoever you are, long live freeware.
On boot up of the machine, the menu system appears. Using the player one joystick cunningly disguised as arrows keys, you step around the menu screen until you find the game you want. The fire button also cunningly diguised is the enter, the menu launches the batch file which runs the game in question. Too easy.
After a few years I conceded defeat and installed Windows98. You still run up in DOS and stay in DOS through the batch file system; however "windows" is now and option on the menu. Heh, just like the old windows 3.x days. I use windows for network, internet and other stuff that is so much easier in non-DOS land.
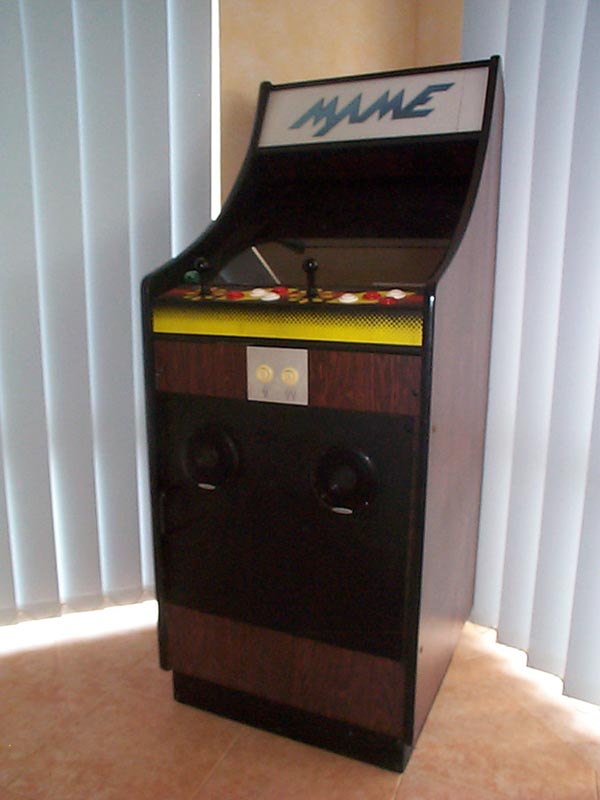
Fitted out and finished.
Eventually, after various changes in computers and hardware (constant hand-me-downs) I gave up on DOS altogether and stuck to Windows XP. I miss DOS, but getting drivers and latest builds of MAME was more trouble than it's worth.
Fire it up and play it! Invite your mates over and force them to put 20 cents in it! Be the envy of all the neighbours! Keep it inside, just next to the pool table, put a chair in front of it and a table to put your beer on ;)
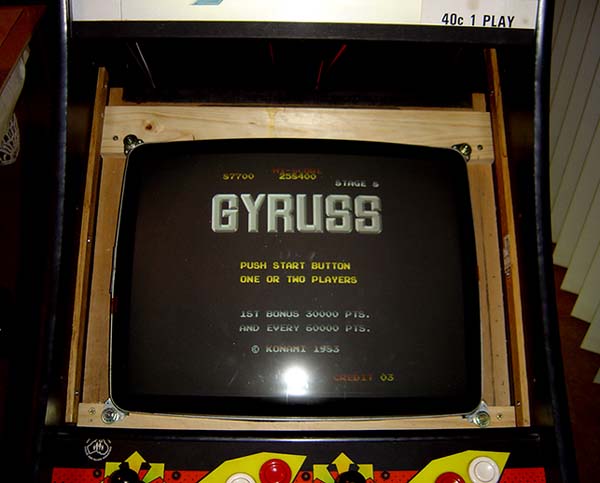
And here it is, the reason why I started this epic, my all time favourite game from the late eighties (other than gyruss - my favourite from early eighties). I remember the days when you would put in 40 cents and complete that game using only headbutts...
Note: my Arcade Machine ran up for the first time with a PC-powered MAME'd Gyruss on October 20, 1998; the start of it all and by no means the end ;)


 database
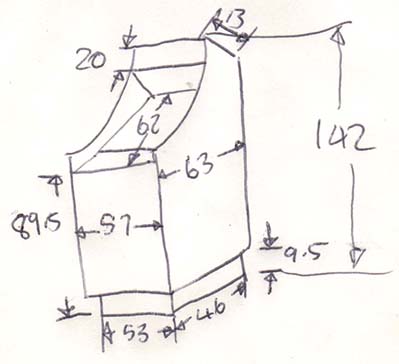