The materials used, the design, the permanent attachments, the number of legs, the crossbracing, the storage space underneath... all of it has been argued by blokes before and it will be argued again.
The one thing we all tend to agree on however is - it must be strong enough to carry the weight of at least a V8 if not possibly 2 truck diffs, a 300kW 6.6kV motor, a front chop of a VT commodore and an elephant.
Somewhere between a cardboard box and a solid lump of steel crane lifted in is the shed bench you see before you.


Quick Specifications:
- 8 legged all metal construction - 5 at the back and 3 at the front, 5 cross braces top and middle,
- Frame is 30m of 30x30x1.6mm steel RHS AUD$70(2000),
- Bench top is 600x3200x3mm steel with a 100mm fold at the back AUD$90(2000),
- 18mm MDF middle shelf and bottom shelf AUD$40(2000),
- Fully welded together with arc welder AUD$100(2000),
- Physically bolted to shed walls in 12 places AUD$10(2000).
Lets look at how it was put together.
First I got out a pen and paper and drew a picture of what the frame should look like. The wise man who sold me the metal told me that if I put a base down to weld to then when I put the legs on I would have something to weld to and they won't skew from the heat. Doubly a good idea I reckon, it means you can have a bottom shelf that isn't the floor...
So with a framework sketched out and some measurements taken you buy yourself enough steel for the job The 30x30x1.6 RHS I used flexes ever so slightly between the supports, but you could bring a sledgy crashing down and it wouldn't bend. 30x30x1.6 is fine, galvinised to slow the rusting process.
You can see the progression I made from the photos. It's not rocket science, build up the frame piece by piece, simply measuring and cutting new lengths as you go. Simple stuff. This bench is staying with the shed forever - the fact that it is welded into one big solid thing proves that ;) If you want to take your bench from house to house, maybe consider bolting some sections rather than welding the whole thing together
Pretty early on I put the benchtop on, to ensure that the framework lined up. You could make a rhombus if you don't watch your 90 degrees, but by having the top on you can simply ensure your welding lines up with that. Use lots of clamps in the process! The benchtop is 3mm mild steel and I highly recommend the fold on the back - it stops things from rolling off the back you see.

Welding underneath.
Oil the benchtop right away! Being mild steel it will rust almost immediately. I waited until after the construction before splashing a liberal coating of engine oil on it, and to this day you can see my dirty fingerprints and sweat from the construction. Not that it matters. Once you have splashed motor oil on it, it won't rust. Ever. Even after you've wiped the oil off. It "gets in" or something - only nasties like acid would rust it now I reckon.
The top is welded on underneath as you can see from the photo. No need to go 200 rods into it - Every 20-30cms I fed in a bit of weld just to hold it secure. Has anybody ever told you welding upsidedown is hard? Well it is. Wind the current down a bit. You'll get marks on the top, oh well, it's just a bench not a car fender!
Welding the top down really stiffens the whole thing up. The bench is pretty rock solid after that. To finalise its solidness I bolted it to the shed itself. This involved welding little tabs to the frame and drilling through the shed. Throw in a bolt and some big washers and then it won't just be solid, it will be unable to move around at all...
Add in some shelves under the bench for more storage. I used 16mm MDF notched for the legs and just resting on the frame. With all the junk sitting on them, they aren't going anywhere. No issues here, it can be a bit tricky to fit them into position, I found that I needed to make the shelves 2 separate pieces in order to allow installation.
For the final piece-da-resistance, bolt up your vice, drill press and nything else you have. This is on the left, another wise man told me that as a right hander you naturally tend to work to the right, so have your vice on the left...it makes sense if you think about it long enough!
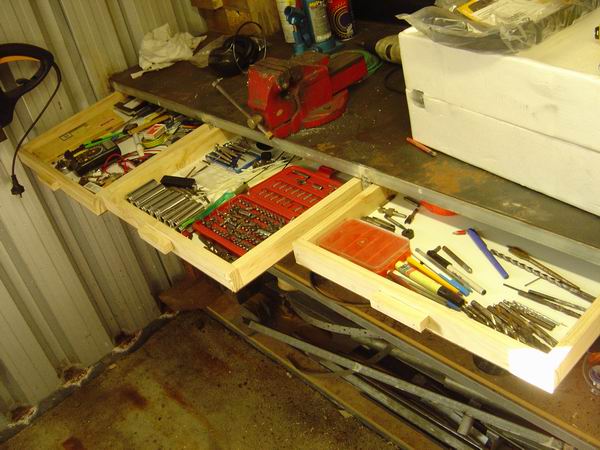
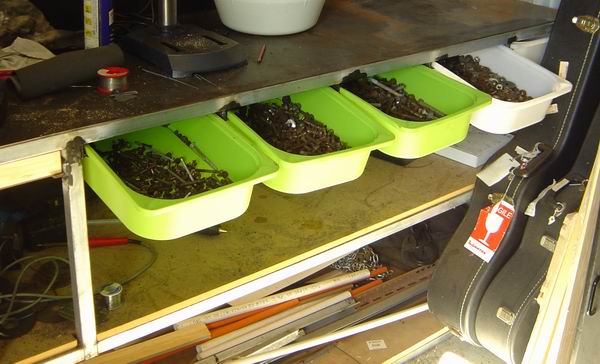
Later on I added some drawers just underneath the benchtop. I went down two paths - shallow ones on one side - handy for drill bits and pencils and the like, without taking up much room on the shelf underneath. The other side used some plastic drawers I picked up at Ikea - they take up more room from underneath but hold more stuff.
The shallow drawers were 40mmx19mm pine sides with a masonite bottom. To get them sliding in and out, I used a bit of steel angle spaced down the right amount with a chock of RHS. Whack on a handle at the front and you are done.
The plastic drawers were even easier. You don't have to make the drawer; the steel angle can simply be welded underneath the bench. Space them out evenly to get the maximum number of drawers in. If you are feeling really poor, substitute the 2 pieces of steel angle back to back with a piece of flat bar welded to another piece of flat bar in an upsidedown "T" formation.
I made good use of the plastic drawers with my bolt collection. (What, you haven't been saving every nut, bolt, washer and screw from everything you've thrown out over the years, in a bucket, for later on?) My 3 year old daughter and I tipped the 5kg bucket of fasteners onto a sheet and sorted them into big threaded, medium threaded and small threaded bolts; nuts and washers; and miscellaneous stuff. Sure there is a mix of metric, imperial, whitworth and goodness knows what else in each box but breaking them up into sizes helps when you are trying to find that 20mm long M12 fine thread bolt.


 database