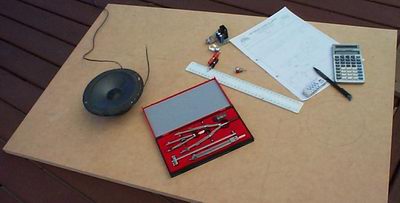
Board, plans and scribing tools.
Well I have my "limitless" supply of 12VDC from the sun, (see solar panel article) but what to do with it? One project I really liked the idea of was a solar powered guitar amp. As in a battery powered amp. That way you could sit out in the middle of a paddock and play until either the battery goes flat, or the cows come home.
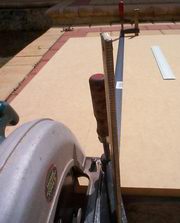
Circular saw against a straight edge.
A couple of skills required here - first a bit of woodwork, then a bit of electronics. Lets start with the wood.
First, you need a plan. From previous experience with speaker enclosures, the main trick in sizing them is to firstly ensure that they aren't "regular" - as in a square or evenly dimensioned rectangle. I grabbed a pretty hefty piece of 18mm MDF board to cut my sides from. A bit thick in hindsight; 12mm would be ample. MDF (Medium Density Fibreboard) is the way to go though.
To use most of my piece of board I made the dimensions 276 x 240 x 170mm. Any dimensions around those sizes shouldn't get any nasty harmonic distortions - check the web for details on speaker enclosure dimensions and sizes. It does make a difference.
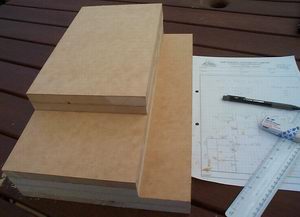
All sides ready to go.
Slice up the board with your circular saw. Don't have one? Well a cheap one these days is only going to set you back AUD$20 which is just amazing. I can't believe they can make them for that price, but hey there you go.
Big tip: clamp a straight edge (another piece of wood, a length of metal bar or what-have-you) to the board and let the saw run down it for a nice clean straight cut.
Now make sure you think about your sides - remember that the board has a thickness! draw yourself a 3D picture of the box and which side is going to lap over the otherside. I made my small ends sit on the outside - since I planned on having one end removable.
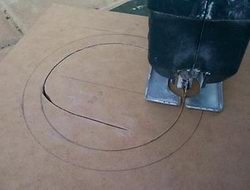
Speaker hole...
Before you get going with the glue and screws, it's time to cut some holes in the front of the box.
Use a compass to pencil in your speaker hole. Obviously, measure the size of the speaker to make it fit! A jigsaw (also another tool available stupidly cheap) will sort that out. A good trick taught to me a long time ago for starting a hole in a board is to hold the blade horizontal somewhere in the middle, start the jigsaw, let the blade slowly cut its way in until it is through. Now straighten up and circle out.
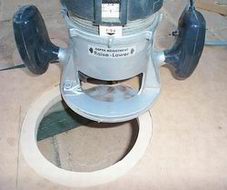
...and rebate.
I went one step further with the speaker hole and routed a rebate into it so the speaker would sit flush. Routers aren't quite so cheap and they are pretty viscous things. Be careful huh.
The battery, right. I use a 7.2AH Gelcell. 7.2 is the number of Amps you can draw (at the rated voltage) for an hour. Gelcells are lead-acid, like your car battery. However rather than using sulphuric acid as a liquid, it uses it as a gel. Some fancy cleverness also makes it anti-bubbling if you overcharge it so it can be fully sealed; ah, you can read up the specs for these things yourself. About AUD$30 for one of these. Very good units, I recommend them as having heaps of capacity for the price you pay (as versus NiCads or NiMHs)
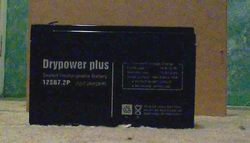
7.2AH Gelcell.
The amplifying circuit. That gets a bit interesting. You only have 12VDC, and whats more it is single rail ie not -12 to 12, just 0 - 12. Good Amps like symmetrical rails and higher voltages. However when we are talking 12VDC we are talking car amplifiers so there is plenty of stuff around. You could just buy a car amp, or you could build a kit like I did here.
A very straight forward kit, delivering 4W of power. Not going to blow your hair back, but will get the sound out. I built it, I installed it, enough said.
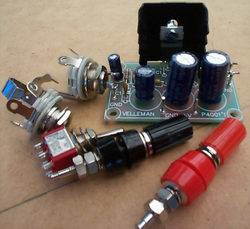
12VDC 4W amp kit.
Oh, but do grab yourself some nice plugs and switches for the cover hey?
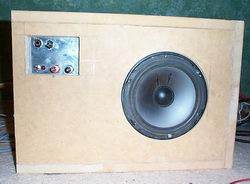
You can see now its wired in and mounted. A few notes:
- The box is screwed together and also no-more-nails glued. You want it fully airtight sealed. One end I left removable - but I made a gasket as you can see so it should seal pretty well.
- Spade connectors on the battery. So you can remove it if you need to.
- Some nice hefty wire to take power to the switch and to the speaker.
- Some locating boards so that the battery can't move about in the enclosure!
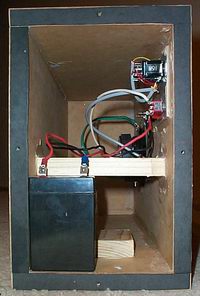
Mounted.
An put together. Notice the front panel has a little aluminium plate with an on/off switch (with red LED power light), a volume knob (simple voltage-divides the input signal) a guitar 7.5mm jack and two banana plugs, one red one black - to connect the box to the solar powered charger.
The charger was already regulated from the sun so there is no way you can overcharge the battery - see my solar panel article.
At this stage it was operational. It wasn't bad. The battery lasted absolutely ages, it made enough noise from an electric guitar for a quiet practise. I wasn't satisfied with the output. I looked into getting more power.
Sometime later I did a bit of investigation in RS Components and Farnell for single chip amps. There are heaps that will operate at 12VDC and they are all cheap. I guess it is the Auto market again. I used an SGS-Thomson TDA7256 30W bridge Car Radio Amplifier. Grab yourself a datasheet; it is fully featured and just needs a few resistors and caps to get going.
First pass
I threw one together on a heatsink and was pleasantly suprised with the results. Now we were making some noise!
It is about this time I discovered my enclosure wasn't working too well - it worked better with the side cover off! I put a 40mm PVC port in the front, about 20cm deep, which really improved things. Then I added a handle, a speaker grid cover, some corner bash plates - I was cookin'.
But it still just wasn't enough power. The battery still lasted ages; longer than my fingers while playing the guitar - so I knew I could get the power higher. I certainly wasn't getting 30W and this was simply because the speaker was 4 Ohms. I thought that would be low enough, but, it isn't.

throw together amp
Sadly for you, the reader, that is where I stopped. I needed a speaker with an impedance of around 1 to 1.5 Ohms. Everything else was just about perfected. Later I bought a mains powered amp and the speaker was very big and rated at 1.7 Ohms. That is definately the way to do it, low voltage but high current. That's what the battery needs.
So for now, the solar guitar amp is sitting quietly in the shed possibly awaiting a revival sometime in the future.


 database